Pages

Wednesday, September 26, 2012

Happy Halloween Treat Box

Hello Friends!
I'm Super Excited to share with you my Decorated Halloween Treat Box made for my Niece. Im going to be making 2, and this is the first 1 done :) I designed it for Really Reasonable Ribbon and The Scrapping Cottage.


I need to pick up candy for my Nieces to fill this box, but will do that shortly. 

This is a Hair Bow I made and attached it to the Tulle. I figured my Niece Sienna can wear it for the week of Halloween if she would like. I used 1 1/2" Orange Circus dots, Dots from the September Ribbon Kit, and then Gingham black ribbon to create this fun bow. I added the Halloween Owl to the center, too CUTE!!!

Next for the bottom of the box, I decided to use the SUPER FUN CottageCutz Gothic Gate, and LOVED coloring this up, and putting it together. I used Faber Castell to color the gate,laterns, skull, and grass. For the Pumpkins I used tim holtz distressed ink and dusted them. I also added some Stickles to the Gate!

For the top and the bottom of my box I used the Pom Pom Trim from Really Reasonable Ribbon.
Supplies Used:
Really Reasonable Ribbon/Orange Circus Dots
Really Reasonable Ribbon/Club Kit
Really Reasonable Ribbon/Gingham
Really Reasonable Ribbon/Pom Pom Trim
CottageCutz Die/Gothic Gate 4 x 6
Treat Box
Helmar Premium Craft Glue
Tim Holtz/Dusting Pumpkin
Black Magic Glimmer Mist for Tulle
Black Diamonds Stickles


Thank you for looking and have a lovely week!!
Hugs to all,
Cheryl

Monday, September 17, 2012

Floral Garden Layout

Hello everyone and Happy Monday to all!
Today I'm sharing a Layout made for Really Reasonable Ribbon using a ton of beautiful Ribbons,Lace,Netting, and trim all from Really Reasonable Ribbon.

Really Reasonable Ribbon Used:


I also designed this layout for a contest with Fabscraps, im going to enter it , I used all fabscraps dp,flowers, and the chipboard circle.

On my layout I used Black Satin for the Black Bows, and Black centers for the flowers. Next I used Black Netting, and then Penelope Natural Lace next to the netting. I also ran more of the Black netting along the bottom of the photo mat, and then used Sheer Box Pleats Ivory for on that.

For the BIG Pink bows I used the Chevron Striped Pink Twill to make those. I LOVE this ribbon, and its new to me, but it makes beautiful bows.


My design paper, flowers and the circle chipboard are all from FabScraps. I painted the circle chipboard with Tim Holtz Crackle paint, then distressed it. Next The flowers came from a book from Fabscraps as well and I punched them all out, super easy to do, and then inked up the edges with Black ink. 

The flowers were put together using Helmars Scrapdots, it gives a 3-D effect for them.

I left some room for a Title, and will add a photo later. I was trying to find one of my dear Grandma to put on here, but will have to scan and then print it. 


Thank you for looking and to see more inspiration from Really Reasonable Ribbons AWESOME DT please visit us HERE!
Hugs to all,
Cheryl

ALSO IF YOU USE FACEBOOK, COULD YOU PLEAAAASSSSSE HELP ME OUT, HERE IS A LINK TO MY LAYOUT, THE PERSON WITH THE MOST LIKES WINS!!! WISH ME LUCK!!!

Saturday, September 15, 2012

Friends(Pocket Card)

Todays Pocket card was designed for Really Reasonable Ribbons Fall Challenge! Love the colors I used for this super fun challenge!!!
Card Measures 6 x 6 Pocket Card
Really Reasonable Ribbons Used:

Copic colors=
YR09,YR15(Dress,Headband)
YR31,Y15,Y08(boots),
R00,R20,(for skin and cheeks)
R17,R37(Strawberries),(YG03,YG95 leaves)
E57(basket), E39,E07(Hair)

Other supplies:
DCWV/Dp
Helmar/Acid Free/Zapdots, and Helmars Quickfix tape runner
Tilda
Friends stamp is SU!
Sewing and flower

 The design paper is Doodlin Around stack from DCWV, and I thought they would be perfect for my FALL card! Love the blue with the fall colors, and tilda couldnt be any sweeter!!! There is a pocket on the inside for either tea or tags, or something. Not sure if Im putting a tag or tea bags in there :)

Thank you for looking and hope you have a wonderful day!!
hugs to all,
Cheryl

Thursday, September 13, 2012

Really Reasonable Ribbon September Blog Hop

Hello everyone, and Welcome to Really Reasonable Ribbons September Blog Hop!


RRR Designers have a ton of Inspiration to share with you today, using the September Ribbon Club kit, so grab your favorite drink and enjoy our hop!! :)
Today I wanted to share my Spooky Halloween Calendar for the Month of October. This is for the 2013 Calendar Ive been working on. I LOVE this months Ribbon Assortment from Really Reasonable Ribbon.

You should have arrived here from Lisa's Blog, if not you will want to start at the Really Reasonable Ribbon Blog,
I also decided to use some of the NEW CottageCutz Halloween Dies for my Calendar today. I LOVE the CottageCutz Bats on Branch that i used up top of the Calendar. I sprayed it with Copics, and then added some black pearls for the eyes.

Next I used the CUTE CottageCutz Halloween Owls, to create this owl here. He too is airbrushed,and his cape is done with the Faber Castell Pit Artist Pen in warm grey. Next I used the gelato in silver.

For behind the 1 photo matt i used the web netting from Really Reasonable Ribbon and thought it was a perfect fit!
Supplies Used:
Really Reasonable Ribbon/September Kit
Really Reasonable Ribbon/Black Net Webbing 2"
Really Reasonable Ribbon/Black Pearls
Helmar Acid Free/Premium Craft Glue
CottageCutz Dies /By The Scrapping Cottage
Buttons
Copics
DCWV Calendar Kit


Both of these pages were put together using Helmar's Acid Free Glue, and Premium Craft Glue, and you will finds those here. Hope you enjoyed today's Hop and thank you for joining us!!!!


Your LAST stop on the HOP is the Really Reasonable Ribbon Blog


Thank you for joining us and have a lovely day!!
Hugs,
Cheryl


Wednesday, September 12, 2012

Just Married!

Hello Friends! Happy Wednesday to all of you!

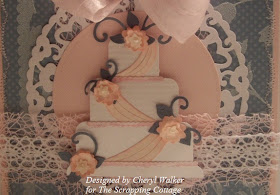
Today's Card was designed for The Scrapping Cottage Using the BEAUTIFUL CottageCutz Dies!!

CottageCutz Dies Used:

Others Used:
DCWV/Forever and Always Stack
Helmar/Premium Craft Glue, Acid Free Glue, Zapdots, 450
Wedding Bells button
Sewing
Copics


On my card I decided to use the super sweet CottageCutz Just Married Car (4x6) and then cut the car in a glitz white, and the bumper and tail light surroundings in a light grey design paper. My accent color for this card is pink, so I made everything else on the car pink.

Next I used the CottageCutz Wedding Border and doubled it up with Pink and Black to run across the right corner of my card

I used the CottageCutz Baby Frame, and the CottageCutz Magnolia Doily to layer for behind my car.


The Ribbon I used is from Really Reasonable Ribbons September Ribbon Kit, its a Black Satin. I did add a button in the center using Helmar 450 Quick Dry


Here is the NEWEST Release from The Scrapping Cottage 


Thank you for looking and have a lovely day!!!!
Hugs to all,
Cheryl


Monday, September 3, 2012

Tiered Cake Pocket Card & Video

Happy Monday Friends!!

Today I have a Beautiful Tiered Cake Pocket Card to share with you all! I left it blank, it could be used for a Birthday/Anniversary/Wedding

Card Measures 6 x 5 3/4"
I think the pocket is perfect for a gift card, I did place a tag in there to add some writing.

My cake on the front was done using the BEAUTIFUL CottageCutz Tiered Celebration Cake die from The Scrapping Cottage!

Card Stock is from Paper Temptress/Metallic Enmerald/Laser Silver Lustre/ Pink
All Ribbons are from Really Reasonable Ribbon

CottageCutz Dies used:

Design Paper is from DCWV/The Screen Print Stack

Card was put together using Helmar Premium Craft Glue/450 Quick Dry, Craft & Hobby PVA Glue, Zapdots, all can be found at Helmar

Inside of card, there is plenty of room for writing. I added some Netting,lace, Pom Pom trim and Silky Crush ribbon, all from Really Reasonable Ribbon

In this picture above I wanted you to be able to see how pretty the card stock is.


I did a video to share with you all on how I made the CottageCutz Tiered Celebration Cake


Thank you all for looking and Have a wonderful Holiday Weekend!!
Hugs to all,
Cheryl