Pages

Thursday, October 30, 2014

Balloon Bouquet


Hello everyone!
Today's card is another super fast and easy card I made for the Scrapping Cottage using the darling CottageCutz Balloon Bouquet! This is one of the many DARLING CottageCutz Dies from the "Birthday" Release!

Card Measures 2 1/2" x 6"
Super fast and easy to make! I cut the card stock at 5" x 6 then scored on the 5" side at the 2 1/2" mark. I rounded the corners once scored and folded using a 1/2" corner rounder. Next I cut the card stock at 2 1/4" x 5 3/4" and rounded the one side. I did distress the card stock using distress ink and a duster. 
Next I cut the CottageCutz Balloon Bouquet with blue card stock, and then added glitter glue to the balloons. set aside to dry, unless you do embossing powder and heat dry, that would be faster.
I then added my ribbon and bow, and lastly the pearl half backs to the bottom.

CottageCutz Die Used:

Ribbon used is from Really Reasonable Ribbon and is a Gingham print!


Thank you for looking and have a lovely day!
Hugs to all,
Cheryl

Sunday, October 26, 2014

Shabby Chic Gift Card Holder

Hello everyone, and Happy Sunday to all!\

So first I did cut out the CottageCutz Gift Card Holder using some pretty design paper, and then distressed it. Next I added some lace, and then a piece of a white doily, that I distressed. Next I cut out the Birthday Wishes Doily in pink, and distressed it as well. I only used a part of it, as I wanted it as the background for the flap of my gift Card Holder. The CottageCutz Fancy Present, and Tag Topper are both distressed as well, and then I added some Viva Pearl dots to both of them.

Here is a photo of the inside.
Please click on the photo's to take you directly to each CottageCutz die.
 The little bows, and big bow is made with RRR Seam Binding. Love the look of seam binding, and its very shabby chic! I added a button, and some pearls to the bows.
I hope you enjoyed my post for today! Thank you for stopping by and have a lovely day!
Hugs to all,
Cheryl

Friday, October 24, 2014

Quick & Easy Birthday Card!

Hello everyone, today I'm sharing a mini card I made for the Scrapping Cottage using the New "Birthday Release"!

My card measures 2 1/2" x 6"
Super FAST & Easy card to make! I cut my card stock 5" x 10" and then scored at 2 1/2" inches on the 5" side . Next I cut my card stock at 2 1/4" x 5 3/4" and then rounded the corners with the 1/2" corner rounder on both the card stock and design paper. Design Paper is Birthday pack from American Crafts.
Next I cut the CottageCutz Happy Birthday Present with Blue card stock, and then used glitter glue over the wording and the bow. Set aside to dry, and then cut the CottageCutz Expressions "Niece" in red card stock. I ran some Really Reasonable Ribbon in gingham print around the front, and tied a bow on. Lastly I added a button with some Jute!

I love making quick and easy cards once in awhile, as they are nice to have for that last minute gift giving!!

Thank you for looking and have a lovely day!
Hugs to all,
Cheryl

Monday, October 20, 2014

CottageCutz Birthday Party Bear


Hello everyone, today I wanted to share with you a Birthday Surprise card I made for the Scrapping Cottage using the Darling "Birthday CottageCutz" Dies. LOVE this release, as all the dies are absolutely darling and perfect for cards,mini albums, and scrapbook pages.

On my card here, I used the Darling CottageCutz Birthday Party Bear , and colored him and everything else with copics. I did add some liquid glitter glue to the cupcake, present, and balloon. I also used the CottageCutz Birthday Candle Border, and glittered it up too. Its behind the bear and his gift,cupcake,and flower pot.

Next I used some Birthday Design Paper, and then layered the border across the center of my card with the CottageCutz Birthday Border. The CottageCutz Surprise was cut in white, and then colored with copics to match the dp. 

Here are the CottageCutz Dies I used:
All photo's below are linked to the Scrapping Cottage for easy finding! Just click on each photo
The Polka Dot ribbon is from Really Reasonable Ribbon, and I used this to create my bow, and run a piece across the center of my card. I also used Scor-tape, also from Really Reasonable Ribbon!

Thank you for stopping by and have a lovely day!
Hugs to all,
Cheryl

Sunday, October 19, 2014

CottageCutz "Sweet Petites" Owl

Hello Friends, and Happy Sunday to all!
Today I'm sharing a 5 x 5 card I made using the CottageCutz Petites Release. 

My card Measures 5" x 5"
I used the CottageCutz sweet Petite Owl, and the Butterfly with flowers. I cut the own out in white, and then in green, so I could dust him, and then use the green branch from the 2nd owl that I cut in green. Then I cut out the Butterfly with flowers in green & Orange. I wanted my butterfly to be orange, I dusted that too, and then added some glitter glue in red,orange,brown and a light orange.

CottageCutz Dies Used: Click on photo to bring you to the Scrapping Cottage Store :)
I used some design Paper I had picked up for super cheap, and then used seam binding from RRR for my bow!


Thank you for looking and have a lovely day!
hugs to all,
Cheryl

Friday, October 17, 2014

Christmas Joy/Page 2 of Mini Album

Hello everyone, Cheryl here with Page 2 of a Christmas Mini I'm currently working on for a Christmas Gift.
On this page I used some more of the Beautiful Really Reasonable Ribbon that is in this months Ribbon Kit, LOVE all the Christmas ribbons and lace in this months kit.

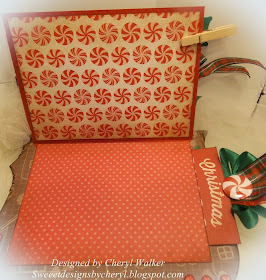
I used ribbon for the tag pulls, and also made bows for all the tags. There are 2 tags to the left, that pull out for photo's, and 1 tag at the bottom for more photo's, all have bows, and ribbon pulls on them.

Next I added some of the beautiful lace to the left bottom corner, and then the right upper corner. In the photo below, you will see some of the green delicate stitched satin, used as tag pulls on both of the tags on the inside.

I love how this 2nd page turned out for my mini, its been a long time since I've made a Christmas Mini, so I'm super excited to be working on this one.

Thank you for stopping by, and have a super wonderful day!
Hugs to all,
Cheryl

Wednesday, October 15, 2014

Really Reasonable Ribbon & Heartfelt Creations

Anything Goes Challenge w/Ribbon!
Hello everyone and welcome to Really Reasonable Ribbon & Heartfelt Creations Cross Promotion Anything Goes Challenge/Hop
.To join us for this super fun challenge and to see all the Beautiful Creations using RRR & HC Products, please be sure to visit the Really Reasonable Ribbon Blog for the entire Line-up of all the blog

You should have arrived from Linsey's Blog ;if not you will surely want to start at the Really Reasonable Ribbon Blog, to be sure not to miss anything.

So for my card today I received this BEAUTIFUL Heartfelt Creations Paper Stack from Heartfelt Creations to use today, and absolutely LOVE their design paper, its absolutely Gorgeous! To view all their design paper stacks please click HERE!

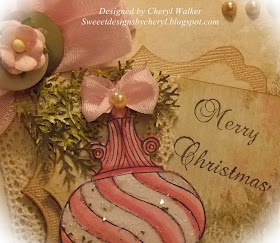
I chose the Christmas design out of this stack, as I thought it would go perfect with their Ornament stamp. I stamp the stamp in Black Memento Ink, and then cut it out using their matching die cut. Next I colored it with 2 different shades of copic markers, and then used HC White Gala Glitz. The Merry Christmas Stamp came from another one of their past releases and is also stamped in Memento black ink. The branches are a MS punch, and I did punch out some of the same dp to use as part of a Christmas Tree Branch. 
The Pink Beautiful Ribbon is from Really Reasonable Ribbon as is the Delicate Stitch Pearl Pink Satin Ribbon. I Absolutely LOVE this ribbon, and should have bought many rolls of it. Its super easy to use for Bows, and even Lil' tiny bows as well. I also used Really Reasonable Ribbons Lace called "Melissa" to run down the left side of my card. The buttons, and Hemp are also from Really Reasonable Ribbon, and I love using the Hemp to make the buttons look like they are sewn on. Lastly I added my Favorite RRR flower, the Sweetheart Blossoms, I should own stock in these babies........LOL I LOVE them!!! I seem to use them on everything, and they are the perfect size.

Your NEXT Stop is Kathy's Blog! Hope you enjoyed today's Inspiration, and also would love for you to join us for our Challenge!!!
Thank you for stopping by, and have a wonderful day!
Hugs to all,
Cheryl

Monday, October 13, 2014

Really Reasonable Ribbon October Hop

Hello everyone and Welcome to 
♥♥♥Really Reasonable Ribbon's♥♥♥
October Hop!

You should have arrived from Jen's Blog If not you will want to start out at the Really Reasonable Ribbon Blog so that you wont miss anything.


I hope you have enjoyed our Hop so far today as there is a LOT of inspiration using the Beautiful October Ribbon Kit from Really Reasonable Ribbon. I just LOVE all the ribbons in this months assortment! Of course I LOVE every month as they are all so Beautiful!!! For this month I decided to make a Mini Album Page for a Christmas Album that I am currently working on for a Christmas gift.


For my Page I chose to use the Red, Green and Plaid print ribbon from this months RRR Ribbon Kit! Love how Bonnie puts these together with all the right ribbons and trims to match.


I used the Ribbons on the tag pull outs, and a little piece for the small tag on the front. For the inside 

I again used all 3 coordinating Ribbons as banners, and then glued a sticker sentiment tag on top of them.
There is plenty of room on this 1 page to hold at least 8 photo's.... Love when each page can hold a lot of photo's and not just one :)


Your NEXT stop on the Really Reasonable Ribbon HOP is the Kathy's Blog. Thank you so much for joining us this month, and hope you enjoyed all the inspiration from the DT so far!
Hugs to all,
Cheryl

Monday, October 6, 2014

Haunted House Treat Bag/Video

Hello Everyone, and Happy Monday to all!
Today I have a Halloween Treat Bag I made for Really Reasonable Ribbon using the Beautiful Ribbons from last months Ribbon Club assortment. I also used the beautiful Sweetheart Blossoms, Leaf Trim, and some lace to complete my bag.


I started with my Treat bag, then cut some spellbinders frames for the background, using American Crafts dp. Next I layered the black and orange ribbon and ran in from the left corner to the bottom right corner, alternating the colors. Then I used foam squares to pop the frames off the bag, and then added my CottageCutz Haunted House and Spooky Sign. Once that was done, I added the Leaf Trim in Black and Orange, and then used Really Reasonable Ribbons Sweetheart Blossoms in Orange and White. I did dust them both, using orange on the orange flowers, and black on the white. Next I went over them with some American Crafts liquid glitter glue. Love the look of them in person. To put the lace and ribbon on the bag I used Scor-tape in 1/4" to hold my lace and ribbons.

I wanted to share how I store some of my Really Reasonable Ribbon Sweetheart Blossom flowers for easy grabbing. So here is a short video showing how :)
Enjoy!!!

Thank you for stopping by, and I hope you enjoyed today's post!
Hugs to all,
Cheryl