Pages

Thursday, June 30, 2016

Happy Birthday Wishes

Hello everyone,
Today I have a super Fun and Patriotic card I designed for JustRite Papercraft using the NEW Beautiful Multi step Poppy stamps.
Card Measures 6 x 6
Layer 1 5 3/4" x 5 3/4" white, then the blue is 5 1/2" x 5 1/2", then bazzill stripes are 5 1/4" x 5 1/4".
Layer 2 is Red 5" x 3 1/4" , white is 4 3/4" x 3" , then blue is 4 1/2" x 2 3/4", blue dot dp is 4 1/4" 2 1/2".
Layer 3- white is 4" x 4 1/4", then red is 3 3/4" x 4", blue 3 1/2" x 3 3/4" , dp white with print is 3 1/4" x 3 1/2"
Layer 4 is the JustRite Hope and Oval frame die 05048 cut in blue
spellbinders ovals cut in red and white.
 
Multi Step Poppies-
Multi step poppies 3A,3B,3C, 2A,2B,2C stamped in StampinUp! Pacific Point, Riding Hood Red,distress ink faded jeans. for the greenery kiwi kiss, shabby shutters, forest moss airbrushed with G24, and B12 for the sky.

Happy Birthday- JustRite Papercraft Large Oval Celebration CR-05054 stamped in Pacific Point ink.

Thank you for looking and have a lovely day!
hugs to all,
Cheryl


Monday, June 27, 2016

You're Beautiful

Hello everyone, and Happy Monday to all!
Here is another Beauty created for The Project Bin using the NEW A Way With Words Set called "#bff" this set has so many wonderful sentiments in it. You can view them all HERE!

I also used the Beautiful frames(Heart & Frames dies, & Hope Oval Frame Dies) from JustRite Papercraft. And the flowers are Spellbinders , and I used my favorite technique (Glass flowers) on these too. There is something about these flowers, I love doing them , and they make the cards look so elegant too. I did use some vintage pearls in the centers of the flowrs, and the Seam Binding I used is and OLDIE from Really Reasonable Ribbon.
 Supplies:
The Project Bin /#BFF
Spellbinders flowrs
Martha stewart branch
JustRite Hello Decorative Oval Frame Dies,Heart & frame die
DCWV French Country Stack
StampinUp! soft sky for the edges of the flowers, then did the glass technique.
RRR seam binding


Friday, June 24, 2016

Precious Baby


Hello everyone,
Today's SWEET card was created for Really Reasonable Ribbon, using the Beautiful Ribbon, Seam Binding, and flowers that the RRR Store carries! I LOVE them all, and LOVE how my card turned out for today! This Baby card was also created for my daughter, son in-law, & grandbaby Chloey! I will be sharing some photo's here shortly!

Card Measures 5 1/2" x 5 1/2"
White Card stock cut at 5 1/2" x 11" then scored at 5 1/2"
Layer 1- 5 1/4" x 5 1/4" , then yellow design paper cut at 5" x 5"
Layer 2 Pink cut at 4 1/4" x 4 1/4" , then pink dp at 4" x 4"
Layer 3 - JustRite Hope Oval Frame Die cut in white, then a spellbinders die in pink, then spellbinders scalloped oval in white, and then the oval from Hope Oval frame cut in white, and airbrushed in pink copic. On top of that I used the sweet teddy from The Pixie Cottage Stamps.
Cuddly Cute Bear - colored with copics E43,E31,E51,E93 (for teddy), pinks are RV23,RV11 for the little mice, I used C3, W-1,
SU! Ticket- airbrushed with RV23, and YR31!
Flowers -Really Reasonable Ribbons Cherry Blossoms Baby Pink, Miniature Sweetheart Blossoms Mixed Pink
Seam Binding- Really Reasonable Ribbons Moss Green, and ruched for the greenery.
Bows- Really Reasonable Ribbon Satin 3/8" pink.
Sewing done on machine.

 Thank you for looking and have a lovely day!
hugs to all,
Cheryl

Wednesday, June 22, 2016

IBFS Thanks A Lot

Hello everyone,
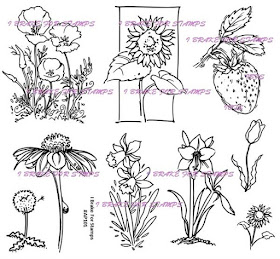
Today I have a fun Sunflower card I created for I Brake for Stamps using the Beautiful Sunflower stamp found here, its from the New Flower & Strawberry sheet of stamps. I stamped it ,colored it, and then fussy cut it out.
http://ibrakeforstamps.com/flowersandstrawberrysheet.aspx

 I LOVE all the stamps on this sheet! I did stamp my image in Memento black ink, and then colored with copics yellows,greens and a brown. Next I fussy cut the sunflower out, that way it could lay on the oval along with the IBFS sentiment.

The IBFS sentiment I used is from the set "Thinking , Happy, Get Well, Thanks" for this one I did airbrush it, and added some pearls in bronze.

Ribbons are from Really Reasonable Ribbon , Yellow ribbon came from the June Ribbon Club Assortment, and the brown is a seam binding.
For more Beautiful stamps, please visit the I Brake For Stamps Store HERE!
Also for the DEAL of the WEEK visit HERE!

Thank you for looking and have a lovely day!
hugs to all,
Cheryl

Monday, June 20, 2016

Live Life...

Hello everyone, and Happy Monday to all!
Hope you all are enjoying the weather in your state! I have to say I have been LOVING our weather here!! its been beautiful
This Beauty I made for The Project Bin using "Awesome Sauce" stamp set! Love this fun sentiment, and I think I do live my life like no one is looking....hehehee
Card Measures- 5 1/2" x 5 1/2"
Layer 1 cream cut at 5 1/4" x 5 1/4" then the green design paper(Heartfelt Creations) cut at 5" x5"
Layer 2 cream is 4 1/2" x 4 1/2" then green is 4 1/4" x 4 1/4", dp floral is 4" x 4"
Layer 3 4 1/4" x 2 1/4" , dp floral is 4" x 2"
Layer 4 JustRite Hello Decorative Oval Frame dies. cut in cream, green, and cream again.
The Project Bin stamp is Awesome Sauce stamped in Black ink.
Flowers are die cut using spellbinders, then doing the glass technique

Supplies Used:
The Project Bin Stamp Set "Awesome Sauce"
OldPaper distress ink, Martha stewart branch punch,
JustRite Papercraft Hello Decorative Oval Frame Dies
Heartfelt Creations dp pack burst of splendor
Gems in a green color
Martha Stewart Punch (Branches)
Challenges:
One Stitch at a Time/Layers
Dragonfly Dreams/Say it with Flowers
Glitter N Sparkle/anything goes( so I did flowers)
TTCRD/Anything Goes
Corrosive Challenge Blog/Lots of Layers
Thank you for looking!
hugs
Cheryl

Friday, June 17, 2016

A Daisy For You!


Happy Friday to all!
Today is the  start of the Really Reasonable Ribbon Challenge , and its a super fun one " Sizzlin' Summer Colors" and the RRR DT has some awesome Inspiration to share with you all, hope you will visit us HERE! & join in on the FUN! 
 my card was also created for I Brake For Stamps using the Beautiful Tall Daisy stamp! Love the colors on this. I tried to do something a little different :) No PINK.....hehehehehe
Card Measures 5 3/4" x 5 3/4"
Layer 1- 51/2" x 5 1/2" for the Red , then Kraft is 5 1/4" x 5 1/4", then the checked red is 5 x 5.
Layer 2- 4 1/2" x 3 1/4" red, Kraft is 4 1/4"x 3", green design paper is 4" x 2 3/4"
Layer 3- Red is 4 1/2" x 3 1/2" , Kraft 4 1/4" x 3 1/4" , Blue & red polka dots 4" x 3"
Layer 4 is spellbinders frames and ovals with I Brake For stamps Daisy stamp.

Daisy StampI Brake For Stamps Tall Daisy colored with copics 2 shades of yellow, 2 shades of green, and brown. Then added some stickles

Ribbon- Really Reasonable Ribbon Gingham Red
Design Paper - Crate Paper Little Boy Blue

If you would like to SAVE 10% off your order from I Brake For Stamps, please used COUPON CODE "SAVE10CHERYL" when checking out! Have fun!!

Thank you for looking and have a lovely day!
hugs to all,
Cheryl

Tuesday, June 14, 2016

EVERYBODY.....

Hello everyone!
Happy Tuesday to all! Today's card was created for Really Reasonable Ribbon using the beautiful
Delicate Stitched Satin Ribbon in Turftan Brown from the Really Reasonable Ribbon Store. LOVE this ribbon, its so pretty and easy to use for bow making!

 
 I also created my card for The Project Bin using the Beautiful stamp from the "Bazinga!" Collection. hehehehe, some super cute stamps in this set I do have to say! For my sentiment I did use SU! pens to color the sentiment in a red & brown. super easy to do. But when using a pen on clear stamps, I always take an eraser to the stamp first, so the pen will stay on nicely, so you get a clean stamped image. Pretty fun!!!
Card Measures is 5 1/2" x 5 1/2"
cut white card stock at 5 1/2" x 11" score at 5 1/2"
layer 1- Kraft card stock cut at 5" x 5" then stripes  dp cut at 4 3/4" x 4 3/4"
Layer 2- 4 1/4" x 3 1/4" for kraft cs. Dp is cut at 4"x 3"
Layer 3- Spellbinders frames, I did dust the white sentiment one.
Also used a CheeryLynn die underneath, its cut out in white
Spellbinders in corners
Buttons are vintage, I did add some thick thread to them so they look sewn on.

Flowers used are from JustRite Papercraft!!! LOVE these beauties! they are from DIE-05022 Floral Trio One Dies(used #1) I cut 6 of them out. colored them up with red distress ink by dusting them. I then added some glitter glass to the centers, set aside to dry.
 The brown beautiful leaves are from Really Reasonable Ribbon, Bonnie does carry different ones and you can find those here! 
Challenges:


Monday, June 13, 2016

Really Reasonable Ribbon June Hop


 Welcome to "Really Reasonable Ribbon's" JUNE Blog Hop!
 
If you arrived here from Jennifer's Blog, you are on the right track. If not , you will want to head back to the Really Reasonable Ribbon Blog that way you don't miss out on any of the FABULOUS Designs from the Design Team today!
This months assortment is PERFECT for Summer! Isn't this a fabulous assortment!! 
 
 This assortment contains 9 fun ribbon styles and a total of 18 yards of ribbon. Not a member yet? JOIN TODAY and begin with this June assortment. What a fun way to build your ribbon stash and try new ribbon styles.
 
 
So for today I created a card using the Beautiful YELLOW ribbon you see 2nd from the left. Its BEAUTIFUL!!! I made a BIG YELLOW bow for this beauty!
I used Crate Paper "Open Book" paper pad to design this card. Next I chose some Spellbinders dies, and then stamps from I Brake For Stamps. I chose the Happy Birthday( you can SAVE 10% using coupon code SAVE10CHERYL), stamped in Memento black ink, and then the rose(Floral Plate 1), stamped 2 times ink black, then colored with yellows, and green SU! pens. I lastly added some stickles to the roses.
 
The sketch for my card I did a little different, I was playing around with different layouts today, and chose to do something fun :)
 
The pieces that I used for the 4 corners are from Pizzazz Aplenty, not sure if they are still around or not, as this was sent to me several years back. these are blue with silver rim, however I flipped them over to use the side that matches the dp I used today :)

Your NEXT stop for today's hop is Bonnie's Wonderful Blog!!!

Hugs to all,
Cheryl

Saturday, June 11, 2016

Down By the Sea

 
Hello everyone,
today I wanted to share a card I created for JustRite Papercraft ! I LOVE how this one turned out! I had created this for Splitcoaststampers Free 4 all challenge a couple weeks back, and wanted to share it on my blog today. I absolutely LOVE JustRite Papercrafts stamps & Dies, and cant wait to share more of my designs with you using their products.


I'm keeping todays post short ,as I am busy getting ready for our big trip to California to see our daughter, and our New Granddaughter Chloey! Cant wait, im so excited! I am counting down the days.... :)
For my main panel(window) I did airbrush, and stamp using JustRite At the beach clear stamp set. I ended up stamping the greenery, after I airbrushed, then stamped the Happy Birthday. The other sentiment was stamped on one f the circles from the die set JustRite Four in a Square. I also stamped up the seashells and used them to place on the window.
 
Ribbon- Really Reasonable Ribbon/ Ribbon from Mays Ribbon club assortment
Paper -echo park
Sewing & gems to embellish
 
I hope you ejoyed todays post, see you back here on Monday with Really Reasonable Ribbons Blog hop!
Hugs to all,
Cheryl

Friday, June 10, 2016

Daffodil Delight

Hello everyone,
Hope you all are enjoying your Friday so far! Our weather here has been absolutely Beautiful and HOT(99) yesterday, just the way I like it, as it gives us a break from our COLD winters....hehehehehe

Ok on to my card for today :) it  was created for I Brake For Stamps and for SplitCoastStampers Color challenge this week. I am Absolutely LOVING all the flowers from IBFS, and the Color challenge on SCS!

Flowers can be found here! Want an easy image to color>? this one is perfect!! I really enjoyed coloring these up!

I used copics to color, and then added some Nuvo glitter dots to the daffodils. I also added some airbrushing to give a distressed look around the image. The design papers are random pieces from my stash, and lastly I added some ribbon for a bow, button, and sewing! Super easy card to make!

Hope you enjoyed my post for today, and have a lovely day!!!
 
Hugs to all,
Cheryl

Monday, June 6, 2016

Beauty begins.....

THE MOMENT YOU DECIDE to be YOURSELF!
 

 Awwww LOVE this sentiment as its so true!!! Love being myself, and would never want to pretend to be something other than just that! This sentiment is one of the Many Beautiful sentiments from The Project Bin!!! I LOVE everyone of their stamps, as they are so unique and beautiful!

 Lately I have been trying to work with some different color combo's and some have colors I really don't work with often, like Orange. hehehehe. Its one of my least favorite colors to work with, but im finding that when I challenge myself to use these colors like YELLOW, I am happy with the results. And this color combo works well. I took the colors from the design paper. it has a maroon , red,orange, and green in it. It does have my favorite color in it as well (PINK) but I did not use that color in my colors for today.

The sentiment I used today came from the Project Bin's "Wise Women" set. I stamped it in CTMH Pansy Purple on white card stock, then cut that out with a spellbinders frame die(airbrushed it),next i stamped the sentiment again on another piece of white card stock in SU! Riding Hood Red ink, I cut the banner "Yourself" out and popped it up on the main sentiment area. The fancy  Beautiful frame behind the sentiment is from JustRite Papercraft and is called Heart & Frame Dies 05016 and was cut out in white!
Design paper is from American Crafts!
Ribbon is from RRR and is the Satin ribbon with grosgrain edge.
Thank you for looking and have a lovely Sunday!
hugs to all,
Cheryl

For more inspiration from the Project Bin DT, please visit us here!

Saturday, June 4, 2016

Freshly Picked "Happy Graduation" Card


 Hello everyone, and Happy Saturday to all!!!
Today I am sharing my card created for Really Reasonable Ribbon & JustRite Papercraft! On my card for today I used Beautiful Ribbon & Trim from RRR, and all dies and stamps from JustRite Papercraft! LOVE how this card turned out for today!
 Love the SWEET Floral flowers I created here! I also used Really Reasonable Ribbon Ruby Red Satin ribbon, and Moss Green Leaves. I wanted to add a bow to this, but it was covering up the paper,dies, and all the sweetness of this card, so instead I decided to tuck my bows under the dies :) hehehe that way it didn't take away from this card.

Card Measures 5 1/2" x 5 1/2"
white card stock is cut at 5 1/2" x 11" and scored at 5 1/2"
Layer 1 - Black card stock cut at 5" x 5" then green dp is cut at 4 3/4" x 4 3/4"
Layer 2- Black cut at 4" x 4 1/2" then black polka dots cut at 3 3/4" x 4 1/4"
Layer 3- black cut at 4" x 4" then the strawberry freshly picked dp at 3 3/4" x 3 3/4" now add sewing to all
Layer 4- SENTIMENT (JustRite Congrats Card Basics CR-05068) stamped in memento black ink for the (Happy Graduation) and oval frame stamped in Kiwi Kiss SU! ink. then cut out using the Ovals from JustRite A2 Card Front Basics Dies(DIE-05047) next layer in black behind this is the JustRite Heart & Frames Dies(DIE-05016) Heart shaped one is in black, then the large frame is in white(Cut apart) for the beautiful frame behind.
Flowers- were cut out using JustRite Floral Trio One Dies(number #2)cut in a random design paper that I hardly ever use, but for flower cuts. its a cream /blueish color. I then airbrushed each flower(8 of them) with copic RV23 and then dusted with distress ink Fire Brick. Next I added a little button to the centers.
Greenery- was done using Really Reasonable Ribbons Moss Green leaves, and then adding in JustRite Papercraft die cuts from Flower Garden Dies(DI-05067) using #3, #6, #7, #8(cut in green card stock) and then distressed those in Shabby shutters distress ink.
Ribbon Loops- Really Reasonable Ribbons Satin Ruby Red ribbon, and created 2 bows, and then turned them into looped ribbon treatments for my card.
 Inside of my card I used the DCWV Freshly Picked stack, and stamped my sentiments onto it. Super Simple for an easy and quick inside fix.

Challenges:
Chocolate Coffee & Cards Challenge/Bingo Distress , pattern paper, ribbon
Paper Creator's Crafts/All about the flowers
The East Wind/Something Old(dp) something new(Dies) and Stamps
Aud Sentiment Challenge/Anything goes with a sentiment
Craft Dee Bowz challenge/Anything goes with a handmade bow
Southern Girls Challeng/Layers


I hope you enjoyed my post for today! I always love to hear what you think, or what you would like to see!!!
have a super awesome Weekend!
hugs to all,
Cheryl

Friday, June 3, 2016

Did someone say Sailing?

 Awwww LOVE this sentiment!!!!
Hello everyone and Happy Friday to all!!! Yes its the WEEKEND!!! wooohooo :) Today's Manly card was created for The Project Bin & Really Reasonable Ribbon! Yes its that time again for our challenge over at the Really Reasonable Ribbon blog, and this time around its a MANLY challenge :)

Really Reasonable Ribbons May assortment is what I used on my card for today, LOVE the RED, WHITE, & BLUE! So I decided to keep with the Manly theme challenge, and use the ribbon for banners with the buttons. I thought it worked perfect!!! LOVE all the ribbons Bonnie had put together in this assortment for May!
I LOVE this sentiment from The Project Bin "Anchors Away stamp set" as it is so sweet, and reminds me of being on the water in our boat. Its been a LONG time since we have taken our boat out on Utah lake, as the water level is super low, and we don't want to take any chances of ruining it. We do have tons of lakes here in Utah, and hope to be bringing it out to them this year. :) I also love the sailors cap with this sentiment, isn't is just too cute!???

The dp I used is a mix match of different ones I have in my stash. I did use Bazzill Bling Blank Check, and Then American Crafts Red. I added sewing in Blue and red to compliment my card. Love adding sewing as its an embellishment in itself!

To see all other cards by the RRR Design Team for our Manly Challenge , please visit the Really Reasonable Ribbon Blog here! 

For more inspiration using The Project Bin Stamps please visit us HERE!

Challenges:
Really Reasonable Ribbon/Masculine with ribbon or trim Challenge
Going Grey with Scrap - Creations challenge/Manly
Southern Ridge Trading Co/anything masculine
Paru's Cards Challenge/June challenge Father'sDay
Crafting from the Heart Challenge/Anything Goes
Through the CraftRoom Door/Anything goes


Thank you for looking and have an AWESOME weekend!!
hugs to all,
Cheryl

Thursday, June 2, 2016

Butterfly Effect

Hello everyone and Happy Thursday to all! Hope you all are enjoying your week!
Today's card was designed for JustRite Papercraft using their BEAUTIFUL Stamps and Dies! LOVE all that they carry, and if you haven't had a chance to go take a peek, you might want to, as May's release is a beauty!!!
DIE-05065 is the A2 Butterfly card front. this is the one you see the small butterflies on. its absolutely Gorgeous, and I cut it out using black card stock. I did cut it down a bit, so it would fit perfectly on my card here. I used the Glass Technique on my butterflies, but also used airbrushing as well. I LOVE LOVE LOVE the way this turned out, and how beautiful the butterflies look in person. I also used some vintage beads on the centers of the butterflies. it gives a nice look to them.
Butterflies are airbrushed using copic BG72 then using the glass technique on them
CR-05068- was stamped in memento black ink, and the large butterflies placed along the bottom.
My card base measures 6" x 6" and is white
Layer 1- Black is 5 3/4" x 5 3/4", then AC dp is 5 1/2" x 5 1/2"
Layer 2- black is 4 3/4" x 4 3/4" , then dp is 4 1/2" x 4 1/2"..
Layer 3- 3 3/4" x 4 1/2" for the black, then for the dp is 3 1/2" x 4 1/4" I did cut the A2 Butterfly Card front down to 3 1/2" x 4 1/4" so it could be sewn with the layer.
Ribbon- Black grosgrain dots is Really Reasonable Ribbon, the gingham is just from my stash, not sure who its by.
I absolutely LOVED making this card, and love the results as well! I love this color combo together, and of course LOVE the butterflies!!! Thank you for looking!!!! Hope you enjoy my post today
For more inspiration from the JustRite Design Team, please visit us HERE
Challenges:
Through the Craft Room Door/Anything Goes
Crafty Boots/Butterflies and bee's
Craft your Passion/Anything goes
Crafting for all seasons/Make it Girly!
613 Avenue Create/Anything Goes
Art 4 Impressions /Layer it on! LOTS of layers I have done here :)
Broken Fairy Challenge/Vintage or shabby chic(shabby chic)

Hugs to all,
Cheryl

Wednesday, June 1, 2016

Dream Big Telescoping Card


Hello everyone, today I am sharing my Dream Big Telescope Fold Card designed for JustRite Papercraft, using their beautiful Stamps and dies! My card was also created for a few different challenges, and I will have them listed below!

LOVE making the Telescope cards, they are super fun and easy to create. I did use the Beautiful Stamps from JustRite Papercraft and they are called Congrats Card Basics(CR05068), those are all the sentiments, and iron works.
Next I used the Small Oval Wishes stamps(CR-05053) and that would be one of the decorated oval stamps on the top part of my card. Also used the coordinating dies called "Joy Oval Frame Dies(DIE-05049) and to back the oval Dream Big layer, I used the JustRite Heart & Frame Die(DIE-05016) I cut 2 of those out in cream(small heart die) and distressed them and placed them behind the small oval die cut piece. Love how it frames that area perfect!

 For my card base I used random spellbinders dies, that I have in my stash. Card measures 4 x 4 closed and 4 x 9 open. I love that the bottom part has a hidden message area, I do have a video showing how to create this card, and you can find that HERE in my Tutorials!

Flowers are JustRite Floral Trio One Dies(DIE-05022) #3 cut 6 times and distressed with Red Ink to give this look. I also airbrushed a bit of the flowers. Lastly I did do my Glass Flower technique and added a half backed pearl to each flower.

Embellishments - Ribbon from my stash, old old vintage button, and then a part of a feather!
 In the photo above you can see where you can do your writing and hide it. My writing is sloppy, so I would want it hidden....hehehehehehehe LOL anyways it is a little messy. :)

Challenges:
Word Art Wednesday /Anything Goes
Card and Scrap/Flower challenge
Craft Dee Bowz/Anything goes with a handmade bow
Scrappyland/anything goes(I used spellbinders to create my telescope card)
Fussy N Fancy/Die cuts/or punches(I used dies)
Glitter N Sparkle /Flower Power

Hope you enjoyed my post for today! Please let me know what you think of my card for today!
hugs to all
Cheryl