Pages

Thursday, October 27, 2022

KBD Candy Corn Donut Ginger


Hello crafty friends , today I'm sharing this darling Kadoodle Bug Designs Sitting Candy Corn Donut Ginger, isn't she the cutest? I wanted to make another fun Memorydex to enjoy and this one is the first fall one for this year. 
to start with I cut out my memorydex card using a die, and then used the sweet Ginger girl that I had put together. She is cut out in different colored card stock and then distressed. I used inks and pens to do all that. Next her eyes, I love doing their eyes its so much fun. On her eyes I try to use a 005 pen for the lashes, then using another little thicker pen for the liner, and then chalk for the highlighting.Next for the blue eyes I did cut in a blue and then used 2 copics for highlighting the edges. The black I did using the glossy accents over the black, and I did have to add more paint pen in white on top, as it faded what was underneath. I chalked her cheeks and added some white paint pen. I do show the pen in my videos, and I think I bought a 2 pack of these on ebay. I love the paint pens so much better than gel as the gel pens dry up. Now for her bow, I used the gorgeous RRR Sherry & Ivory Plaid ribbon. My sentiment is from The Project bin stamps.

Thank you so much for stopping by and have a lovely day!

Hugs to all, Cheryl

Wednesday, October 26, 2022

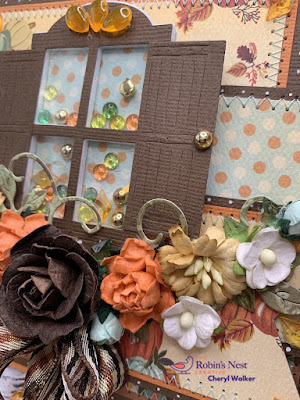
Sweet Fall Shaker card

Hello everyone and Happy Wednesday to you all! Today's card was designed for Really Reasonable Ribbon and The Robins Nest Creative. Loving the fall colors and working with all fall related items. I will list below what I used and how.

Card base and layers-

  • card base is an orange card stock cut at 6" x 12" and scored in the middle to create 6" x 6" card.
  • Layer 1-cut my brown 5 3/4" x 5 3/4" , then the rust at 5 1/2" x 5 1/2", and DP is 5 1/4" x 5 1/4"
  • Layer 2- is 4 3/4" x 4 3/4" brown, orange is 4 1/2"x 4 1/2" , dp is 4 1/4"x 4 1/4" 
  • layer 3- 2 3/4"x 5" brown, then polka dot is 2 1/2" x 4 3/4"
  • Layer 4- 2 1/4" x 4 1/2" brown, orange is 2" x 4 1/4", dp is 1 3/4" x 4" then cut the end off
  • Layer 5- window shaker, I added lots of The Robins Nest Dew drops in the inside.'
  • Inside Layer is done using 3 layers, brown, rust and white. 5 3/4" x 5 3/4" , 5 1/2" x 5 1/2" , 5 1/4" x 5 1/4"
All layers have sewing, dots, and dew drops in the corners. I love how the diamond shaped dew drops look in all corners and give some embellishing to my card layers. I also used dew drops on the window shutters, and top of window. 

Flowers-

  • I chose all my flowers from Really Reasonable ribbon, and used several different types. I listed them all below for easy finding. I also added some branches, and dew drops to the floral cluster I made. The gorgeous ribbon is Plaid Ivory , Brown and copper. Love it!

Really Reasonable Ribbon Supplies:


Thank you for stopping by and have a lovely day!
Hugs to all,
Cheryl

Tuesday, October 25, 2022

Jingle Time tag

Hello crafty friends and Happy Tuesday to you all! todays tag was designed for TLC Designs Release Hop we are having over on Instagram. I will come back and update to the TLC Instagram later, but here is the link to mine for now. 

My tag-

  • I used to create my tag the TLC Designs See you in the center die. First I picked my card stock and design paper and kinda layered to see how I like. Next I cut the silver withe the largest die, then the pink with the next and then the next die I cut 2 times, once in white and then in the pink design paper that is from the Snow Family Fun Design paper pack.
  • Next I cut out in silver again the sentiment using the oval from the Loving Petals Square Die set.
  • I did distress in pink and added some white dots and some RRR Pearls.

Santa & Tree

  • I printed out my santa, tree, and sentiment from the Jingle Time Digi Stamps, and then colored with copics. I thought how fun it would be to have santa in pink. Love him! I then added some confetti glitter to him, as I thought it would look so cute on him. Love how he turned out.
  • Tree was colored with copic markers and then I added the TLC Designs sprinkles and little gingerbread boys to it. 

decorating tag-

  • I added lots of flowers from Really Reasonable Ribbon and some stamens , dew drops and branches. the tree was decorated using the sprinkles and I did add some gorgeous ribbons and flowers that all came from RRR.


 Thank you so much for stopping by and have a lovely day!

hugs to all,
Cheryl

Monday, October 24, 2022

KBD Moon Witch Salem Treat Holder

Hello crafty friends and Happy Monday to you all! Today I'm sharing this darling Moon Witch Salem from Kadoodlebug Designs, isn't he just the cutest!? I used him for another treat holder, this one is for my granddaughter for Halloween.


Making the treat holder

  • to start with I cut a piece heavy card stock measuring 4" x 8 1/4"
  • Next I score at 3/4" , 4 1/2" , and then 4 3/4" , now fold the 3/4" up and staple. also fold at the others so it closes like a matchbook.
  • I cut the design paper for the front at 3 1/2" high x 3 3/4" wide, and glued to the top flap. If you are wanting to you can add a message or more design paper to inside, would do this now.

adding the candy to inside

Outside

Thank you for stopping by and have a lovely day!

Hugs to all, Cheryl
 

Sunday, October 23, 2022

KBD Spooky Hoots Treat holder


Hello crafty friends, today I'm sharing this darling treat holder I made for my grandson for Halloween. This little cutie is a Kadoodlebug Designs Spooky Hoots SVG file. Love these little guys as they are so stink'n cute.

Spooky Hoots- was cut in green , green polka dot design paper, purple, black , orange and white. I distressed each piece and then glued together. Lastly added some white paint pen dots and marks.  
I added some branch trees from a punch, a sticker sentiment , and the ghost is a sticker too. The Ribbon is Really Reasonable Ribbon, and the black diamonds are dew drops from The robins nest Creative.

Making the treat holder

  • to start with I cut a piece heavy card stock measuring 4" x 8 1/4"
  • Next I score at 3/4" , 4 1/2" , and then 4 3/4" , now fold the 3/4" up and staple. also fold at the others so it closes like a matchbook.
  • I cut the design paper for the front at 3 1/2" high x 3 3/4" wide, and glued to the top flap. If you are wanting to you can add a message or more design paper to inside, would do this now.

adding the candy to inside


thank you for stopping by and hope you have a lovely day! Hugs to all, Cheryl

Thursday, October 20, 2022

KBD Sweet Pumpkin Pile Ellie card

 
Hello everyone today I have another fun card designed for Kadoodlebug Designs using their darling Gnomie Friends Pumpkin Pile Ellie, isnt she darling>>? I just love her, and had so much fun distressing her and putting her together.

Pumpkin Pile Ellie is from the Gnomie Friends Collection from Kadoodlebug Designs. I cut out all my pieces in colored card stock and the blue design paper. The blue design paper is double sided so I cut it a couple of times to get both sides so I could decide what I liked best. I did add some white paint pen, and black dots to her face, along with some chalk in pink. Lastly I added some yellow dew drops to the center of her bows.

My design papers are from echo park, and my stamped image is The project bin stamps. All flowers are from Really Reasonable Ribbon. and dew drops are from The Robins Nest Creative 


Thank you so much for stopping by and have a lovely day!

Hugs to all, Cheryl

Tuesday, October 18, 2022

Jack O' Gnome card & treat holder

Hello crafty friends and Happy Tuesday to you all! Today's projects were designed for TLC Designs using the darling jack O' Gnome digi set, and Creeping it Real design papers. 

I decided to do 2 projects, one being a card and the other is a matchbook type treat holder. Its super easy to make and holds 3 candies perfect. I decorated it up using the darling gnome, stickers, ribbons, and a button. he sure is a cutie, and I had a lot of fun working with him.


Next I have the card I made, and this one was pretty simple

  • My card measures 5 3/4" x 5 3/4" the orange base
  • Next I cut my black card stock 5 1/2" x 5 1/2", then the polka dots 5 1/4" x 5 1/4". the next layer was cut at 4 1/2" x 4 3/4" black, then the creeping it real was cut 4 1/4" x 4 1/2", i then added sewing.
  • for the frame I chose the Tiny vine oval frame, and then distressed the white with purple. I did print out my sentiment from the Jack O' Gnome set and distressed it as well. Love this little guy he is absolutely too cute.
  • Jack O' Gnome was colored with copics and then I added some fun glitters to his beard. 
  • Lastly I added some white dots, and double bow.
  • Creeping It Real Digital Design papers 
  • Jack O' Gnome digital stamp set
  • Tiny Vine Oval die set


Thank you so much for stopping by and have a lovely week!
Hugs to all,
Cheryl


Friday, October 14, 2022

Kadoodlebug designs smore peeking nash

Hello everyone, super excited to share my 1st post for Kadoodlebug Designs as a Design Team Member, I love using their darling SVG files as she carries so many darling ones, today I'm using the darling Gnomie Friends Smore Peeking Nash SVG. 


for my card today I chose to work with the darling Smore Peeking Nash, isnt he way too cute??! I just love him. 

I cut him using all white card stock, then airbrushed the dark pieces using the copics and my airbrushing system . for the lighter pieces I used the copics and colored. The black nose, ears and hands were done with black copic marker. for the light pieces I used some inspiration paints, they give a pearly effect. Next I addes some white paint dots and lines to him. Love how this one turned out, and will try again using a different technique.

For my card- 
I cut red card stock at 6" x 12" score at 6", then I cut my black card stock at 5 3/4" 5 3/4" and then my design paper at 5 1/2" x 5 1/2". Next layer I cut  3 3/4" x 5 3/8" and then cut the design paper at 3 1/2" x 3 3/8". My next layer was black cut at 4 3/4" x 4 3/4" , then the design paper at 4 1/2" x 4 1/2". I did all my sewing and added my dots. I just had to add some fun red dew drops from the Robins Nest Creative, love adding these to the corners of my layers. Lastly I added a fun bow using Really Reasonable Ribbons satin ribbon.

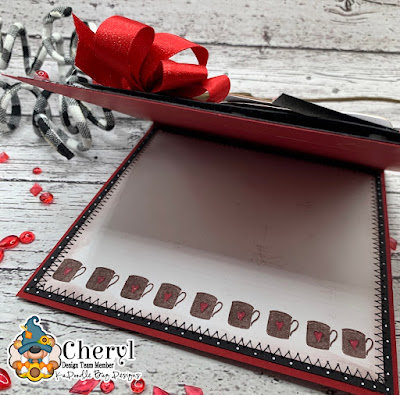
Inside -
Of course I love doing the insides of my cards that way they are ready to go, and they match the outside somewhat. On this one here I chose to use black card stock cut at 5 3/4" x 5 3/4" then the white at 5 1/2" x 5 1/2". I then stamped the little cocoa mug from just rite designs Christmas Elements stamp set. I then colored the heart red. lastly I distressed the edges using a brown ink.


I hope you enjoyed my post for today and thank you for stopping by!
Hugs to all,
Cheryl


Thursday, October 13, 2022

Really Reasonable Ribbon October Hop

Welcome to "Really Reasonable Ribbon's  October” Blog Hop if you arrived here from Kathy's Blog you are on the right track. If not , you will want to head back to the Really Reasonable Ribbon Blog that way you don't miss out on any of the FABULOUS Designs from the Design Team today! There is going to be lots of Beautiful projects to see today using the Christmas Collection Ribbon Assortment, so I hope you Enjoy


For my card today I I chose to use two of the beautiful ribbons in this months collection. My design papers I chose to match, and love how it all turned out. 
  • First I started with my card base in white. cut it 6" x 12 " and scored in half to measure 6" x 6"
  • Next I cut my brown card stock 5 3/4" x  5 3/4" and the green design paper 5 1/2" x 5 1/2", On the next layer I cut a red, brown and then design paper, all measuring smaller than the first. I then wanted to use the darling print with cookies and gingerbread men, candy cane and so on. I lastly added my dots, and sewing to each layer.
  • for the main layer I chose to use My makers movement dies and stamps. I
  • embellished with snowflake from RRR and then dew drops from The Robins Nest Creative.
  • Really Reasonable Ribbon supplies used: October ribbon club, foam tabs, snowflake embellishment, scor-tape 1/4"

Thank you so much for stopping by, and hope you enjoyed my Halloween Scare Bear card for today.
Your NEXT stop for today's hop is Bonnies Wonderful Blog!!!
Hugs to all,

Cheryl

Wednesday, October 12, 2022

Witchy Bear Treat Holder

Hello everyone and Happy Wednesday to you all! Todays sweet Halloween treat holder was designed for Really Reasonable ribbon and The Robins Nest Creative. Love making these as they are super fun and super easy to create. I will give instructions below. 

Making the treat holder

  • to start with I cut a piece heavy card stock measuring 4" x 8 1/4"
  • Next I score at 3/4" , 4 1/2" , and then 4 3/4" , now fold the 3/4" up and staple. also fold at the others so it closes like a matchbook.
  • I cut the design paper for the front at 3 1/2" high x 3 3/4" wide, and glued to the top flap. If you are wanting to you can add a message or more design paper to inside, would do this now.

adding the candy to inside


Decorating the front using The Robins Nest dew drops , Really Reasonable ribbon & witchy bear

  • I added the checkerboard satin in purple ribbon using hot glue to cover up the staple on the bottom of my treat holder, Then glued the dew drops in black to it.
  • Now I used the darling svg witchy bears that I bought from Kadoodle bug and thought how cute the robins nest dew drops would look on her and her broom. So I glued the purple, yellow and white to her hat, star, and broom.
  • then I used some glitter on her star, and some on the broom stick.
  • before adding the bear I added a haunted house foam sticker and then popped her off that. Next I added a sticker bat, and a tombstone. Super easy to make

Thank you so much for stopping by and I hope you enjoyed my post for today!

Hugs to all, Cheryl


Tuesday, October 11, 2022

TLC Designs Jack O' Gnome Treat box


Hello crafty friends and Happy Tuesday to you all! Todays fun Halloween Treat box was designed for TLC Designs using their darling Jack O' Gnome and Creeping It Real design papers. Super fun and easy.

So my box I bought at Hobby Lobby and then just decorated it up using the Creeping It real design papers. I love this darling paper, its super cute, and I had a hard time covering it up, so I tried to show as much as I could. 

  • Jack O' Gnome is a digi and I colored him using copics, and then some purple mix beads for his beard. Love how cute he is. I did fussy cut him out and popped him off the front of the box.
  • the little bat is fussy cut from the design paper Creeping It Real. 
  • Next I added some Really Reasonable Ribbon bows and then some netting to the top.
  • The sentiment tag was printed using the sentiment that came with the gnome digi set and then cut out using the TLC Loving Petals Square Die.
Fast and easy gift or treat box to decorate. Please let me know what you think of my treat box for today.
Thank you so much for stopping by and have a lovely day!

hugs to all, Cheryl

Tuesday, October 4, 2022

Hidden Message card & Video Tutorial


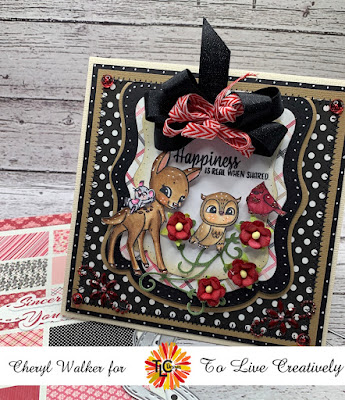
Hello everyone and Happy Tuesday to all! Today's fun fold card with Hidden Message was designed for TLC Designs using their darling stamps, dies, and design papers. Here is a link to my YouTube video I will post all information below.


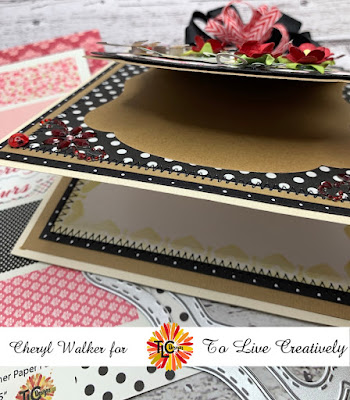
Inside of my card and hidden message area. Love this as it gives you more room to write or even hide a message from others. You can always add a magnet. Then for the inside I used the stencil Celebrate Sweetly Stencil and I have a Video on this

  • card base measures 6" x 6" , cut a 6" x 12" and scored in half to make 6" x 6"
  • Next for Layer 1 on the front of card Black 5 3/4" x 5 3/4", Tan 5 1/2" x 5 1/2" , black polka dots 5 1/8 x 5 1/8 from Sincerely Yours design paper
  • secret message area- cut tan using largest die(see you in the center) please see video tutorial on this one.
  • cut black in the second largest size die
  • next cut the design paper and white in the smallest die from this set, (please see video)
  • lastly decorate using the darling forest Pals set, some ribbon, flowers, and the tiny vine.

Supplies Used: TLC Designs Forest Pals , Sincerely Yours Design paper , See you in the Center DieTiny Vine Oval DieCelebrate Sweetly Stencil 

Also used Ribbons from Really Reasonable Ribbon and Dew Drops from The Robins Nest Creative 


Thank you so much for stopping by and have a lovely day! Hugs!