Wednesday, December 28, 2022

Its Party Time!

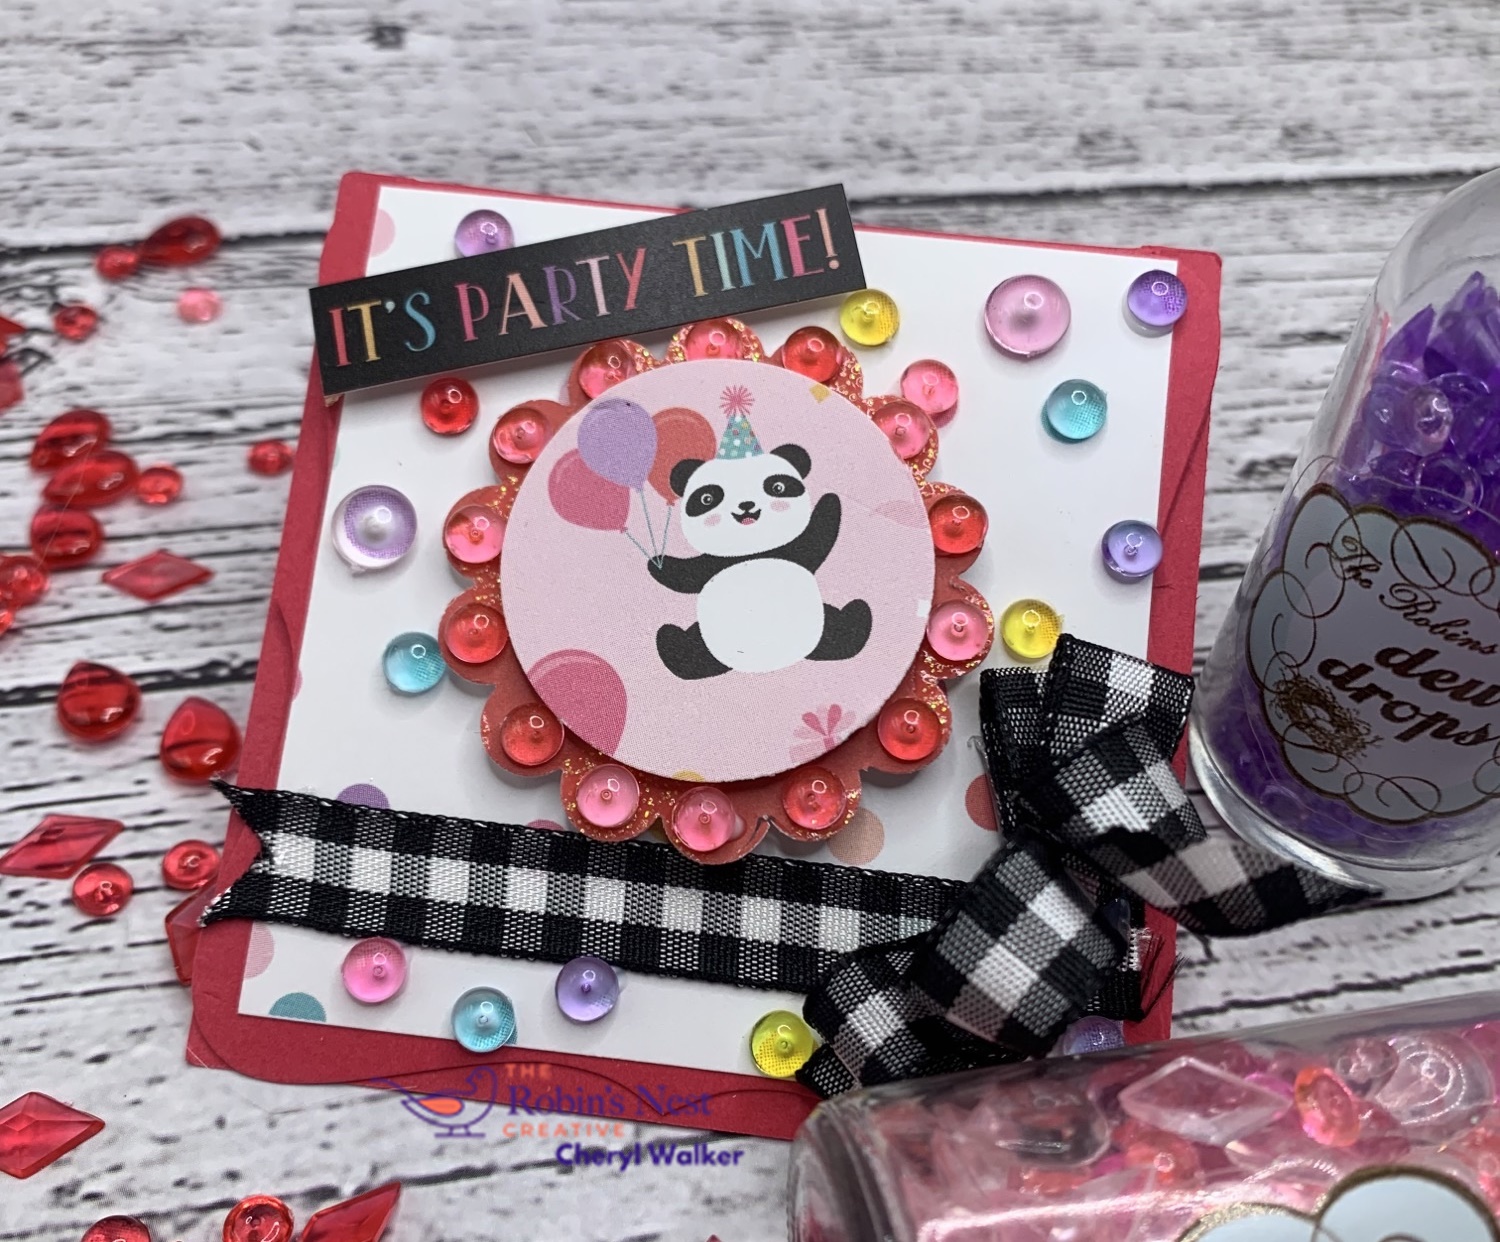
Hello crafty friends and Happy Wednesday to you all! So today's mini card was designed for The Robins Nest Creative using lots of dew drops. 

To begin I grab one of these bazzill mini card bases and then add my design paper. Next I wanted to add some ribbon, so I chose the black gingham ribbon and ran it across the bottom of my card. Nest I used a scalloped punch and punched out my red card stock. Then used a circle punch to punch the panda out of the coordinating design paper. I wanted to add lots of dew drops, so I added the colors to all the dots on the design paper using Red, Pink, Yellow, Blue, Purple dew drops. Lastly I added lots of pink ones around the scalloped edge.


I hope you enjoyed my short and sweet post for today, and wish you all a Happy New Year!
Hugs to all,
Cheryl


Tuesday, December 27, 2022

TLC You make my heart dance


Hello crafty friends and Happy Tuesday to you all! I do hope you all had a very Merry Christmas! Today's card I'm sharing with you was designed using the darling Tiptoe Fairy Dance Stamp set. Just love this darling set, so many cute images in it. So for todays card I chose to use 2 of them.

To start with I chose the die set called Daisy Frame Die, and cut out all my layers using pink card stock and the beautiful Krafty & Sweet Design paper. Next I stampe my sentiment on the white card stock. My images were stamped and colored using copic markers and then I fussy cut them out to pop them off the front of my card. I wanted a clean and simple card as it always nice to be able to put some together quickly. As after the holidays I'm always pooped , hehehe anyways I did have fun putting this one together and hope you enjoyed my post for today. 


 Thank you so much for stopping by and have a lovely day!

Hugs to all, Cheryl

Friday, December 23, 2022

Merry Christmas Candy tag

Hello crafty friends and Happy Friday to you all! Today's Christmas Candy tag was designed for Really Reasonable Ribbon and also for my grandson. I will be adding this tag to one of his presents for Christmas. This is my last Christmas tag for the year. Hope you enjoy!

So for my tag base I just chose a spellbinders die shape that I like best for this darling dragon. I cut out one in red and one in white, and then stamped my sentiment in red ink on the white card stock. Super easy right?! Next I used the RRR Foam tabs to pop the white frame and then added my white paint dots. for the dragon I used an SVG cutting file, and had these put together from last year, so it was easy to just grab one and use. I did use several foam tabs layered on top of each other to pop him higher up so the sucker could slide in behind him. The suckers came from Walmart. Next I picked out 2 ribbons, and used the plaid christmas ribbon red and green in 5/8" and then the Checkerboard Satin in forest green 3/8", I just looped them both and hot glued to the back. I did staple them together first. Lastly I slide the sucker in and then used a foam tab to hold it in place. Love making these fun little tags for Christmas.

Thank you for stopping by and hope you enjoyed my tag for today! May you all have a Very Merry Christmas and Happy New year!

Hugs to all, Cheryl

Thursday, December 15, 2022

Christmas Candy Cane Holders

Hello Crafty friends and Happy Thursday to you all!  Today I have some fun Candy Cane Tags that I made for Christmas. I've been having so much fun creating different types of tags and treat holders for the holidays, love making these! Need a quick gift for a neighbor or co-worker, these would be perfect!

So to start with I grabbed a few tags from my stash that I had gotten from somewhere and covered them with Christmas design papers. Next I added my Ribbon from Really Reasonable Ribbon to create a bow and tie. I ended up using the Plaid Ribbon Christmas Red and Green in 5/8". Love this beautiful ribbon and makes gorgeous bows. Now I used my craft knife to make some cuts in the tag to hold the candy cane in place. 
SNOWMAN-
Now for the snowman I used punches to create him, and I did cut his hat by hand. I also added some of the same ribbon to create his scarf, and then used the 3/8" Poppy red checkerboard Satin ribbon for his hat. Next I added a snowflake to his hat, as I thought it would be so darling. for his face I used some dew drops, and also for his buttons. The nose was cut by hand and then I added his mouth. Lastly I added some white paint pen marks around the black scallops.  I did add a poinsettia embellishment and a Merry Christmas tag. 
Monkey tag-
I did the same with the tag for this one, and then added my KaDoodle Bug SVG Santa Monkey that I had cut on my cricut and then distressed and put together. Lastly on both tags I added the Merry Christmas sticker that I placed on the red scallop circle using foam tabs.

Really Reasonable Ribbon supplies:
Thank you for stopping by and I sure hope you enjoyed my post for today!
Hugs to all,
Cheryl
 

Wednesday, December 14, 2022

Frosty the Snowman Candy Cane


Hello crafty friends and Happy Wednesday to you all! Today's fun project was designed for The Robins Nest Creative using the super fun dew drops to decorate this darling snowman I made.

To start with I did punch out 3 black scalloped circles, and 3 white circles using stampinup punches. nest I made his hat by just cutting some black card stock. Now glue all the pieces together to create this darling snowman. I chose to add some ribbon to his hat, and then created a snowflake using white dew drops. Next I chose some black dew drops for his eyes and buttons and glued them on. I did add some ribbon to create his scarf and then made some holly and berries using dew drops as well. Love how he turned out. I added him to a candy cane to put on a gift for christmas. also would be perfect for neighbor gifts. Lastly I added a Christmas tag. Super fun and easy to make!
 Hope you enjoyed my treat for today and thank you for stopping by!
Hugs to all,
Cheryl


Tuesday, December 13, 2022

Really Reasonable Ribbon December Blog Hop


Welcome to "Really Reasonable Ribbon's  December” Blog Hop if you arrived here from Kathy's Blog you are on the right track. If not , you will want to head back to the Really Reasonable Ribbon Blog that way you don't miss out on any of the FABULOUS Designs from the Design Team today! There is going to be lots of Beautiful projects to see today using the Winter Carnival Mix Ribbon Assortment, so I hope you Enjoy


For today's Hop I chose to make another fun treat holder using a spellbinders die. I love creating different treat holders for the holidays, and this one here is for a candy cane and some Andes mints. I just cut my card stock as wide as I wanted for this project which is 3 1/4" wide, 7 1/2 long ,then I cut the top only using part of a spellbinders shape die, so now it measures 6” long that how I got the top part of this done. Next I scored to create a folded area (score at the bottom at 2" up and then 2 1/4" . then fold these up. I then added some design papers and more spellbinders circles and scallopes for the sentiment. Now the scalloped circle piece is hot glued just in place at the top of the circle that way it will hold the bottom flap in place when closed. You could stamp Merry Christmas inside, and I may add a sentiment . I chose my ribbons to match from this months gorgeous ribbon collection. My darling Reindeer is from kaDoodle Bug Designs and is the darling Christmas Reindeer. Lastly I embellished with some dots, and a little sweet snowflake from Really Reasonable Ribbon.

To attach the candy cane and andes mints I used 1/4" score tape for candy cane,and then 1" for mints.


Thank you so much for stopping by, and hope you enjoyed my treat holder for today.

Your NEXT stop for today's hop is Bonnies Wonderful Blog!!!
Hugs to all,

Cheryl


Christmas Poinsettia Treat Holder


 Hello crafty friends and Happy Tuesday to you all! Today I'm sharing this Andes Treat holder I designed using the TLC Butterfly Rectangle Die set, Peppermint Design paper and Delicate Poinsettia Stamp set. 

To start with I took the largest die out of the Butterfly Rectangle Dies and cut it in a green card stock. Next I scored it at 3" and then 3 1/4" press your folds so the small part comes up like in photo above. Next I just used the second largest die and cut a piece or portion of that using the die, so I did not cut out the entire die. I then glued my design paper to the front, easy peasy!  

Next I wanted to cut out the oval from the Loving petals square, this is what helps hold the bottom in place once treats are inside. So I cut out a pink card stock and then used the smaller oval for a white. I stamped my sentiment on the white and then distressed using green ink. I did put these ovals together and then used a punch with 2 holes to tie my ribbon through to hold in place at the top. Now is time to add poinsettia and bow. super fun and easy treat holder for the holidays!

supplies used:


Thank you so much for stopping by and have a lovely day! Hugs to all, Cheryl

Tuesday, December 6, 2022

TLC Delicate Poinsettia Tag

Hello everyone and Happy Tuesday to you all! Today's Delicate Poinsettia tag was designed for TLC Designs using the gorgeous new Delicate Poinsettia stamp set. I just love this set, as its super fun to stamp up the different colors and fussy cut the pieces out. So I do hope you enjoy my post for today!


These tags are super easy to make and take no time at all! Around the holidays I like to make some simple but beautiful gift tags for Christmas, and this one I absolutely love. I used the Delicate Poinsettia Stamp set to stamp up my image, and then fussy cut it out. Next I did another piece and fussy cut it out, this one is on top to give some dimension. I then took a gold metallic pen to do the edges of the flower and the leaves. Love how it turned out. for my design paper I chose the Peppermint Collection from TLC and OMYgosh its Gorgeous design paper! Love this DP! Well I love all of TLC Design paper packs.Lastly I used the tag for my sentiment from the Loving Petals Square die set. I did add some white paint dots using my posca paint pen in white, and then Really Reasonable Ribbon , button, and snowflake embellishment to complete my tag.

Thank you so much for stopping by and have a wonderful day!

Hugs to all, cheryl
 

Thursday, December 1, 2022

A Little Love Pocket tag & Video

Hello crafty friends, today I have a fun little pocket tag & video I did for TLC Designs Instagram Hop, you can find the hop here. I love when you can use dies in different ways, and in my video I will show you how to take one of your large dies or the See you in the Center die and make this tag. super fun and super easy to make!

I did use several dies from TLC Designs, the main one was the See You in the Center Die, then Tiny Vine oval, and the last being Butterfly Rectangle Die Also used their darling design paper from Classic Santa Collection. Stamps used are TLC Designs Warm & Fuzzy Unicorn set. Now the only thing I added after my video was the Ric Rac. I decided once I finished on adding it. You can add any trim or ric rac, or even a border punch. Ribbon is from Really Reasonble Ribbon! Have fun and hope you enjoy! 


Hugs to all,
Cheryl