Showing posts with label Spellbinders. Show all posts

Thursday, July 13, 2023

Really Reasonable Ribbon July Blog Hop


Welcome to "Really Reasonable Ribbon's  July” Blog Hop if you arrived here from Kathy's Blog you are on the right track. If not , you will want to head back to the Really Reasonable Ribbon Blog that way you don't miss out on any of the FABULOUS Designs from the Design Team today! There is going to be lots of Beautiful projects to see using Summer theme, So each DT member will showcase something using Beach or Beach colors.

Be sure to comment on the blog hop post on the RRR Blog for a chance to win a $10 gift certificate to Really Reasonable Ribbon  


So for my project today I made a Nautical Theme Carry Caddy with side compartments . I absolutely had so much fun making this sweet caddy. I used some dies, and made up a box as I figured out how large I wanted it to be. The measurements on this caddy are 4 5/8"w x 5 1/4" H x 3 1/4" D. The sides can hold any crafting goodies, gift cards, candy, or office supplies. The inside can hold a little gift or whatever you choose. These would be fun to make for co-workers, crafting swaps, or whatever you choose. I will be making more of these and may do a video tutorial on this as well.

I used lots of Really Reasonable Ribbon for my Caddy today, and also lots of flowers. The paper collection I chose to use is By the Sea by Carta Bella . The little Sailor dog is by KaDoodle Bug Designs.
Ribbons and flowers used:


Be sure to comment on the blog hop post on the RRR Blog for a chance to win a $10 gift certificate to Really Reasonable Ribbon


Your NEXT stop for today's hop is Bonnies Wonderful Blog!!!
Hugs to all,

Cheryl

Friday, May 26, 2023

RRR Shabby Chic Lollipop card & video

 
Hello everyone and Happy Friday to you all! Today's fun project is a shabby chic Lollipop card I made for Really Reasonable Ribbon and for our Doll club meeting that I hosted in April where I taught a class on making these. I had prepped all the layers and bows and had everything ready for everyone to make, it was Super fun! I used the beautiful ribbons, flowers and embellishment from RRR.

To start with I cut out several different die cuts in different design papers and what ahead and use foam tabs to layer each one on top of each other. Next I used an Image that I had printed out and then cut out with an oval die, then used an old trim around that using hot glue. I did add a straw and used Really Reasonable Ribbons Grosgrain Swiss dots ribbon in light pink around the straw, and love how it looks. Next I used Delicate stitched ribbon in a shade of blue, and then a old vintage blue ribbon as well ,I made bows with those, and then I used some Satin Pink Ribbon 1/4" for my bows in pink. I used one on the bottom and one up on the top by the flowers.

Flowers used are:
open roses  2tone pink with dusty pink centers, and then 2 tone ivory an pale pink 20mm

For all the layered die cut pieces I did use really reasonable ribbon foam tabs. And then the small flower on the bottom bow is really reasonable ribbons flower. I love making these lollipop cards and do have a video on making one that I made awhile back. I will link video here.

Thank you so much for stopping by and I hope you enjoyed my blog post today. Also if you'd like to see my YouTube video on creating a lollipop card you can find my video here on YouTube
hugs to all,
Cheryl

Friday, August 12, 2022

Floral Delight 3-D sewing machine

Hello everyone and happy Friday to all! Today I'm sharing another one of these darling 3-D sewing machine boxes that I made. I found the tutorial on youtube and you can see it here as well. Her name is Krisiannes crafty adventures, she will show how to construct the box. I added my own touches to it. Hope you enjoy!
I decorated using Really Reasonable Ribbons flowers, and ribbon, half backed pearls, and even the darling daisy flower embellishments. for the handwheel I chose to use a small ribbon spool, and added matching dp to it. I also used spellbinders dies to create that. for the front tension wheel, thread stitch regulator , and thread stitch pattern. Next I also made my needle and faceplate using silver shimmery card stock. for the wheels I chose scrap diva die.


this sewing machine has several places to put things for storage or gift giving. super fun and addicting to make. Ive made 4 so far and will be making more.

Thank you for stopping by and have a lovely day! Hugs to all!
 

Monday, August 8, 2022

3-D Sewing machine with storage

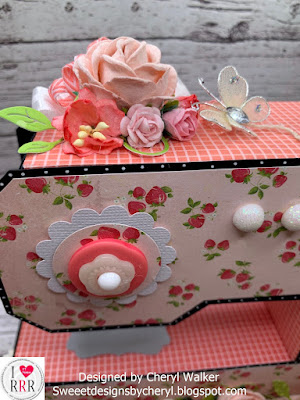
Hello crafty friends and Happy Monday to you all! Today I have this super darling sewing machine storage box that I made for Really Reasonable Ribbon, and to keep on my work area. Love making these and will have many more to share on my blog . Ive used lots of Really Reasonable Ribbon flowers and ribbon on this and will list items below.


In the picture above you see both drawers, there is also a storage box under the spool of thread. And another storage under the base. super fun. I used this darling strawberry design paper and card stock. Then used punches, dies , buttons, and such to decorated. I loved using all the RRR flowers and will list them below for you.

Really Reasonable Ribbon 
Flowers-
Ribbons-
Extras-
White flat backed pearl n a 10mm or 12mm for top of spool
the sewing machine tutorial is on youtube from Kristiannes crafty adventures
Thank yo so much for stopping by and have a lovely day!
Hugs to all,

Tuesday, July 13, 2021

Really Reasonable Ribbon July Blog Hop


Welcome to "Really Reasonable Ribbon's  July” Blog Hop if you arrived here from Kathy's Blog you are on the right track. If not , you will want to head back to the Really Reasonable Ribbon Blog that way you don't miss out on any of the FABULOUS Designs from the Design Team today! There is going to be lots of Beautiful projects to see today using the Sizzlin Summer Ribbon Assortment, so I hope you Enjoy


For my card today I chose to this new to me Bo Bunny design paper I picked up at the warehouse sale this past weekend. I did my layers using the scotched advanced tape refill and then added sewing to each layer in white thread. Next I cut my oval die cuts and my New You're My Jam stamp and die set from My Makers Movement. Love this set. I used the Jame, flowers, bee, and sentiment all from one set. Next I thought the Really Reasonable Ribbon would be perfect on my card, so I took the two ribbons and made 2 separate bows, and then hot glued them. I love making shaker cards they are so much fun. The flowers have Really Reasonable Ribbons Embellishment flowers in the centers, love this look! Next I stamped my bee and colored him with yellow copic marker and added some yellow stickles to his wings. Hope you enjoy my card for today, as I loved making it to share with you all! 

Really Reasonable Ribbon supplies used:

other supplies:
Bo Bunny design paper
Cheery Lynn swirl 
Spellbinders oval dies
Stickles
Air compressor and airbrushing system(for flowers)
glitter
Crafters Edge die cutting machine


Thank you so much for stopping by, and hope you enjoyed my You're My Jam Card for today!


Your NEXT stop for today's hop is Bonnies Wonderful Blog!!!
Hugs to all,

Cheryl


Saturday, March 13, 2021

Really Reasonable Ribbon March Blog Hop

Welcome to "Really Reasonable Ribbon's  March” Blog Hop if you arrived here from Kathy's Blog you are on the right track. If not , you will want to head back to the Really Reasonable Ribbon Blog that way you don't miss out on any of the FABULOUS Designs from the Design Team today! There is going to be lots of Beautiful projects to see today using the Spring Fling Ribbon Assortment, so I hope you Enjoy 

For my card today I chose some old old design papers I have, and then layered them up using pinks and yellow card stock. I then cut out an oval and shaped die cut to layer my cupcake chick on. I stamped the Happy Easter using black ink and a stamp. I thought it would be cute to add some sweet flowers, and branches I cut out using the Martha Stewart punch. The ribbons I chose are from this months assortment and it was a hard pick for me, as i loved them all! 
supplies used:
other items used
sewing machine, pink threads, copics, hot glue, card stock, gel pen, dies

Thank you so much for stopping by, and hope you enjoyed my Easter card for today!


Your NEXT stop for today's hop is Bonnies Wonderful Blog!!!
Hugs to all,

Cheryl


Friday, September 2, 2016

My Favorite Color is AUTUMN & Video


Hello everyone,
Today I have my card created for Really Reasonable Ribbons Autumn Colors Challenge & The Project Bin. I also have a video showing how I did the Ombre Stamping with the Mini Misti Tool. I absolutely LOVE using this tool to do my stamping, as it makes it super easy and fun!

On my card for today I used The Project Bins Beautiful Sentiment from the Autumns Calling stamp set! LOVE all these beautiful unique sentiments that The Project Bin carries.

The Beautiful ribbons are from Really Reasonable Ribbon and are perfect for my card.
Card Base- 5 1/2 x 8 1/2" scored at 4 1/2" and then did the border punch to the longer side.
Layer 1- 5 1/4" 3 3/4" then frayed the edges using scissors,and distressed, then added a sewing
Layer 2 - 4 1/4" x 3 1/4"that is for the kraft card stock. Design paper is cut at 4" x 3" then frayed, distressed and sewn.
Layer 3- is spellbinders frames
Supplies Used:
Stamps- The Project Bin Autumn's Calling
Ribbon- Really Reasonable Ribbon Shimmer Satin Brown, Orange Gingham
Dp- American Crafts
Leaves- Random from my stash of fall embellishments
Gold Pearls- also from my stash.
Martha Stewart border punch, Spellbinders dies
Markers - StampinUp! Bravo Burgundy , Really Rust, Only Orange, Old Olive
 
Ombre Stamping using the Mini Misti tool 
 
Thank you for looking and have a lovely day!
hugs to all!
Cheryl

Monday, August 29, 2016

Haunt It! & Video

 Hello everyone, and Happy Monday to all!
So for today I have a super fun card that I designed for The Project Bin using the Haunt It! Collection. Talk about a super CUTE Halloween collection, this one has that covered!! LOVE these super cute and unique stamps!

I also used the Mini Misti with this card, using the Multi Color Stamping Technique. My video can be seen below.
 
 
Card Measures 5 1/4" x 5 1/4" cut the dark grey card stock at 5 1/4" x 10 1/2" and scored at 5 1/4"
Layer 1-  dark grey card stock 5" x 5"  then polka dot dp, is cut at 4 3/4" x 4 3/4" 
Layer 2 - 3 3/4" x 2 3/4" for the grey card stock, then dp is 3 1/2" x 2 1/2"
Layer 3-  4" x 4" grey card stock, then dp is cut at 3 3/4" x 3 3/4"
Layer 4- is spellbinders frame, & CC frame, and oval
 
The Project Bin - Haunt It! Collection for my stamped image. I used different StampinUp! Markers to color the wording.

Ribbon is from Really Reasonable Ribbon, and the one is the Shimmer Satin Light Orchid, this is one of my many favorites. Next I used the Polka dot Grosgrain, also from RRR.
 

Design paper is from American Crafts Pumpkin Patch, and Haunted Hollow. I was lucky enough to pick up these packs of 25 sheets each for 1.20 for the entire pack!
Embellishments- I used green gems, and ribbon for my embellishments. Also 2 shoes are CC dies. StampinUP! markers to color my stamped image.

Challenges:
Crazy 4 Challenges/Holiday(I chose Halloween)
Craft Dee Bowz challenge/Anything goes with a handmade bow
Jo's Scrap Shack- Use your dies and machines
Art Impression/Too cute to spook
My video below!

Monday, August 1, 2016

YOU bring out the silly in me.

 Hello everyone, Today's card was created for The Project Bin using the beautiful sentiment from the The Fun is Good collection.

The Project Bin Sentiment- Fun is Good Sentiment was Stamped in black ink and then airbrushed using copics in blue, purple,pink, and green.

justRite Papercraft flowers-Floral Trio Two dies were cut using dp, then dusted, and then I did my favorite technique "Glass Flower".
Leaves-Really Reasonable Ribbon
Ribbon-Really Reasonable Ribbon delicate Stitched
Pearls- vintage beads
Frames -Spellbinders
Dots- white gel pen
I love the design paper, its an OLD one from one of my older stacks, and love the different combinations of purple,blue,yellow, pink and green.

Ribbons are one of my many favorite from Really Reasonable Ribbon its the Delicate Stitched Satin Ribbon, and you can find it here!
Thank you for looking and have a lovely day!
hugs to all,
Cheryl

Monday, July 18, 2016

I remembered your BIRTHDAY

Hello everyone and Happy Monday to all!
Today's card was designed for The Project Bin using another super sweet stamp set called "Born Yesterday"! LOVE all the sentiments in this set! Below I have listed all products used to create my card :)
Card Measures 5" x 5"
Stamp is from The Project Bin Stamps- Born Yesterday set and stamped in StampinUp! Pacific Point ink.
Pebbles Birthday wishes is what was used for the Design Paper on my card today. I also used dark grey card stock , and then a pink from American Crafts.

Ribbon - is vintage seam binding, and is 3 different colored in one.
Flowers- are from Really Reasonable Ribbon, and so are the foam squares I used.
Dies-  I used for the fancy one JustRite Papercrafts Damask Flourish One die, and then 2 spellbinders

The sentiment on this one is super cute, as it says " I REMEMBERED Your BIRTHDAY  without looking on Facebook!" hhahahahahaha

I hope you enjoyed my post for today! Thank you for stopping by!
hugs to all,
Cheryl

Monday, June 13, 2016

Really Reasonable Ribbon June Hop


 Welcome to "Really Reasonable Ribbon's" JUNE Blog Hop!
 
If you arrived here from Jennifer's Blog, you are on the right track. If not , you will want to head back to the Really Reasonable Ribbon Blog that way you don't miss out on any of the FABULOUS Designs from the Design Team today!
This months assortment is PERFECT for Summer! Isn't this a fabulous assortment!! 
 
 This assortment contains 9 fun ribbon styles and a total of 18 yards of ribbon. Not a member yet? JOIN TODAY and begin with this June assortment. What a fun way to build your ribbon stash and try new ribbon styles.
 
 
So for today I created a card using the Beautiful YELLOW ribbon you see 2nd from the left. Its BEAUTIFUL!!! I made a BIG YELLOW bow for this beauty!
I used Crate Paper "Open Book" paper pad to design this card. Next I chose some Spellbinders dies, and then stamps from I Brake For Stamps. I chose the Happy Birthday( you can SAVE 10% using coupon code SAVE10CHERYL), stamped in Memento black ink, and then the rose(Floral Plate 1), stamped 2 times ink black, then colored with yellows, and green SU! pens. I lastly added some stickles to the roses.
 
The sketch for my card I did a little different, I was playing around with different layouts today, and chose to do something fun :)
 
The pieces that I used for the 4 corners are from Pizzazz Aplenty, not sure if they are still around or not, as this was sent to me several years back. these are blue with silver rim, however I flipped them over to use the side that matches the dp I used today :)

Your NEXT stop for today's hop is Bonnie's Wonderful Blog!!!

Hugs to all,
Cheryl

Monday, June 6, 2016

Beauty begins.....

THE MOMENT YOU DECIDE to be YOURSELF!
 

 Awwww LOVE this sentiment as its so true!!! Love being myself, and would never want to pretend to be something other than just that! This sentiment is one of the Many Beautiful sentiments from The Project Bin!!! I LOVE everyone of their stamps, as they are so unique and beautiful!

 Lately I have been trying to work with some different color combo's and some have colors I really don't work with often, like Orange. hehehehe. Its one of my least favorite colors to work with, but im finding that when I challenge myself to use these colors like YELLOW, I am happy with the results. And this color combo works well. I took the colors from the design paper. it has a maroon , red,orange, and green in it. It does have my favorite color in it as well (PINK) but I did not use that color in my colors for today.

The sentiment I used today came from the Project Bin's "Wise Women" set. I stamped it in CTMH Pansy Purple on white card stock, then cut that out with a spellbinders frame die(airbrushed it),next i stamped the sentiment again on another piece of white card stock in SU! Riding Hood Red ink, I cut the banner "Yourself" out and popped it up on the main sentiment area. The fancy  Beautiful frame behind the sentiment is from JustRite Papercraft and is called Heart & Frame Dies 05016 and was cut out in white!
Design paper is from American Crafts!
Ribbon is from RRR and is the Satin ribbon with grosgrain edge.
Thank you for looking and have a lovely Sunday!
hugs to all,
Cheryl

For more inspiration from the Project Bin DT, please visit us here!

Tuesday, May 31, 2016

Sweet Beautiful Poppies!


Hello everyone and Happy Tuesday to all! Super EXCITED to be playing along in this weeks challenges!!! Todays card was created using the Beautiful POPPIES Stamp from I Brake For Stamps NEW Release! You can find that release here.
This Beauty was designed for I Brake For Stamps & Splitcoaststampers Color Challenge! LOVE todays colors, they are a red, green, and a gold! All of which I have here :)

Card Base- 6 x 12 Cream scored at 6"
Layer 1- black 5 1/2" x 5 1/2" , Cream 5 1/4" x 5 1/4" ,
Layer 2-  Black 4 1/2" x 4 1/2" Polka dots 4 1/4" x 4 1/4"
Layer 3- Balck 3 3/4" x 3 3/4" , floral 3 1/2" x 3 1/2"
Layer 4- Large spellbinder oval, and then black scalloped oval.
Poppies(I Brake For Stamps) using copics R59,R46,R39,R35 these are all shades of REDS. Next for the GREENS I used G99,G94, YG95. For the centers of the Poppies I added little bits of glue then put some gold glitter on those.
Embellishments- Ribbon is satin from Really Reasonable Ribbon. Button is an old one from my stash , and lastly I added some red half back pearls.

It was nice to be able to play along in some challenges this week so far, and I really enjoyed creating my card for today!
Challenges-
Splitcoaststamper /Color challenge
Die Cuttin Diva's /Anything goes with diecuts
Craft-Dee Bowz/Anything goes with a handmade bow
Crafty Ribbons/Flower challenge
Card and Scrap /Flowers Challenge
Thank you for looking and LOVE to hear what you think of my card for today!!
Hugs to all,
Cheryl

Wednesday, May 18, 2016

Blackberry Dream

 Hello and Happy Wednesday to all! My card for today was designed using I Brake For Stamps Beautiful Blackberry stamp. I have to say I LOVE this stamp & I LOVE Berries!!! hehehehe
I really enjoyed coloring up this beautiful image of berries and flowers! Love this stamp!!!
 
Card measures 6 x 6
Card base is cut 6" x 12" and scored at 6"


Layers-
black 5 1/2" x 5 1/2" then green design paper is 5 1/4" x 5 1/4", next is 4 3/4" x 4 3/4" black then fruit dp is 4 1/2" x 4 1/2",
next layer is 3 3/4" x 4" black, then dp is 3 1/2" x 3 3/4", then add sewing
Design paper is freshly picked stack


Image i used Blackberries and stamped in memento black ink, then colored with copic markers G24,G99,G28, R59,R39, and YR31 I cut with an oval, and then distressed the inside using antique linen. The fancy frame is spellbinders and I added white gel dots around it, plus all the other layers.

Embellished with Really Reasonable Ribbon's  Gingham 3/8"Moss Green and cream Ribbon, then dew drops in green


Challenges:
Glitter N Sparkle/Ribbon or lace 
Artistic Inspiration/use a die cut
The Crazy Challenge/3 layers or more
To see I Brake for Stamps Deal of the Week , please click on the badge below! have fun!!
http://ibrakeforstamps.com/dealoftheweek.aspx
To SAVE 10% use Coupon Code "SAVE10CHERYL" out checkout! Have fun!!!
Thank you for looking and have a lovely day!
hugs to all,