Friday, October 28, 2016

Christ the Lord

 Hello everyone and Happy Friday to all!
Todays card was created for Club Scrap & The Project Bin! I also created my card for a few challenges, and the main challenge is Splitcoaststampers WT challenge(way to use it challenge) and that was to use Ribbon!!! Most of you know that I LOVE Ribbon and own a TON of it.... hehehe I really don't think I will ever run out of ribbon, as I have way too much of it! :)

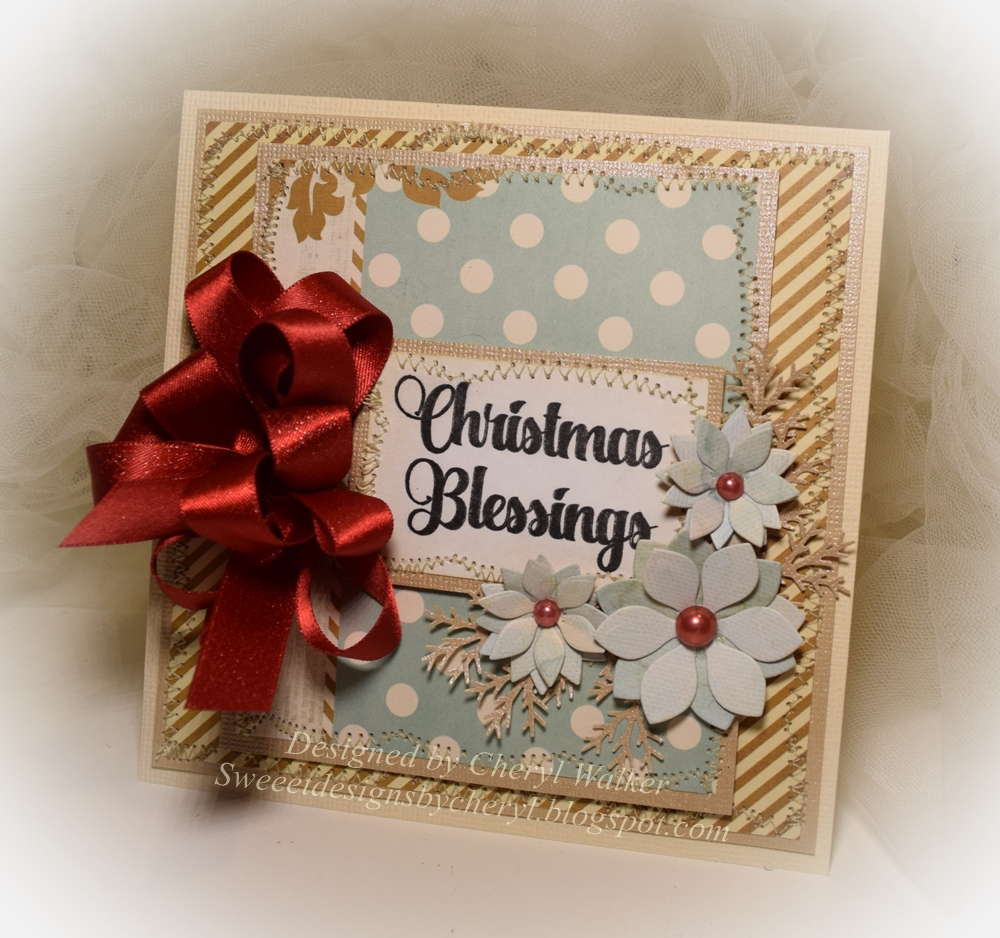
So for my card today I used Club Scraps Literature Deluxe Club Kit to create my card. The ribbon you see is also from this kit as well. I chose to use the Cream Card Stock, Brown Card Stock and the design paper you see(all in the kit), I did add sewing in a cream color as well.

The sentiment I used is from The Project Bin. Its from the "Luke 2" stamp set. It was stamped in Frayed Burlap several times to get the desired look.

Flowers were created using Cheery Lynn Tea Rose Small Die. I did add in the Gold glitter paper.
Challenges:
Splitcoaststampers way to use it challenge
 

Thank you for looking and have a lovely day!
Hugs to all,
Cheryl

For more inspiration from the Club Scrap Design Team, please visit the blog here!

Thursday, October 27, 2016

Love , Peace , Joy

 Hello everyone, and Happy Wednesday to all! Today I have a card created for I Brake For Stamps using this beautiful sentiment called "Love ,Peace , Joy" I love how fancy the writing is on this stamp, he script is absolutely gorgeous!
 I stamped my Beautiful sentiment image LOVE PEACE JOY in tim holtz distressed ink Black Soot, using the Mini Misti tool. I can stress enough how easy and fun this makes stamping. I always get a nice dark image this way. I normally have un-mounted rubber, so this makes it so easy to do. Just had to share :)

The papers I used are from the DCWV Tis the Season Stack, this stack is huge and has tons of patterns in it, I have had this for a long time now. the fancy edge layer is a punch around the page, and then the frame at the top and bottom of the sentiment is a cut die piece that I had laying around :) I just cut it in half. I added sewing in pink, pink flowers cut from the same coordinating dp, and then some blue seam binding. Super fun!!!

Flower Die is Small Tea Rose from Cheery Lynn Designs , and Seam Binding is from Really Reasonable Ribbon
Thank you for looking and hope you have a lovely day!
Hugs to all,
Cheryl
 

Wednesday, October 26, 2016

Club Scrap Literature Blog Hop


Hello everyone and welcome to Club Scraps October blog hop featuring the NEW Literature Kit! If you arrived from Deb's Blog then you are in the right place , if not you will want to start from the beginning at Karen(Club Scrap blog)so you don't miss any of the wonderful inspiration from the Club Scrap Artist Team! There is also a list of the entire line up there for you with links :) Have fun & I hope you enjoy todays Hop!
 My project today is a Literature Layout using all the beautiful design papers/Card Stock, Ribbon, and the tag from the sheet of cut aparts. My layout was super simple to make! I will list how to below! All items are from the Literature kit except my OLD beads, and the flower on the bow.
 Instructions:
1 - 12 x 12 cream sheet of card stock
1 - 12 x 12 sheet of shimmer brown card stock cut to 11 3/4" x 11 3/4"
1 - 12 x 12 design paper sheet cut to 11 1/2" x 11 1/2"
Sew the top 2 layers together, then used ATG gun to attach to the cream layer, so you wont see sewing in the back.

Next I figured out my layout, by adding the 2 photo matt layers to the center of my page. I did NOT glue this down, as I just set it there for a reference on where to place my flowers.

Now cutting flowers. I did use cheery Lynns Judy's Blooms. I cut the red card stock, brown shimmer card stock, and the kraft card stock all in flowers for my page. Next I used the flourish #8 for my flourishes. Everything is distressed using tim holtz distress inks in forest moss(flowers) and for the flourishes. The centers have old beads glut on. I also spritzed my page after it was done with a gold glimmer mist.

Sentiment frame- was cut from one of the cut apart sheets and then distressed using vintage photo. above the tag I added a bow created with the Red Ribbon from the Literature Kit. I did add a fancy flower to the center.
 Now we are ready to figure out where to place all the flowers. I normally will lay them out how I think I like them, and then move them around a bit. I also decided to add 3 above the matt for the photo as I felt it balanced the page out some.

I also cut out my flourishes and added them first by gluing them down. Then added my flowers, and lastly came in with filler leaves/and branches. I glued everything down and let dry. Lastly came in with the Gold Glimmer Mist, and spritzed my flowers and some areas on the page. Dabbed it dry with a towel.

 I really enjoyed creating my layout for todays hop!! :) Your next stop on the HOP is Josette's Blog! Have fun!!!
Thank you for stopping by and joining us today!
Hugs to all,
Cheryl

Monday, October 24, 2016

Heart Shaped Candy Tins

 Hello everyone,
Today's Heart shaped candy tins were made for a Doll Conference & for Really Reasonable Ribbon. I made these last month to take to Montana to give to the peeps at our table, and used all the Beautiful supplies from Really Reasonable Ribbon. LOVE all the new embellishments, and you can find those here. I also used Sweetheart Blossoms, and Ribbons :)

I made 8 Pink tins -
using the Delicate Stitched Pearl Pink Satin Ribbon I also used some tulle, and then 3 different colors of Seam binding. All can be found here at RRR . I also used some of the sweetheart Blossoms and those can be found here. I also used some of Really Reasonable Ribbons NEW Embellishments- Flower Shaped Flatback Pearls , 11mm Pearl Daisy Flower Beads , Resin Flowers with Rhinestones. . I also used some of the new Leaves :)


Blue Tin-
I used the same flowers, and embellishments as listed above, the only difference is, I used blue and white. Now for the Ribbon I chose the Shimmer Satin in Blue Topaz, for my bow.

I really had so much fun making these, and they are all a little different in layout. The Heart shaped tins I have had for years! I picked up a bunch of these at Big Lots and knew one day they would come in handy!


Thank you for looking an have a lovely day!
hugs to all,
Cheryl

Friday, October 21, 2016

Poinsettia Christmas wishes

 Hello everyone and Happy Friday to you all!
Today I have a card created for Really Reasonable Ribbon's "Orange You glad its Autumn Challenge" & The Project Bin using the beautiful Luke 2 sentiment.
 On my card I used the Beautiful sentiment from The Project Bin, it was stamped in a distress inke on white card stock and then distressed.

The Ribbon I used is the beautiful Shimmer satin rust from Really Reasonable Ribbon and it makes a beautiful bow. The flower is the Poinsettia from Cheery Lynn and LOVE this die, its so pretty and easy to use! The center piece is a cabachon from RRR, these are absolutely gorgeous!!! Branches are Martha stewart and cut using graphic45 design paper from the same collection.
Thank you for looking and have a wonderful weekend!!
hugs to all
Cheryl

Wednesday, October 19, 2016

Club Scrap October Artist Team Challenge

 Hello everyone, and welcome to Club Scraps October Artist Team Challenge! This month our challenge was to create something to give as a gift. I chose to do one of my Post-it Easel Notepads, these are so fun to give, and the recipient always seems to LOVE these.

Now you should have arrived from Lilian's Blog , however if you did not come from there, you might want to start at the beginning with Karen's Club Scrap blog that way you wont miss anything. All design paper, card stock, Stamps, and Ribbon used are from The Club Scrap Literature Kit.
 So for my Post -it notepad, I used the cricut to cut out the 2 card bases, then made an easel card out of both of them. Next I decorated the top part using the card stock, and design papers from the kit. They are popped up using foam tabs. I did distressing with Tim Holtz Distress inks.

Sentiments- I stamped them in distress ink, these are also the Literature Greeting stamps

Flowers were cut using the beautiful card stock shimmer that is in the kit. I LOVE all the design papers and colors in this months collection, they are absolutely Gorgeous!! I did use Cheery Lynn Medium Rose die to cut the flowers, and the centers are glitter brads

Ribbons- I chose to use the beautiful Plaid brown print, and the cream and red ribbons that came in the Literature Kit. LOVE them.

Leaves- these are moss green leave trim from RRR, I just hot glued it around the flowers.

Post - It is from my stash, as I keep plenty of these on hand :)
Thank you so much for joining us and stopping by!!!
Your NEXT stop is Kelly's Blog!

Hope you enjoyed todays hop!
Hugs to all,
Cheryl

Tuesday, October 18, 2016

My Heart is and Always will be , YOURS

Good morning crafty friends!
Today's card was created for Club Scrap & Really Reasonable Ribbon. This months Literature Club Scrap Kit is absolutely Beautiful!!! To see this months kit, please visit Club Scrap here
 
My card was created using the cricut machine and Club scrap design papers, stamps , and card stock. For the card base I cut it out using the kraft card stock that comes in the kit(12 x 12). The next layer is the beautiful Bronze colored card stock(12 x 12) cut with the cricut. The scalloped layer(cut with spellbinders) is one of the 12 x 12 prints. I left the flower for you to see, as I LOVE this design paper its so sweet!!!
 
My sentiment was stamped using the Club Scrap Literature UM stamp. I stamped it in black soo and on the same dp as the flower dp I used. I then layered it on the Bronze card stock and cut it out. The corners were cut using the circle punch. Everything was distressed using the Vintage Photo distress ink.
 
Flowers were cut using Cheery Lynn Tea Rose Small. I all of them out using Red card stock from the Club Kit, and then the Bronze.


Leaves, and embellishments are from Really Reasonable Ribbon

Thank you for looking and have a lovely day!
hugs to all,
Cheryl

Monday, October 17, 2016

Christmas

 Hello everyone,
Today's card is for The Project Bin using another Beautiful Sentiment from the "Luke 2" stamp set.
I am loving creating all my Christmas cards this year. Its so much fun to think of some different color schemes and layouts. Of course I always have my go to sketch :) hehehe but sometimes I do try to think of some others :)

So for my card today, I chose to use the Sentiment from Luke 2, and stamped it in Tim Holtz Black Soot, using the Mini Misti tool. Love the results from using this tool. Next I chose to use Cheery Lynn's Poinsettia Strip, and wow how these flowers just POP! For the centers I used brads from AC, and  I also used Really Reasonable Ribbons Wild Orchid Craft Bead Berry Spray Clusters. for layering. The branches are Martha Stewart Punch. I used also Graphic45 Christmas Past Collection. I also used American Crafts Black card stock, and added some white gel dots around each layer.
 
Card Base Measures 5 1/2" x 5 1/2"
Layer 1- black card stock cut at 5 1/4" x 5 1/4", then stripes cut at 5" x 5"
Layer 2- black cut at 4 1/4"  4 1/4", then leaf design cut at4" x 4"
Layer 3 - black cut at 4 1/2" x 3 1/4" , then the snowflake design cut at 4 1/4" x 3"
Layer 4- is spellbinders oval dies, cut black card stock, and then for the oval I used the graphic45 coordinating design paper. I did stamp on it in Black Soot ink.
Layer 5- consist of Cheery Lyn Poinsettia's, Martha Stewart Branches, RRR Berry clusters, and red glitter brads.
 
 Thank you for looking and have a lovely day!
hugs to all,
Cheryl

Saturday, October 15, 2016

Glory to God

 Hello everyone, and Happy Saturday to you all!
Today's card was created for Club Scraps October Technique Challenge(Embossing Challenge )that started this past week over at the Club Scrap Blog. Hope you will join us for some FUN and Inspiration!!! To Join in on the fun, here is the link to the Linky Party! 

 Ok so for my card I did do dry embossing using a plate to emboss each panel on my card. Its hard to see in photo's, so I tried to take an couple of extra's to post. I used the 12 x 12 printed sheet in the Literature Kit(LOVE this kit) , and then backed it with the Brown Card stock in the kit as well. I cant tell you how much I LOVE this card stock and design paper, its the thickest I have ever seen!

Card Measurements 5 1/2" x 5 1/2"
All Card stock and design paper is from the Club Scrap Literature October Kit
Layer 1- Club kit brown cut at 5 1/4" x 5 1/4", then the design paper (literature kit 12 x 12 design paper)cut at 5" x 5"
Layer 2- Brown cut at 4 1/4" x 4 1/4" then the design paper cut at 4" x 4".
Layer 3- Brown cut at 3 1/4" x 3 1/4" , then card stock 3" x 3"
Layer 4-  3 3/4" x 2 1/4" then card stock(Ivory) cut at 3 1/2" x 2" this is the sentiment tag the sentiment was stamped using The Project Bin Stamp set "Luke 2"
 
*All layers are embossed using a embossing plate ,except the brown layers.
 Flowers - Were done using Cheery Lynn Dies , I just cut out the design paper from the ki, and then did the glass flower technique on them. Love the way they look here. They are so beautiful in person , not sure the photos show all the beauty of the paper.

Centers were done using Vintage Glass Gold, then red glitz brads. I added some Punched out Martha stewart branches in gold, brown. Ribbon is Really Reasonable Ribbons Shimmer Satin in Red!
 Thank you for looking and have a lovely day!
hugs to all,
Cheryl

Friday, October 14, 2016

'Tis the Season

Hello everyone, today I have a Christmas card I created for Really Reasonable Ribbon using the Plaid Ribbon Red Bold Checked from this months Ribbon Club Assortment. Love all the beautiful ribbons in this months kit!! I also designed my card for The Project Bin using the Beautiful sentiment from the "Luke 2" Stamp set

So for my card I decided to make 2 big bows using the Plaid ribbon, and then for the centers I used Really Reasonable Ribbons NEW 12mm Silver Glitter Stardust Rhinestones Embellishments, I am absolutely LOVING all the new embellishments that RRR now carries. You can find all these beauties here on the RRR Store.

My card base is as follows:
6" x 12" white , scored at 6" to make a 6" x 6" card base
Layer 1- Blue colored card stock is 51/2" x 5 1/2" , then the red is 5 1/4" x 5 1/4", next the dots design paper is 5"x 5"
Layer 2- blue card stock 4 1/2" x 4 1/2" , then red is 4 1/4" x 4 1/4", then design paper is 4" x 4"
Layer 3- 3 3/4" x 2 3/4" for the red card stock, then the blue is 3 1/2" x 2 1/2", then the dots are 3 1/4" x 2 1/4"
Layer 4- is a JustRite Classy frame & tag die, and stamped on using The Project Bins new Luke 2 stamp set stamped in soot black.

Embellished with 2 big bows, and 2 of the 12mm silver glitter stardust Rhinestones.

 The design paper I used is from DCWV Big "Tis The Season" Stack. I LOVE all the design papers in this stack :)
I hope you enjoyed my post for today! Please let me know what you think, and thank you for stopping by!
Hope you all have a lovely day!
hugs to all,
Cheryl

Thursday, October 13, 2016

Really Reasonable Ribbon Blog Hop/Candy Tins


Welcome to "Really Reasonable Ribbon's" October Blog Hop!
 

If you arrived here from Judy's Blog  you are on the right track. If not , you will want to head back to the Really Reasonable Ribbon Blog that way you don't miss out on any of the FABULOUS Designs from the Design Team today!
 
 I love the selection of ribbons in this months kit. On my Christmas Tins I used 5 of the ribbons on my 6 tins here. These are perfect for holding chocolate to give as little gifts for a table setting, or for giving to neighbors and friends for Christmas. These here will be auctioned off at our Doll Club meeting this Thursday :)
Todays Christmas tins are for holding yummy chocolate or treats.
I used the heart shaped tins from Martha Stewart, and i have had these forever it seems. Not only did I used Really Reasonable Ribbon, but I also used RRR Cherry Blossoms, Embellishments, and Bead Berry Spray Cluster gold. I did also use some of the Really Reasonable Ribbon Green Leaves
Hope you enjoyed my post for today! thank you for stopping by, and PLEASE let me know what you think of my Christmas tins for today :)
Your NEXT stop for today's hop is Bonnie's Wonderful Blog!!!

Hugs to all,
Cheryl

Thursday, October 6, 2016

Christmas Blessings

Hello everyone, and Happy Thursday to all! So today I just had to share this beautiful Christmas sentiment that I used on my card from the NEWLY released stamp set called "Luke 2" from The Project Bin! Awww I just LOVE designing Christmas cards, they are so much fun! Cant wait to share some more with you all soon. :)
So on this card I kept the sentiment simple , by just stamping it in Distressed ink Black Soot. Love that using the Mini Misti tool helps to get that perfect look on your sentiments. Omgosh this is the best tool ever for stamping! I love how if you missed an area, you can just stamp directly over it again and again, or if you want a deeper darker look, the same applies. Ok so enough about the mini misti and on to my card for today

Card base-
 ream card stock cut at 5 1/2" x 11"  and then scored at 5 1/2" to create my card base.
Layer 1- 5 1/4" x 5 1/4" bazzill then dp is 5" x 5"
Layer 2-  4 3/4" x 4" then design paper is 4 1/2" x 3 3/4"
Layer 3- 2 3/4" x 1 3/4" for the card stock, then design paper is 2 1/2" x 1 1/2" sentiment stamped in Black Soot using the Mini Misti tool(LOVE THIS)
Layer 4- flowers from JustRite Papercraft, and the branches are from Martha Stewart. I used the glue gun to take those down to the card, then the flowers were put together using a liquid glue.

BOW- the big bow was made using Really Reasonable Ribbon Shimmer Satin, and is 2 bows placed on top of each other.
Supplies-
The Project Bin Luke 2 sentiment
Really Reasonable Ribbon Foam Tabs
Pink Paislee Snow Village for design paper
Scotch Glue (liquid)
Sewing
JustRite Floral Trio Two die
Half backed pearls Red
Really Reasonable Ribbon Shimmer Satin

Challenges :
Crafty Halzelnuts Christmas Challenge
Sweet Stampin Christmas/Christmas die cuts( my flowers for poinsettias)
Crafty Gal Corner/Punches and die cuts
Craft Rocket Challenge/Ribbon and or lace
Thank you so much for stopping by and looking! Please let me know what you think of my card for today!
Hugs to all,
Cheryl

Wednesday, October 5, 2016

Polar Pals

Hello everyone, Happy Wednesday to all! Today I wanted to share a Christmas card I created for I Brake For Stamps using the darling stamp called "Polar Pals" found in the Christmas section here. I LOVE Christmas and IBFS has TONS of beautiful Christmas stamps to choose from.

I stamped my Polar Pals stamped image in Tim Holtz Distress Black Soot, and then colored with copic markers. I also had to add some stickles to the wings, hat, star , and the bunny cottontail.
I did add some sewing to the 3 layers on my card for today, and to embellish, I used some gems, Really Reasonable Ribbon's cherry blossom, punched branches(Martha Stewart), and then 3/4" Chevron Striped Twill in red ribbon for my bow.
 
The design paper I used is American Crafts , I've had this pack for about 2 years and finally used it :) I do have single sheets too, and used some of them over time.
 
Challenges :
Creative Moments/Anything goes with 2 design papers
A Snowflake Promise/Anything goes with a twist of season
Craft-Dee Bowz/Anything goes with a handmade bow
Critters and Creatures/ anything with a critter or creature on it
Get Creative Challenges/Stitching
Thank you for looking and have a lovely day!
hugs to all,
Cheryl