Tuesday, October 18, 2016

My Heart is and Always will be , YOURS

Good morning crafty friends!
Today's card was created for Club Scrap & Really Reasonable Ribbon. This months Literature Club Scrap Kit is absolutely Beautiful!!! To see this months kit, please visit Club Scrap here! 
 
My card was created using the cricut machine and Club scrap design papers, stamps , and card stock. For the card base I cut it out using the kraft card stock that comes in the kit(12 x 12). The next layer is the beautiful Bronze colored card stock(12 x 12) cut with the cricut. The scalloped layer(cut with spellbinders) is one of the 12 x 12 prints. I left the flower for you to see, as I LOVE this design paper its so sweet!!!
 
My sentiment was stamped using the Club Scrap Literature UM stamp. I stamped it in black soo and on the same dp as the flower dp I used. I then layered it on the Bronze card stock and cut it out. The corners were cut using the circle punch. Everything was distressed using the Vintage Photo distress ink.
 
Flowers were cut using Cheery Lynn Tea Rose Small. I all of them out using Red card stock from the Club Kit, and then the Bronze.


Leaves, and embellishments are from Really Reasonable Ribbon

Thank you for looking and have a lovely day!
hugs to all,
Cheryl

Monday, October 17, 2016

Christmas

 Hello everyone,
Today's card is for The Project Bin using another Beautiful Sentiment from the "Luke 2" stamp set.
I am loving creating all my Christmas cards this year. Its so much fun to think of some different color schemes and layouts. Of course I always have my go to sketch :) hehehe but sometimes I do try to think of some others :)

So for my card today, I chose to use the Sentiment from Luke 2, and stamped it in Tim Holtz Black Soot, using the Mini Misti tool. Love the results from using this tool. Next I chose to use Cheery Lynn's Poinsettia Strip, and wow how these flowers just POP! For the centers I used brads from AC, and  I also used Really Reasonable Ribbons Wild Orchid Craft Bead Berry Spray Clusters. for layering. The branches are Martha Stewart Punch. I used also Graphic45 Christmas Past Collection. I also used American Crafts Black card stock, and added some white gel dots around each layer.
 
Card Base Measures 5 1/2" x 5 1/2"
Layer 1- black card stock cut at 5 1/4" x 5 1/4", then stripes cut at 5" x 5"
Layer 2- black cut at 4 1/4"  4 1/4", then leaf design cut at4" x 4"
Layer 3 - black cut at 4 1/2" x 3 1/4" , then the snowflake design cut at 4 1/4" x 3"
Layer 4- is spellbinders oval dies, cut black card stock, and then for the oval I used the graphic45 coordinating design paper. I did stamp on it in Black Soot ink.
Layer 5- consist of Cheery Lyn Poinsettia's, Martha Stewart Branches, RRR Berry clusters, and red glitter brads.
 
 Thank you for looking and have a lovely day!
hugs to all,
Cheryl

Saturday, October 15, 2016

Glory to God

 Hello everyone, and Happy Saturday to you all!
Today's card was created for Club Scraps October Technique Challenge(Embossing Challenge )that started this past week over at the Club Scrap Blog. Hope you will join us for some FUN and Inspiration!!! To Join in on the fun, here is the link to the Linky Party! 

 Ok so for my card I did do dry embossing using a plate to emboss each panel on my card. Its hard to see in photo's, so I tried to take an couple of extra's to post. I used the 12 x 12 printed sheet in the Literature Kit(LOVE this kit) , and then backed it with the Brown Card stock in the kit as well. I cant tell you how much I LOVE this card stock and design paper, its the thickest I have ever seen!

Card Measurements 5 1/2" x 5 1/2"
All Card stock and design paper is from the Club Scrap Literature October Kit
Layer 1- Club kit brown cut at 5 1/4" x 5 1/4", then the design paper (literature kit 12 x 12 design paper)cut at 5" x 5"
Layer 2- Brown cut at 4 1/4" x 4 1/4" then the design paper cut at 4" x 4".
Layer 3- Brown cut at 3 1/4" x 3 1/4" , then card stock 3" x 3"
Layer 4-  3 3/4" x 2 1/4" then card stock(Ivory) cut at 3 1/2" x 2" this is the sentiment tag the sentiment was stamped using The Project Bin Stamp set "Luke 2"
 
*All layers are embossed using a embossing plate ,except the brown layers.
 Flowers - Were done using Cheery Lynn Dies , I just cut out the design paper from the ki, and then did the glass flower technique on them. Love the way they look here. They are so beautiful in person , not sure the photos show all the beauty of the paper.

Centers were done using Vintage Glass Gold, then red glitz brads. I added some Punched out Martha stewart branches in gold, brown. Ribbon is Really Reasonable Ribbons Shimmer Satin in Red!
 Thank you for looking and have a lovely day!
hugs to all,
Cheryl

Friday, October 14, 2016

'Tis the Season

Hello everyone, today I have a Christmas card I created for Really Reasonable Ribbon using the Plaid Ribbon Red Bold Checked from this months Ribbon Club Assortment. Love all the beautiful ribbons in this months kit!! I also designed my card for The Project Bin using the Beautiful sentiment from the "Luke 2" Stamp set

So for my card I decided to make 2 big bows using the Plaid ribbon, and then for the centers I used Really Reasonable Ribbons NEW 12mm Silver Glitter Stardust Rhinestones Embellishments, I am absolutely LOVING all the new embellishments that RRR now carries. You can find all these beauties here on the RRR Store.

My card base is as follows:
6" x 12" white , scored at 6" to make a 6" x 6" card base
Layer 1- Blue colored card stock is 51/2" x 5 1/2" , then the red is 5 1/4" x 5 1/4", next the dots design paper is 5"x 5"
Layer 2- blue card stock 4 1/2" x 4 1/2" , then red is 4 1/4" x 4 1/4", then design paper is 4" x 4"
Layer 3- 3 3/4" x 2 3/4" for the red card stock, then the blue is 3 1/2" x 2 1/2", then the dots are 3 1/4" x 2 1/4"
Layer 4- is a JustRite Classy frame & tag die, and stamped on using The Project Bins new Luke 2 stamp set stamped in soot black.

Embellished with 2 big bows, and 2 of the 12mm silver glitter stardust Rhinestones.

 The design paper I used is from DCWV Big "Tis The Season" Stack. I LOVE all the design papers in this stack :)
I hope you enjoyed my post for today! Please let me know what you think, and thank you for stopping by!
Hope you all have a lovely day!
hugs to all,
Cheryl

Thursday, October 13, 2016

Really Reasonable Ribbon Blog Hop/Candy Tins


Welcome to "Really Reasonable Ribbon's" October Blog Hop!
 

If you arrived here from Judy's Blog  you are on the right track. If not , you will want to head back to the Really Reasonable Ribbon Blog that way you don't miss out on any of the FABULOUS Designs from the Design Team today!
 
 I love the selection of ribbons in this months kit. On my Christmas Tins I used 5 of the ribbons on my 6 tins here. These are perfect for holding chocolate to give as little gifts for a table setting, or for giving to neighbors and friends for Christmas. These here will be auctioned off at our Doll Club meeting this Thursday :)
Todays Christmas tins are for holding yummy chocolate or treats.
I used the heart shaped tins from Martha Stewart, and i have had these forever it seems. Not only did I used Really Reasonable Ribbon, but I also used RRR Cherry Blossoms, Embellishments, and Bead Berry Spray Cluster gold. I did also use some of the Really Reasonable Ribbon Green Leaves
Hope you enjoyed my post for today! thank you for stopping by, and PLEASE let me know what you think of my Christmas tins for today :)
Your NEXT stop for today's hop is Bonnie's Wonderful Blog!!!

Hugs to all,
Cheryl

Thursday, October 6, 2016

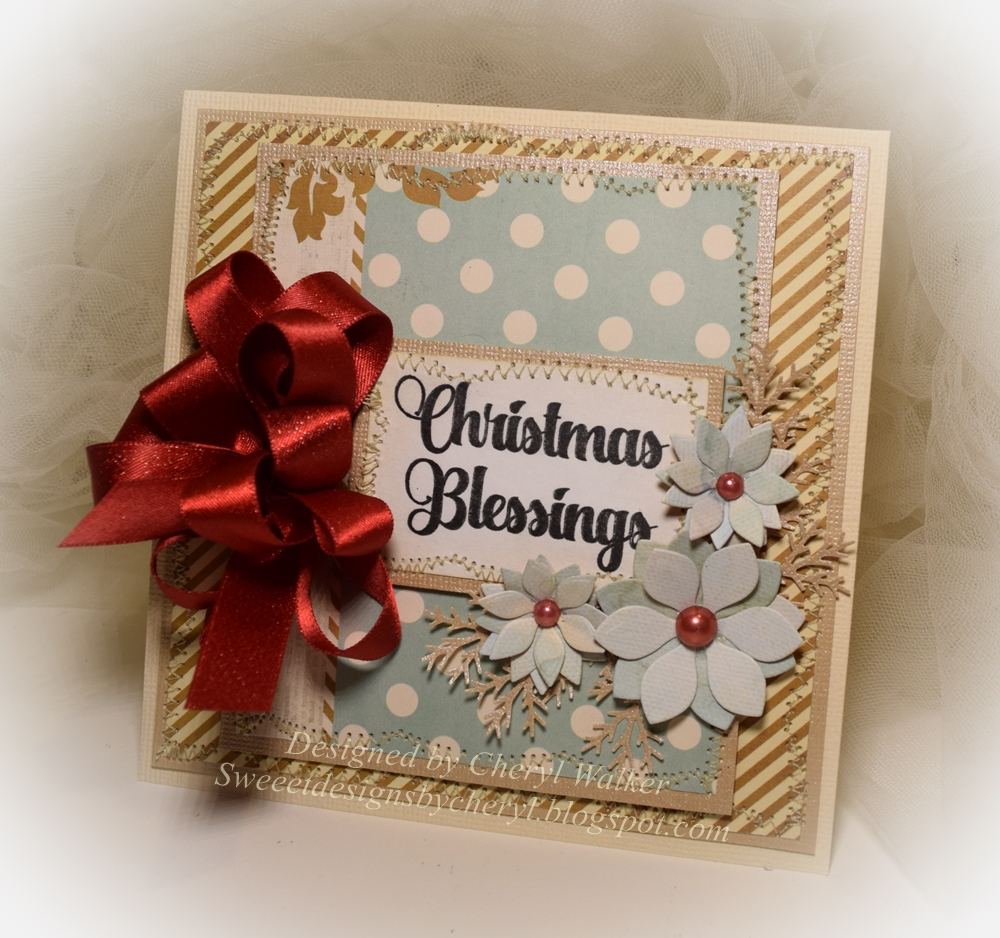
Christmas Blessings

Hello everyone, and Happy Thursday to all! So today I just had to share this beautiful Christmas sentiment that I used on my card from the NEWLY released stamp set called "Luke 2" from The Project Bin! Awww I just LOVE designing Christmas cards, they are so much fun! Cant wait to share some more with you all soon. :)
So on this card I kept the sentiment simple , by just stamping it in Distressed ink Black Soot. Love that using the Mini Misti tool helps to get that perfect look on your sentiments. Omgosh this is the best tool ever for stamping! I love how if you missed an area, you can just stamp directly over it again and again, or if you want a deeper darker look, the same applies. Ok so enough about the mini misti and on to my card for today

Card base-
 ream card stock cut at 5 1/2" x 11"  and then scored at 5 1/2" to create my card base.
Layer 1- 5 1/4" x 5 1/4" bazzill then dp is 5" x 5"
Layer 2-  4 3/4" x 4" then design paper is 4 1/2" x 3 3/4"
Layer 3- 2 3/4" x 1 3/4" for the card stock, then design paper is 2 1/2" x 1 1/2" sentiment stamped in Black Soot using the Mini Misti tool(LOVE THIS)
Layer 4- flowers from JustRite Papercraft, and the branches are from Martha Stewart. I used the glue gun to take those down to the card, then the flowers were put together using a liquid glue.

BOW- the big bow was made using Really Reasonable Ribbon Shimmer Satin, and is 2 bows placed on top of each other.
Supplies-
The Project Bin Luke 2 sentiment
Really Reasonable Ribbon Foam Tabs
Pink Paislee Snow Village for design paper
Scotch Glue (liquid)
Sewing
JustRite Floral Trio Two die
Half backed pearls Red
Really Reasonable Ribbon Shimmer Satin

Challenges :
Crafty Halzelnuts Christmas Challenge
Sweet Stampin Christmas/Christmas die cuts( my flowers for poinsettias)
Crafty Gal Corner/Punches and die cuts
Craft Rocket Challenge/Ribbon and or lace
Thank you so much for stopping by and looking! Please let me know what you think of my card for today!
Hugs to all,
Cheryl

Wednesday, October 5, 2016

Polar Pals

Hello everyone, Happy Wednesday to all! Today I wanted to share a Christmas card I created for I Brake For Stamps using the darling stamp called "Polar Pals" found in the Christmas section here. I LOVE Christmas and IBFS has TONS of beautiful Christmas stamps to choose from.

I stamped my Polar Pals stamped image in Tim Holtz Distress Black Soot, and then colored with copic markers. I also had to add some stickles to the wings, hat, star , and the bunny cottontail.
I did add some sewing to the 3 layers on my card for today, and to embellish, I used some gems, Really Reasonable Ribbon's cherry blossom, punched branches(Martha Stewart), and then 3/4" Chevron Striped Twill in red ribbon for my bow.
 
The design paper I used is American Crafts , I've had this pack for about 2 years and finally used it :) I do have single sheets too, and used some of them over time.
 
Challenges :
Creative Moments/Anything goes with 2 design papers
A Snowflake Promise/Anything goes with a twist of season
Craft-Dee Bowz/Anything goes with a handmade bow
Critters and Creatures/ anything with a critter or creature on it
Get Creative Challenges/Stitching
Thank you for looking and have a lovely day!
hugs to all,
Cheryl

Monday, October 3, 2016

Christmas Window of Wishes

 Hello everyone, super excited to be sharing another Christmas card made for JustRite Papercrafts & Really Reasonable Ribbon. For my card today I used several dies and stamps from JustRite, and then beautiful Gingham Ribbon and Twine from RRR.

I made the window on my card by using 2 dies, and love the way it turned out. The paper also works perfect with this window, as it looks like a curtain and love the little gingerbread men. hehehehe

Card Instructions-
Card measures white 6 x 12 scored at 6 for a 6"x 6" card base.
Layer 1- blue bazzill bling card stock was cut at 5 3/4" x 5 3/4" then the brown design paper from American Crafts was cut at 5 1/2" x 5 1/2". Next I added more design paper to this layer and its the blue polka dots, it measures 5"x 5"
Layer 2-  4 1/4" x 4 1/4" brown, next is blue 4" x 4", then the design paper with the gingerbread men is cut at 3 3/4" x 3 3/4"
Layer 3 (Window)- is created using the JustRite Die called Four In a Square Dies. I then used JustRite Hope Oval Frame and cut the sides to create the top and bottom ornate window toppers. All cut in brown card stock. I also stamped right on the design paper Merry Christmas using the sentiment from the JustRite Nativity Sentiments.

Flower layers- JustRite Floral Trio Two Dies (1,2,3 were used to create these),these were easy as I have a bag of them cut up using this random card stock I got for super cheap. so I keep them to color, however these are left plain. NOTHING done on them...hehehe now that is a first for me :) I did add a brown pearl to each center.

Bow Treatment- Really Reasonable Ribbon Gingham in Red, also used the bakers twine, and Foam Tabs to pop up my layers here.

Tiny Ornament tag was cut using JustRite Papercrafts Snowflake and Tag Dies. I cut it out with the coordinating design paper, and then stamped the sentiment and holly from these sets (Holly berry from JustRite Inside and Outside Christmas Sentiments), and then the Joyeux Noel is from the Small Oval Christmas Tidings stamp set. These are both newly released, and I LOVE all the sentiments in both of these sets.
Supplies Used:
JustRite Papercraft CR-05097 Inside and Outside Christmas Sentiments
JustRite Papercraft CR-05098 Small Oval Christmas Tidings
JustRite Papercraft CR- 05103 Nativity Sentiments
JustRite Papercraft DIE- 05001 Snowflake and Tag Dies
JustRite Papercraft DIE-05048 Hope Oval Frame Die(ornate piecing for top of window)
JustRite Papercraft DIE-05034 Four In a Square Dies(for window pane)
JustRite Papercraft DIE-05023 Floral Trio Two Dies(for flowers I used #1,#2 , #3)
Really Reasonable Ribbon bakers twine
Really Reasonable Ribbon 3/8" red gingham
Really Reasonable Ribbon brown leaves
Really Reasonable Ribbon Foam tabs
DCWV Tis The Season Stack

 Here is a close-up of the tag and bow I colored the holly and berries with copics R59 for the red, and then for the greens I used YG95, and YG13

Challenges:
Crafty Hazelnuts Challenge/Vintage or anything goes Christmas
My Sheri Craft/Christmas card with 3 dimensional embellishments(my flowers)
Polkadoodles /anything goes challenge
Crafty Hazelnuts Christmas Challenge/ anything Christmas

I really had a lot of fun creating this fun Window of Christmas wishes! Hope you enjoyed my post for today, please let me know what you think!
hugs to all,
Cheryl

Friday, September 30, 2016

Super EXCITING News & Garden Delight LO/ Card


Hello everyone and Happy Friday to you all!!
Today I have some SUPER EXCITING News to share with you all, I am now part of the Club Scrap Artist Team, and so excited to be designing for this AWESOME company! They have the most beautiful design paper , and the thickness is just awesome! I LOVE all the sweet embellishments and goodies you receive in their kits, I absolutely LOVE their kits, and cant tell you how excited I am to now be designing with them!!! whooooohoooo!!! :) You can see both of my projects here on the Club Scrap Blog.
 
Everything you see on my pages here was designed using their September Club Kit called "Garden Shed Deluxe Kit" . I did use some dies to cut out all flowers using again their beautiful design paper. I submitted this 2 page layout and a card for the final round :)
All details are listed below on my 2 page layout. 
 
 
 Garden Delight 2 page LayoutPage 1 & 2
green 12 x 12 card stock
Yellow 11 3/4" x 11 3/4"
Design paper 11 1/2" x 11 1/2" I then added sewing.
Page 1 & 2 - Photo matte measures 6 1/4" x 4 1/4" for the green, the yellow is 6" x 4" , and then the design paper is 3 3/4" x 5 3/4"
 
I cut the printed cut a part sheet to get my banners for the left hand corner on page 1, and then the right corner on page 2. I then took scissors to distress the edges, I also used an antique linen ink to distress over the edges.  All the flowers were cut out with dies using the 8 1/2" x 11" design paper sheets. I also fussy cut the bee's and butterfly. I then did my favorite technique the Glass flower technique that I use on most of my flowers. This was done using clear embossing powder and NO inks or paints. That way you can see the beautiful prints on each of the flowers. I do have video's on the glass flower technique on my blog. The branches were cut using a paper punch and your  pale green card stock. I did add different size pearls to the centers of all my flowers. 

The sweet plant stakes I loved working with. I used the stencil and airbrushed the LOVE & BLOOM on them with copic markers and my airbrushing system. For the
"LOVE Stake" I stamped the Garden Freshness stamp on white card stock and then colored it in, and punched it out using a circle punch. The edged of the circle were airbrushed.  I thought the little bee would look cute with some clear glitter stickles on his wings. I then cut out the printed green card stock and popped the sentiment on top of that. Lastly I attached the sentiment tag to the plant stake. The bee at the top of page 1  was fussy cut and then I added some glitz to his wings. The bee that is on the flower on page 2 was also fussy cut and I used the glass technique on it and the butterfly. The charms in this set are too sweet so I added the watering can charm to page 1, and then the garden shovel to page 2. I LOVE the buttons and added 1 to that page as well. Lastly I had to add some of the beautiful ribbon to my page, and did so behind the clusters of flowers.


Supplies Used on layouts:
3 green photo mattes
3 yellow photo mattes
2 8 1/2" x 11 printed papers for the photo mattes
green card stock for leaves
Printed green card stock for scalloped circle
butterfly and snail cut out from one of the printed sheets
4 12 x 12 colored card stock sheets
2 12" x 12" printed papers for layouts
printed papers for 44 flowers
1 cut a part printed sheet
all cream colored ribbon
2 charms
1 button, and piece of fiber through it
2 garden stakes
stencil sheet
Stamp
Copic markers
half backed pearls
sewing in yellow thread
Tim holtz distress ink in antique linen
stickles , clear embossing powder, heat gun, glue gun, scissors, cutter, sewing machine,
punches, and flower die
I want to thank you for stopping by, and please let me know what you think of my layouts :)
Hugs to all
Cheryl

Thursday, September 29, 2016

Celebrate Christmas

Hello everyone, and Happy Thursday to you all!
Lately I have been busy in my craft room creating Christmas cards and spending many hours just having fun. Here is one I created for JustRite Papercraft using their beautiful Dies and Stamps! I also used some OLD Creative Imaginations design paper I've had in my stash. LOVE this paper!!!

Today's card was a simple one to make. It consist of 2 layers only, and then the JustRite Layers.
Card Instructions-
Card Base-  5 1/2" x 5 1/2"
Layer 1- bazzill blank check cut at 5 1/4" x 5 1/4" then the dp is cut at 5" x 5"
Layer 2- bazzill blank check cut at 5" x 3 1/4" , then the design paper at 5" x 3" they are then attached together using a small piece of scor-tape then sewing is added in one swoop.

JustRite Layers-
JustRite DIE-05049 Joy Oval Frame dies (using the #1 die)
JustRite DIE-05066 Vintage Labels Eleven Dies(#3 die used)
JustRite Stamps CR-05097 Inside and Outside Christmas Sentiments
JustRite DIE-05023 Floral Trio Two Dies (used the dies # 2 & #3)

Flowers- are done using the Glass technique(Video's found here) with airbrushing, I will have a video on this shortly on the airbrushing and glass technique.
Branches are Martha Stewart punch.
Challenges-
Fab N Funky /Christmas
The Crafty Addicts/anything goes & use pattern paper
A Snowflake Promise/anything goes with seasons(I chose Christmas season)
Creates and Makes/anything goes with using a die(flowers and frame)
Holly Jolly Christmas Challenge/Must be Christmas with a technique( mine is heat embossing for glass flowers) & sewing
Craft Dee Bowz/Anything goes with a handmade bow

I hope you enjoyed my card for today!
Thank you for stopping by!
hugs to all,
Cheryl