Showing posts with label American Crafts. Show all posts

Saturday, June 22, 2024

Patriotic Train 2 page LO using TBD

Hello everyone and Happy Saturday to you all! So I'm stopping by to share another extra post this week. Normally I share all these on my Facebook page called Sweeetdesignsbycheryl, where you can see lots of layouts and other fun projects and videos.

This 2 page was so much fun you guys, I love it! I used the darling 4th of July Patriotic train from Treasureboxdesigns, she has tons of beautiful train svg files. Im slowly collecting them all to use on my pages.


Monday, May 13, 2024

Welcome to Really Reasonable Ribbon May Blog Hop

Welcome to "Really Reasonable Ribbon's May” Blog Hop if you arrived here from Kathy's Blog you are on the right track. If not , you will want to head back to the Really Reasonable Ribbon Blog that way you don't miss out on any of the FABULOUS Designs from the Design Team today! There is going to be lots of Beautiful projects to see using Patriotic Theme for this month, So each DT member will showcase something Patriotic this month.

Be sure to comment on the blog hop post on the RRR Blog for a chance to win a $10 gift certificate to Really Reasonable Ribbon 


My little calendar page for this months hop is a up cycled project that I had done but wanted to redo for todays hop. I Used the beautiful gingham ribbon from RRR , flowers and foam tabs and scar tape. My little bear is from KBD and is an svg I had paper pieced last year, so thought it would work perfect for todays project. The pinwheel can image is a ephemera piece from American crafts Americana collection. its an old collection but super cute!

Be sure to comment on the blog hop post on the RRR Blog for a chance to win a $10 gift certificate to Really Reasonable Ribbon
Your NEXT stop for today's hop is Bonnies Wonderful Blog!!!
Hugs to all,

Cheryl


Thursday, May 9, 2024

Beach Challenge / Buckets Of Memories

Hello crafty friends and Happy Thursday to you all! So today I wanted to stop by and share a layout I did for a weekly Challenge my dear friend Colleen and I are doing on FB. Each week we set a theme or color or whatever challenge and we have 1 week to complete and share on Mondays. So this past Monday we shared our BEACH theme LO's with everyone. Love this challenge as Im getting so many pages done and in my albums.

So for this week I chose to use Marjorie Ann Designs Darling Benny & Belinda SVG file. Aren't they so cute? I love them! So for these bears here I did airbrush them using Copic Airbrushing system . Love the look. The photos are oldies from 1995 but such wonderful memories of a time when we use to take the kids to the beach.


The design paper I used is echo park, and then the decorative edge design paper is from AC.
Thank you so very much for looking and hope you are enjoying my pages I've been sharing!
hugs to all,
Cheryl 


Monday, April 29, 2024

So Berry Sweet Layout

Hello Crafty Friends and Happy Monday to you all! Today I'm sharing another fun Layout , 2 pages that was done for our weekly Get IT Done challenge that my dear friend Colleen and I are doing weekly, so hoping to inspire those who love scrapbooking. These were also designed for Really Reasonable Ribbon using the gorgeous ribbons Bonnie carries in the shop. 

Ive been having so much fun doing these pages and sharing them weekly with you all, and then adding them all to my scrapbooks. These pages here were done using the SVG file from Marjorie Ann Designs called "So Berry Sweet" aren't they the cutest bears ever? Just loved working with them and airbrushing them using the Copic airbrushing technique, and then piecing them together. I did do their eyes and eyelashes and have several videos on YouTube showing this technique fi you would like to see, I will LINK here!

 The design papers are a mix of some designs I bought at American crafts warehouse sale several years back, and the borders that are hearts are punched out using the large Martha Stewart Punches. All pieces and layers were attached using Scor-tape from RRR store 


I do hope you enjoyed my Layout post today, and thank you so very much for stopping by! Hugs to all, Cheryl


Tuesday, January 31, 2023

Valentines Chocolate Bunny Candy Holder & Video


Hello crafty friends and Happy Tuesday to you all! Today's cute little pouch was designed for Kadoodle Bug Designs using the darling Chocolate Bunny SVG file, just love this little bunny. I also decorated some suckers to go inside this pouch. 


So for the pouch I just cut my design paper, this one is kinda thick, and then rolled it and used scor-tape to hold the ends together. Next I used scor-tape again along the bottom with some hot glue to hold it extra well. Then I used the pinking sheers along the bottom. Now for the band on the top, I used a Martha stewart punch and  ran that around the top part of the pouch. I then used an old bow die to add to the top. I also used a heart die on the center to place my little Chocolate bunny piece, and love this, super easy and fun to make for Valentines day. I've been working on some fun things to share and to gift to my grandkids, kids, and my mom for Valentines day this year. Hope you like!

Desing paper is oldie from American crafts
Bow die CC
punch Martha Stewart


Video https://youtu.be/Y-6IyFNRoEc

Thank you so much for stopping by and hope you have a lovely day!
hugs to all,
Cheryl

Tuesday, May 31, 2022

Missing You card

Hello crafty friends and Happy Wednesday to you all! Todays card is an extra post for this week, as I came across this darling Lexi stamp that is from  I Brake for Stamps , isn't she the cutest?! I had fun coloring her up using my copic markers, and then fussy cut her out. I just had to share this darling card, I'm super pleased with how it turned out.

The pretty shimmery paper is from Paper Temptress and its gorgeous! I also used the black from there as well. I added lots of white paint dots, and then my sewing. The design papers are all from American Crafts warehouse sale, and were scrap pieces I had. I picked out coordinating flowers to hot glue to my card, and added some swirl branches too.  All the flowers are from Really Reasonable Ribbon . Lastly I just had to add some embellishments, and chose to use The Robins Nest Creative dew drops, love these!


I hope you enjoyed my card for today! Thank you so much for stopping by and have a lovely day!
Hugs to all,
Cheryl


Friday, April 1, 2022

Happy 50th Anniversary Card

Hello everyone and Happy Friday to you all! Today's card is an Anniversary card I made using some of my faux glass flowers, you can find some of my older tutorials under the tutorial tab if you are interested in trying these. Today's Post is a short one, as its an extra post for this week.
On these I just cut out the card stock, and then distressed the edges of the petals, and then followed the gluing and dipping like in my videos. I love the design paper its an oldie but goody. Its from American Crafts called I DO! I love the dew drops and had to add them to the corners of each layer, as I felt the card needed some extra embellishing. I also added a small butterfly, some Really Reasonable Ribbon, and some Half backed pearls for the flowers. Happy Anniversary was done using two different stamps.

Really Reasonable Ribbon Diamond Satin Coral 

The Robins Nest Dew Drops , JustRite Paper crafts dies, Happy is from Close to my Heart stamps, Anniversary is from JustRite Papercrafts, 50 is Thickers, and the th I wrote myself. Butterfly is K & Company, Design Paper is I DO from American Crafts.


 I hope you enjoyed my card for today, as I had fun making and sharing. have a lovely day!

Hugs to all, Cheryl

Thursday, March 31, 2022

Easter Squeak Memorydex card

Hello everyone and Happy Thursday to you all! Today I am sharing this darling Easter Memorydex card using Easter Squeak, isn't she darling? You could always use this layout on a card as well. I'm just loving these memorydex cards as I get to see them every time I'm crafting, and I change them up by just spinning it. Love that! 
I start out with all my cards measuring about 4 1/4" x 5 3/4" , then covering with design paper choices,then cut down the top using different edge dies. Next I cut out my shaped layers so I have a starting point to work with. I will then cut some greenery and pick what I'm gonna use on the center(unless I've picked it already) , I also pick up some of the embellishments I think I may use. This one here I chose to use this darling Easter Squeak and love her!


 thank you for stopping by and have a nice day!

Hugs to all, Cheryl

Monday, March 28, 2022

You're Some Bunny Special Card

Hello crafty friends and Happy Monday to you all! Today I'm sharing a quick post as I made this darling card using the sweet some Bunny Special SVG file from KadoodleBug. I bought so many of these darling files and am hoping to use more before Easter, and share with you all.
Just love that darling bunny face, she is so cute! I had this sweet sentiment and not even sure where I bought this from, but it went perfectly with this sweet bunny. I did airbrush my heart using 3 colors to coordinate with the design paper. All the beautiful flowers can be found at Really Reasonable Ribbon, as well as the gorgeous Delicate stitched Satin ribbon. The heart die cuts are all old ones from CheeryLynn, and not sure if they are even available anymore. My design papers are the same ones I used on another Memorydex card I made a couple weeks back, and its from American Crafts Warehouse sale.

 Thank you for stopping by and have a wonderful day! Hugs!

Friday, January 28, 2022

Valentines Envelope treat Holder

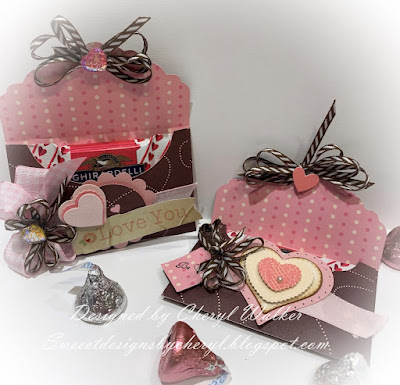
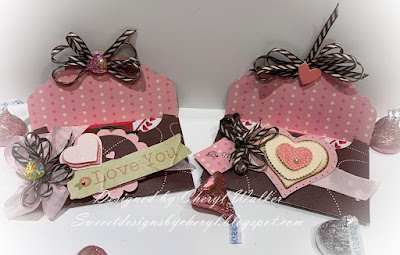
Hello crafty friends and Happy Friday to you all! Today Im sharing these darling Valentines Treat envelopes I made for Really Reasonable Ribbon. These were super fun and easy to make. Love them! Lately Ive been slowly working on lots of fun Valentines Treat holders, and excited to share them all with you.
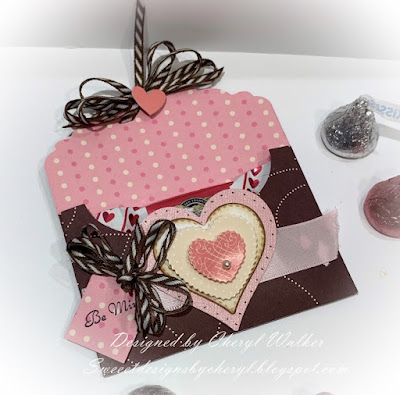
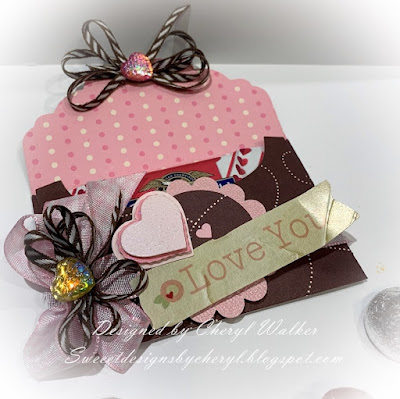
So for the envelopes I used a die cut i had from cottagecutz. Next I chose the ribbons I wanted to coordinate with them. I chose the Satin Pink, Plaid Pink ribbon, and the striped brown, all will list below for easy finding. I also used the darling heart embellishments from Really Reasonable Ribbon.  

for my top envelope- I used die cuts heart shaped, then a tag punch, stampinup! sentiment, sticker hearts that are 3-D. I used the RRR pink satin across the envelope, and then added the bows using the Diagonal striped ribbon in brown. I put them together using scor-tape

For my bottom envelope-

I usded stampinup punches, heart 3-d, sticker that says Love You, Really Reasonable Ribbon Pink Plaid ribbon, Diagonal Stripe ribbon, and fish scale heart cabachon.

I will definitely be making more of these using different colors and die cuts. Love them! 


Really Reasonable Ribbon Supplies:


Thank you so much for stopping by and I hope you loved my Valentines Candy Holders for today!
Hugs to all,
Cheryl


Thursday, August 5, 2021

Hey Sweetie HB with Makers Movement

Hello Crafty friends and Happy Thursday to you all! Today's card was designed for My Makers Movement using their Darling Stamp and Die set called "Cotton Candy Stand". I absolutely LOVE this set and will have another card up shortly using the same set and papers. 

On this card here I chose the super sweet design papers I just picked up at a warehouse sale in our state, as I knew they would go perfectly with this set. I cut 3 layers and added sewing to each using my craft sewing machine. Next I wanted to use a doily so used an old one. The Cotton Candy stand was cut out using all coordinating design papers, and then I even used 2 of the stamps out of this set. for the wheel I chose an embellishment from RRR and hot glued it on.. Love how sweet this card turned out. Lastly I added some ribbon bows, using the delicate stitched ribbon from RRR and chose some of the robbin egg dew drops to embellish my card. I also completed the inside and left room for journaling. 
Makers Movement supplies:

Crafters Edge Crossover II die cutting machine, Cotton Candy Stand set, Standard Metal adapter 

other supplies used: American crafts design paper, bazzill card stock, Really Reasonable Ribbons Delicate Stitched Satin, RRR Flower embellishment, RRR Score tape/foam squares, Dew Drops, Sewing,Hot glue, 

Thank you for stopping by and Hope you enjoyed my post for today! Hugs to all , Cheryl

Friday, September 25, 2020

Thankful


Hello everyone and Happy Friday to you all! Today's card was designed for Really Reasonable Ribbon using the Beautiful Ribbons & Chrysanthemum from the RRR store, and for Makers Movement using their Gorgeous Stamps!I Love working with the fall colors even though I dont want summer to end. Hoping to keep the warmth just a little longer.

On my card I started with lots of layers, and stamped my images from Makers Movement on the top layer, and then dusted orange , Yellow, and Green over the sentiment and flower stamp. I then added stickles to the centers of the flowers and in other spots as well. My ribbon choices were Brown Satin double faced, and the Moss and Cream Plaid ribbon for my bows. I then took the cream colored Chrysanthemum and airbrushed it using copic markers and my air compressor , and added stickles to the center. All layers of my card have sewing and white gel pen dots. 

 Really Reasonable Ribbon & My Makers Movement

Hope you enjoyed my post for today! Thank you so much for stopping by
Hugs,
Cheryl

Monday, June 8, 2020

Pretty Princess card w/Really Reasonable Ribbon

Hello everyone and Happy Monday to you all! Today I have a super fun card I made using Really Reasonable Ribbon, Flowers, and embellishments. Hope you enjoy!

On my card I chose to use the darling paper collection called Little Princess. I knew when I received the Beautiful flowers and ribbon from RRR that it would match perfectly with this paper Collection. I chose to use the Mixed purple /lilac carnations, and Rose buds. Next I used the mixed pink open roses in 15mm, and the big flower is a chrysanthemum. Lately I've been using a lot of the flowers from Really Reasonable Ribbon, as its easier for me to get a card done quickly, instead of making all my flowers. The darling design paper was so fun to work with and is an older collection that ive had for a long time. I love to layer and chose some dies that were from CheeryLynn , except the carriage as its a CC die. I also added some sewing to complete my card for today.

The die cuts are from My Makers Movement, and the Princess carriage is a CC die that I colored using copics.

Ribbon is Really Reasonable Ribbons Delicate Satin.

Card was put together using the Scotch Tape refill and foam squares. Also used hot glue on the flowers and flower embellishments.
Really Reasonable Ribbon Supplies Used:
Mixed Purple Chrysanthemums 
Mixed Purple Rose Buds
Mixed Purple Carnations
Mixed Pink Open Roses 15mm
flower embellishments
Foam Squares
Scotch Tape Refill
Delicate Stitched Satin

Other supplies I used :
CheeryLynn dies
CottageCutz dies
American crafts design paper and card stock.
hot glue
copics
sewing
Crafters Edge Crossover machine(My Makers Movement)
Thank you so much for stopping by and looking! Hope you have a lovely day!
Hugs to all,
Cheryl

Monday, May 25, 2020

Birthday Princess Card w/Really Reasonable Ribbon

 Hello everyone and Happy Monday to you all. Today I have a sweet card made using Really Reasonable Ribbon supplies and the Little Princess Paper Collection that was in my stash. Love all the RRR Flowers and pretty purple gingham ribbon matches perfectly with this paper.
 So for my card I did 3 layers plus a tag layer, and then added the Little princess cutout and hat. The flowers I chose are Pink Chrysanthemums , Purple 20mm Open Roses, Deep Ivory Aster Daisies, 12mm Rose Buds in 2-tone pink, I love layering up all the RRR flowers, they are all absolutely Gorgeous . I did add some branches that I punched out using a MS punch.

Really Reasonable Ribbon Supplies:
Pink Chrysanthemums
Purple 20mm Open Roses (mixed pastels)
Deep Ivory Aster Daisies
12mm Rose Buds in 2-tone pink
Foam Squares
Scotch advance Tape Refill
Gingham ribbon grape

other supplies used
Sewing maching
hot glue gun
Happy Birthday stamp from My Makers Movement
Little Princess Paper Pad by AC
Little Princess Embellishments
Martha Stewart branch punch

thank you so much for looking and have a lovely day!
Hugs to all,
Cheryl

Tuesday, March 13, 2018

Really Reasonable Ribbons March Hop


Welcome to "Really Reasonable Ribbon's" March Blog Hop!

If you arrived here from Ginny's Blog you are on the right track. If not , you will want to head back to the Really Reasonable Ribbon Blog that way you don't miss out on any of the FABULOUS Designs from the Design Team today! There is going to be lots of Beautiful projects to see today using the March Spring Color Mix Ribbon Assortment, so I hope you Enjoy!!!

Every month RRR comes out with the Perfect Ribbon Assortments, I just LOVE each month, and all the beautiful ribbons.

Today's card is an Easter Card I made to give to my Mom. I thought when I saw this months Mix that they were perfect for a sweet Easter card. On my card I used the Yellow Taffeta Ribbon, and the Pinkish Delicate Stitch Ribbon, both come in the Ribbon Club for this month.

Next I used lots of Beautiful Flowers that can all be found at Really Reasonable Ribbon, and I listed them below.
*Mulberry Flowers Pretty Flori Anemone Pastel
*Carnations Pink Mix
*Mini Sweetheart Blossoms Mixed Pink
*Rose Buds Ivory & Yellow
*35mm Green Mulberry Paper Leaves's

Iv'e been addicted to using the Scotch ATC Tape refill that RRR carries, not only is it priced cheap, but love how it works holding my layers together. 

The design paper I used I just came across the unused Heidi Swapp Paper Stack in my paper stash, it was somehow hidden with the Graphic45 paper stacks, not sure why, but when I saw it, I knew it would be perfect for a card using the ribbons and embellishments from RRR and perfect for my Mom. I used 5 layers on my card and built them up using the 3-D foam tabs. Next I stamped the sentiment from ODBD on the front, and inside says Happy Easter Mom! all stamps are from Our Daily Bread Designs. I LOVE the Yellows and pinks all together on this card.

Bunny is a die I used from Cheery Lynn Designs, and thought how sweet it would be to have him in a print, and distressed. I added some of the ribbon and a little yellow rose bud. His eye is the black Viva Pearl Pen.
 hope you all are enjoying today's hop, and hope you enjoyed my post as well! :)
Your NEXT stop for today's hop is Bonnie's Wonderful Blog!!!
Hugs to all,

Cheryl

Friday, February 16, 2018

Thanks a Bunch 3-D Pop Up card

Hello Crafty Friends, and Happy Friday to you all! I'm sure you all are ready for your weekend, I know I am. So today I have a super fun and sweet Thanks A Bunch card. This is a Pop Up card I designed for Really Reasonable Ribbon using their beautiful Ribbons, Flowers, leaves and embellishments. Love that Really Reasonable Ribbon carries all these beauties!

Card was designed with a 3-D pop up die from Cheery Lynn to create my card base. Next I picked out this super cute design paper that I've had for awhile now, as I'm trying to use up some of my design papers that I forget about. I made 4 layers all different sizes, as I LOVE layering! Each layer is put together using Really Reasonable Ribbons Scotch Refill tape 1/4" wide. Love this tape! Its so easy to use and doesn't get caught up on the wheel of the ATG gun. I also popped the layers by using the 3-D foam tabs tombow. I use them on just about every card , as I love the 3-D look they give. :)

Ribbon Treatment: I used Really Reasonable Ribbons Concentric Circles on Ocean Blue Satin Ribbon for the bottom bow, it was in my scrap Jar, then for the top I used the super pretty Pink canvas colored band with stitched edge, as its new to my stash, and wanted to use it. I Absolutely LOVE this ribbon and will have to get more of the colors, as this is my 1st time using it.

Flowers I used these Gorgeous flowers (1st time) from Really Reasonable Ribbon and they are called Pretty Flori Pastel Anemone, they are Beautiful in person, and the perfect size for cards and albums! They are backed with the Green Leaves. I know they will be perfect for many other projects as well.

Tag- was in my stash and I thought how cute it would be to add a sentiment to it. So I used these darling Thicker flower like alphabet to spell A Bunch , the A is in the left corner right above the Bunch. Lastly I added a little resin embellishment flower to the T.


Really Reasonable Ribbon Supplies Used:
3-Foam Tabs Tombow
Scotch Advanced Tape Glider Refills 1/4"
Green Leaves
Pretty Flori Pastel Anemone
Pink Canvas Colored Band with Stitched Edge
Concentric Circles on Ocean Blue Satin
Resin Flower with Rhinestone Flatback Cabochons embellishment

Other Supplies used:
American Crafts DayDream design paper
Bazzill Card stock
Sewing
Cheery Lynn 3-D Pop Up Die
American Crafts Tag
American Crafts Remarks Dimensional

Thank you for stopping by and hope you have a wonderful day!
Hugs to all,
Cheryl