Showing posts with label Heartfelt Creations. Show all posts

Saturday, April 13, 2024

Really Reasonable Ribbon April Blog Hop

Welcome to "Really Reasonable Ribbon's April” Blog Hop if you arrived here from Kathy's Blog you are on the right track. If not , you will want to head back to the Really Reasonable Ribbon Blog that way you don't miss out on any of the FABULOUS Designs from the Design Team today! There is going to be lots of Beautiful projects to see usingMothers Day and or Flowers Theme this month, So each DT member will showcase something using flowers or for Mothers Day.

Be sure to comment on the blog hop post on the RRR Blog for a chance to win a $10 gift certificate to Really Reasonable Ribbon 

For my sweet card today I chose to use the design papers from HC and the fussy cut flowers are from there too. I picked the beautiful flowers from Really Reasonable Ribbon and some of her gorgeous satin ribbon too. I used scor-tape and foam tabs to put all my layers together. I also used some hot glue to glue on the dew drops ,and the flowers are from RRR

When I use scor-tape I pretty much just pick either a 1/4" or 3/8" to use on the back of my card layer(the one attached to the card base outside and inside.

Be sure to comment on the blog hop post on the RRR Blog for a chance to win a $10 gift certificate to Really Reasonable Ribbon
Your NEXT stop for today's hop is Bonnies Wonderful Blog!!!
Hugs to all,

Cheryl


Friday, August 25, 2023

Luna Halloween Page book box

Hello Crafty Friends, and Happy Friday to you all! Todays fun page was designed for Really Reasonable Ribbon using the gorgeous Ribbons and Flowers from the RRR Shop.


To start I used the Luna design paper on this page, and then used some dies that I cut out in black and some in white. I added those layers on my page, and then along the bottom of the page I added some old trim from RRR and the pink gems. Next I wanted some floral clusters.

Floral Clusters were done using some green flourishes, and then Really Reasonable Ribbon Bold Satin with Grosgrain Edge in Pearl Pink5/8" for 2 of the bows. Then the top bow was done in a Plaid Ribbon Black Bold Check 3/8". I made bows out of that too, and then hot glued them on. I did use some pink feathers too. Next I chose my flowers, and for the large flower I used a trellis rose, and then used some cherry blossom, apple blossoms, and sweetheart Blossoms. lastly I used some rose buds to finish this up. 

Tag is from the paper line, I just cut it out and put it on a black card stock and cut it to look like a tag. I added some white dots using a paint pen from postca.

Really Reasonable Ribbon Supplies:

Wednesday, July 26, 2023

Shabby Chic Embellishment Box


 Hello everyone and Happy Wednesday to you all! Today I have a fun project I designed for Really Reasonable Ribbon and The Robins Nest Creative using the gorgeous ribbons, laces, and then dew drops. Love how fun and easy this was to create.
So I had this little bead box that I got for free a long time ago, and thought it would be super cute decorated using some design paper, flowers I made, and ribbons and laces. I think the thing that took me the longest was the flowers as I had to fussy cut them out an then do my faux glass technique on them. 

I started by using some of Heartfelt creations design paper and the flowers were part of this collection. I did fussy cut them out and then did my faux glass technique on them you can see one of my videos here under tutorials as I have many. I love doing this on the flowers once in awhile and have done this for many many years. Now I did measure the box and cut out some card stock in white, and design paper to fit this box, and used Scor-tape to attach them to the box on the inside and outside. Next I added the beautiful dew drops in yellow to the centers of the flowers. I also did the leaves as well. Lastly for the flowers I added some of RRR Rose buds in white and pink. love the look! Ooo I did also use some flourishes for the greenery. 

Window - Its a shaker window die I used from Cheery Lynn, its an old one and not sure if they are even sold anymore, but love it. I added inside of it some of the Robins Nest Dew Drops and some little shaker balls and then some beads. I did add a butterfly dew drop and some pink dew drops to the shutters.

Cluster of flowers- So first I added my Ribbon and I chose the pink Shimmer Satin as it matched this paper perfectly, then I added some Gabrielle Lace as I made both into bows and hot glue them onto the box. Next I added my large flower, some leaves, an then the medium size flowers, and then the small. After adding all my flowers I chose to use some green tear drops (dew drops) from the Robins Nest Creative to the greenery on this. Love how it looks. Lastly I added a tag.

inside of my box.
Really Reasonable Ribbon supplies used:

The Robins Nest Creative-
Pink dew drops for the diamond shaped ones


Thank you so very much for stopping by and have a lovely day!
Hugs to all, Cheryl


Wednesday, September 28, 2022

Gift card Purse/video

Hello crafty friends and happy Wednesday to you all! Today's gift card purse was designed for The Robins Nest using the beautiful dew drops on my purse and flowers. I do have a video on this, and lots of photos over at The Robins Nest Blog. See my video below. Happy crafting to all!

My video on purse


Thank you for stopping by and have a lovely day!

Hugs to all,

Cheryl
 

Monday, April 26, 2021

Happy Mothers Day

Hello crafty friends and Happy Monday to you all! Todays Mothers Day card was designed for Really Reasonable Ribbon using the Beautiful Seam bindings and Pearls that RRR carries in the shop. I absolutely LOVE the way this one turned out. 
the flowers were made using CheeryLynns flower dies, and then doing my Glass flower Technique, love this technique as it makes the flowers look like glass flowers. I layered them and hot glued each flower together and then added a pearl to the center. The seam bindings were ruched and made into smaller flowers to place in between mine. 

The design paper is old and is from HC , as Ive been trying to use up some of my older paper stacks that I forgot about. Each layer was put together using RRR Scotch advanced tape refill and then sewn together. Next I added dots to each layer. I had a lot of fun making this card and Hope you like it.

Really Reasonable Ribbon Supplies Used:


I hope you enjoyed my post for today! Thank you for stopping by and have a lovely day!

hugs to all, 

Cheryl

Saturday, April 10, 2021

Wonderful Mother Really Reasonable Ribbon

Hello everyone and Happy Saturday to you all! Todays Mothers Day card was designed for Really Reasonable Ribbon using the gorgeous ribbon, Flowers, and Seam Binding that RRR carries. I absolutely Love them all! Below I will list all items used on my card for today.

First I started with some beautiful HC design papers that ive had forever. I did layer and add sewing to each layer. Next I chose some heart dies, and distressed it with pink and green, then Stamped Wonderful Mother on the heart in black ink. I used a greenery die cut to get my flower stems, then layered the Chelsea Rose, Open roses, and rose buds with seam binding . The bows I made up using Delicate Stitched Ribbon. All layers are done using the foam squares and scotch advanced tape.

Really Reasonable Ribbon Supplies:


Thank you so much for looking and hope you love my card for today! Thank you for stopping by! Have a lovely day!
Hugs
Cheryl


Thursday, April 14, 2016

The Flower Effect/Video Tutorial

Hello everyone today's card was designed for I Brake For Stamps & Splitcoaststampers way to use it challenge....LOL this challenge was to use inspiration from an Ad! Oh boy, the only ad I could think of was the Jake from State Farm ad....LOL hahahahaha so I knew there were flower ads, and found one on youtube called "The Flower Effect" , so that is where my inspiration for todays card came from.

So for my card I used Cherry Blossom with Dream stamp from I Brake For Stamps. LOVE this image, and the coloring was super easy as I airbrushed it. I do have my video tutorial below for you to view. Also did the Glass Flower Technique on this. As I LOVE the look of these flowers and love how they keep their shape.
 
My write-up for todays post will be short and sweet!
Supplies Used:
I Brake For Stamps/Cherry Blossom With Dream (SAVE 10% by using Code "SAVE10CHERYL" AT checkout.
Dp- Heartfelt Creations(they were scraps)
Ribbon- Seam Binding from RRR
Pebbles pearls, Jolee pearls for flowers
Embossing Powder
Heat gun/air brushing system/glue gun/glue pad
Bazzill card stock
Copics, Distress ink , White Gel Pen


Challenges"
In the Pink/use pink pearls
Southern Girls/Pattern paper free for all
Cute Card Thursday/Handmade embellishments(flowers and butterfly,bow)
Crafty Creations/Stitching
 
Thank you for looking and have a lovely day!
hugs to all,
Cheryl

Friday, March 25, 2016

Blushing Cherry Blossoms

Hello everyone & Happy Friday to all!
Today's card is using the SWEET I Brake For Stamps Cherry Blossom with Dream stamp from I Brake For Stamps. This card was designed using this weeks colors from Splitcoaststampers color challenge & CheeryLynn Challenge(anything Goes), LOVE these colors, and LOVE these flowers! You can find all sorts of BEAUTIFUL flower stamps at the I Brake For Stamps Store :) you might want to grab a cup of coffee/tea/or even water, as there are many beautiful ones to see. Have fun!!
 
Card Instructions:
Card Base- white card stock cut at 6" x 12" and then folded at the 6" mark, and scored, so now you have a 6" x 6" card base.
Card Layers- Bottom panel is 5 1/4" x 5 1/4" for the plum card stock ,then the pink design paper layer on top of that panel measures 5" x 5". then add sewing. Next middle panel is 4 3/4" x 4 3/4" for the mint blue layer, then plum measures 4 1/2" x 4 1/2", and then the Pink dp layer on top of that measures 4 1/4" x 4 1/4", add sewing. Top panel is 4 3/4" x 3" for plum card stock, then mint blue is 4 1/2" x 2 3/4" , then the pink dp measures 4" x 2 1/2". add sewing to all panels.
Image Layer- Cherry Blossom with Dream was stamped in memento black ink on white 110lb card stock and then colord with copics, and airbrushed with copics as well. For the floers I airbrushed using RV11 and the centers were colored with RV34. The butterfly was colored with the same copic colors and then BG000 & B00 I then used a circle stitched die to cut out the part of the image I wanted to have fit. Lastly airbrushing the background with the B00 & then added a half backed pearl to the center of each flower. that layer was placed on a Be Mine die cut I used.
Embellishments- Ribbon, Velvet brad, gems, half backed pearls, die cuts, doily, sewing


http://ibrakeforstamps.com/cherryblossomwdream.aspx
Challenges:
SCS Color Challenge
CheeryLynn /Anything Goes #225 I used a doily from CheeryLynn designs(its my favorite!)
Really Reasonable Ribbon/Welcome Spring with ribbon theme.
This IBFS Cherry Blossom with Dream is 1 of my MANY FAV's! I love the little blossoms, and the butterfly, so many ways to use this stamp! I think I have been on a flower kick lately as I am super excited for spring to arrive. I have buds on my Orchids that I keep in my kitchen, and then my other flower that my mom gave me has some BIG buds that are starting to open up, cant wait to see it, as I have had this Amaryllis plant for 2 years, and this will be my first year seeing it bloom, EXCITING!!! :)
HERE IS A PHOTO of my Amaryllis flower starting to bloom for the 1st time, I JUST HAD TO SHARE/once it fully blooms I will have to share that too!hehehe
 
Click on my badge below to take you to the I Brake For Stamps Store :) Have fun, as there are many 50% off items for this week in there as well! enjoy!
COUPON CODE SAVE10CHERYL to SAVE 10% off your order :)
http://ibrakeforstamps.com/
 
Thank you for looking and have a super wonderful weekend & Happy Easter to all!
hugs ,
Cheryl
 

Thursday, March 3, 2016

So Grateful for you!

 
Hello everyone and Happy Thursday to all! Wow its hard to believe we are already in March!! YIKES time sure does fly as we get older....hehehe
 
Todays card is "So Grateful for you" created using Heartfelt Creations Beautiful flowers Dies & Design paper. Absolutely LOVE their flower stamps and dies!


I used the Vintage Floret Collection by Heartfelt Creations. LOVE this paper, and love the vintage shabby chic truck. I have always enjoyed working with their stamps and dies, and felt I needed to start bringing out all my old stamp collections. I have soooo MANY of them...
 
 
Flowers- were created using Rose Creations Die, I just used the matching dp and cut out. I used weathered wood distress ink by Tim Holtz to dust my flowers, and added some Mist in Silver Sugar over the tops. Now the centers were done using Vintage Glitter Glass in "600 Indian Summer) love the look of these!
Butterfly-Cut in white card stock, and then airbrushed with R11 & distressed with weathered wood ink. I added some of the glitter glass to the butterfly as well (600 Indian Summer) I also added some dots with the viva pearl pen!
Leaves- I left them in the die and then dusted them with Shabby Shutters distress ink. Gives a 2 tone effect for those.  They were cut using the Rose Creation Dies as well.
HC Lace Die-was cut using white card stock, super simple and no fussing to get out small pieces!
Bow-My bow was created with 3/8" satin ribbon from Really Reasonable Ribbon!
Sewing was added to each layered panel!

Challenges:
Try it on Tuesdays/Feminine & Fancy
Craft-Dee BowZ/Anything goes w a handmade bow CDB35
Bunny Zoes Challenge/Things with Wings
Thank you for looking and have a lovely Day!
Hugs
Cheryl

Wednesday, March 2, 2016

SC582 sketch challenge

 
Hello everyone and Happy Wednesday to all!
Today my card was created for Splitcoaststampers Sketch challenge. Absolutely LOVE this sketch as it has lots of layers, and I love layers!!! I made this card last night before bed, and it took me about 35 minutes to make, as I had 8 flowers prepped, and 2 that needed to be done. 


I love when I have extra flowers cut out, and it made me start thinking, that maybe when watching a movie I should bring up my cutter and start cutting them, to have ready to airbrush,paint,dust, or do whatever to. It really makes the card come together much faster if you have them prepped like I did :) hehehe
Anyways I used Heartfelt Creations Stamp sentiment, and then the Posy Patch die for the flowers, They were stamped but you can hardly tell, as I used Creative Inspiration Paints on the flowers to try to match up with the dp.  I used the color Burnt Clay! I then did my glass technique on them. LOVe it, and then added some pearls to the centers. these are a little different, s they have some glitter or something on them. Not sure what it is, but they are pretty! The branches are from Martha Stewarts punch, and the doily is from Cheery Lynn Dies!

The dp is from Heartfelt Creations too, and I added some sewing to each panel. The sketch is available on SCS here if you would like to join in on this fun challenge!
 
Thank you for looking and have a lovely day!
hugs to all
Cheryl

Tuesday, March 1, 2016

Sweeet Friendship


Hello everyone,
Today I have created a card for a few different challenges. 1st up is Splitcoaststampers Color challenge, Next is Cheery Lynn #223 Flourish theme Challenge, and then Really Reasonable Ribbons #135 Celebrate Theme challenge(Friendship) is what I chose for this one.


SCS CC572 So for the Color challenge we were to use Red, Green, and 2 different blues. I did the red flowers,green flourishes, and then the blue card stocks, that are 2 different shades. I also used HC design paper that I had left over.

Cheery Lynns Flourish theme, I used 2 flourishes for my flowers to create a vine for around the Doily. The Doily used is my FAVORITE one from Cheery Lynn and is called French Pastry!

Really Reasonable Ribbons Celebrate Theme challenge. I wanted to make a friendship card to send out. So I thought Friendship would be the theme on this celebration.


Card-
Base- measures 6 x 6 so I cut the black card stock 6 x 12" and scored at 6". Next I cut my darker of the 2 blues 5 3/4" x 5 3/4" then the dp for that layer was cut at 5 1/2" x 5 1/2". Glued together and then sewn. For my smaller panel, I did the same
Flowers - were stamped in distressed ink, airbrushed with copics Red, and pink, to create this color. Next I distressed the edges with fired brick, and then heat embossed with clear embossing powder to give the glass look. Love making these. Lastly I added some vintage pearls to the centers in different sizes.
Doily-Cut in black, then I used a spellbinders circle to cut the layer on top. I stamped Our Daily Bread Designs Stamp in memento black ink, and distressed the edges of the circle in Faded Jean.

Ribbon is from my stash!
Supplies Used:
Heartfelt Creations posy stamps and dies , Vintage pearls, embossing powder, heat gun, hot glue, glue pad, memento black ink, ODBD stamps, Ribbon, Cheery Lynn Doily , Spellbinders , sewing machine, ATG gun. Glass leaves

I really enjoyed creating my card for today! hope you enjoyed my post!
hugs to all
Cheryl

Monday, February 29, 2016

Shabby Chic Pretty in PINK LO

Hello Friends!
Today I'm sharing a Layout I created to be framed. I also created this for the Frilly and Funkie challenge "Layer it UP"! My next goal is, to start framing my layouts. I have lots that need to be done, just have always put it off. Not anymore!! hehehe Hobby Lobby has some really cute frames that will hold 12 x 12 pages, but I want to get them on SALE as its always nice to be able to get more for your money :) hehehe 

Instructions-
Main page
12" X 12" Bazzill Iced Pink card stock
11 3/4" x 11 3/4" Bazzill Blank check card stock
11 1/2" x 11 1/2" Daphne design paper from Heartfelt Creations then added sewing
Photo matt
cut at 7" x 5 1/4" design paper piece
7 1/4" x 5 1/2" blank check card stock
7 1/2" x 5 3/4" Iced Pink Card stock then added sewing
Flowers-
Stamped HC Posey Patch flowers with distressed ink, then airbrushed the centers with copics E33, and RV21, RV00. I distressed the edges with Antique Linen , and then spritzed each flower with Pearl spritzer. for the centers I added some vintage pearls
Embellishments-
Vintage Lace, Vintage feathers, Vintage tatted doily pieces , Vintage Pink Satin large ribbon piece, Spellbinders tag, Really Reasonable Ribbon Seam Binding ruched up for leaves, Pink Silk, Birdhouse charm
 
Supplies Used- Heartfelt Creations Daphne DP pack , Heartfelt Creations Posey Patch stamps/dies, Copics for airbrushing, Air compressor , copic system, spellbinders frame die, Birdhouse charm, May Arts Silk, Vintage pieces(pearls, tatted lace, lace, wide pink ribbon, ruched satin ribbon already done for me) from estate in California.
 

I absolutely LOVED making this layout, and cant wait to start my next one :) As PINK is my favorite color, and I love the look of shabby chic and vintage mixed. I also LOVE girly stuff...hehehe


Thank you for looking and have a lovely day!
hugs to all,
Cheryl

Friday, February 26, 2016

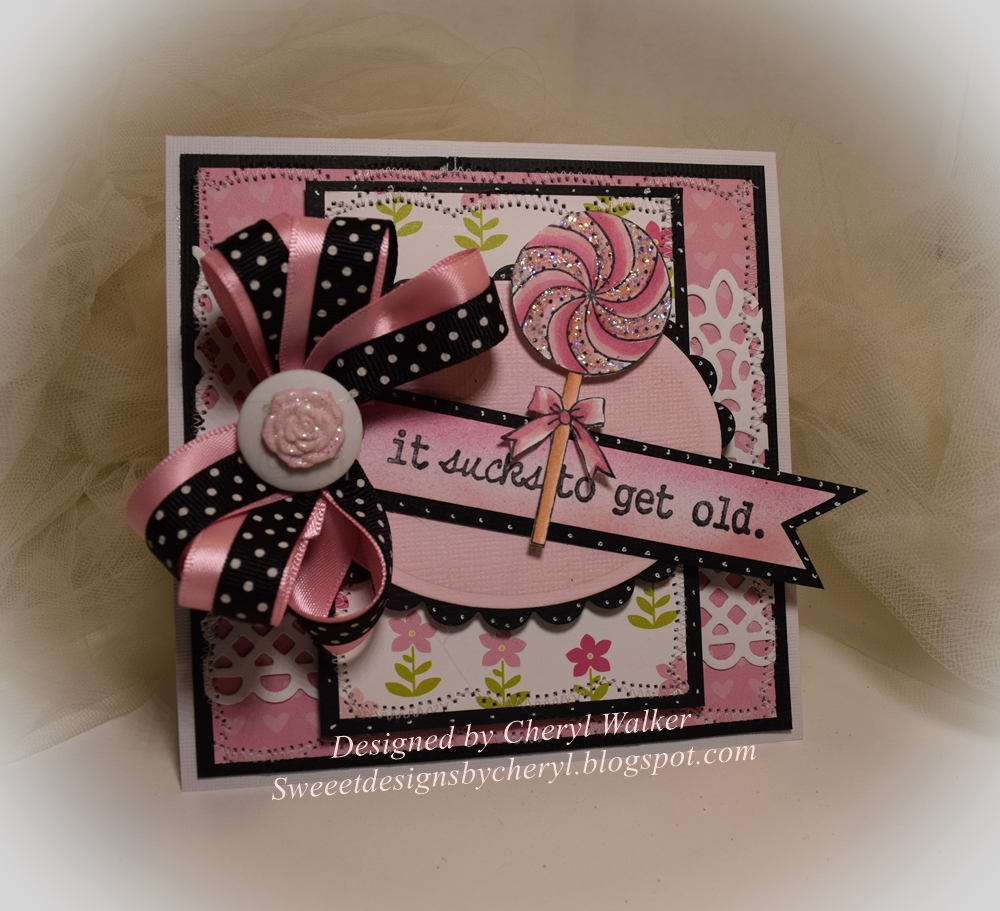
It sucks to get old

Hello everyone, Super excited to share my card today, as I have been working on using lots of my OLD stamps! Next I need to work on mailing out cards...YEP as normally I give those in person, well not anymore! Its my goal this year!


So this card here was designed for Splitcoaststampers Way to use it challenge " HUMOR" was the challenge for us. Use humor on your card. Well long story short, it took me about 2 hours to find a stamp among all my stamps....LOL and this one , I didn't even know I Had! LOL hahaha Card took me roughly about25 minutes to create, super simple I tell ya! Also made for Really Reasonable Ribbons challenge #135 "Celebrate with Ribbon or Trim!
 
I used some a 5 x 10 white card stock, scored in the middle at 5. Next I took some black scrap card stock, and cut the piece down to 4  3/4" x 4 3/4", then the dp at 4 1/2" x 4 1/2". Next the center piece I had left on my table and it measured 4 1/4" x 3" so I used it, and then cut the dp piece for it @ 4" x 2 3/4", then did my sewing. Next I cut the spellbinders frames out, and stamped my 2 unity images and colored them. super easy and fast to make, as this card is pretty simple. The Heartfelt Creations die piece was already cut, as I had cut it last week, but didn't use it. So figured I would on this card. My bow is created with really reasonable ribbon, and took seconds to create. I did add some buttons from my stash to the bow, and some stickles to the sucker.
Supplies used:
Unity stamps/ Itty bitty
American Crafts/Pebbles dp "Ever After"
Really Reasonable Ribbon/polka dot black and white, and pink satin
American Crafts /Card stock black and Bazzill pink
Heartfelt Creations / Die cut
Embellishments/Buttons from my stash and stickles


Thank you for looking!
hugs
Cheryl

Thursday, February 25, 2016

Thinking of You /Sympathy Card

Hello everyone,
Here is my 2nd Sample card for this weeks Splitcoaststampers Sketch Challenge hosted by Allison. LOVE this sketch, so had to make two! :)
 
This is my 3rd sympathy card made this week, so we will be sending them out. So sad to loose our LOVED ones, and I cant imagine what the family is going through at this time. I hope and pray that the sweet memories of their loved one will help carry through this difficult time in their lives! I hope they know that I will keep them all in my thoughts and prayers!!
 
On this card I did the Sentiment "Thinking of You" from Victorine Originals ,and the inside will have another sentiment, haven't stamped it yet.  I LOVE doing the Glass Flower Technique, this is so fun, an I absolutely LOVE LOVE LOVE the look!!! I will have to do a video tutorial on this soon!


Supplies Used:
Heartfelt Creations Design Paper
Heartfelt Creations Rose Creation Die
Vintage Pearls
Sentiment/Victorine Originals
Sewing
Spellbinders circle dies
Martha Stewart branch punch
Card stock is Bazzill and American Craft
 
Thank you again for stopping by!
hugs to all,
Cheryl


Wednesday, February 24, 2016

In Sympathy

Hello everyone, and Happy Wednesday to all!
Today's card was created for the Splitcoaststampers Sketch challenge this week , LOVE Allison's sketch this week, and will hopefully be making another :)


So for my card I used Heartfelt Creations Posy Patch stamps/dies to create these flowers. I had made a TON of these for a layout that im going to frame, and had some left over.

 
Card Measures 5 3/4" x 5 3/4"
 
SUPPLIES USED LISTED BELOW
Flowers- stamped in distressed ink on white cardstock then airbrushed with RV21, and RV00, I distressed the edges with antique linen, and spritzed all flowers with pearl spritz. for the centers I added a vintage pearl, and then used seam binding to create my leaves.
 
Spellbinder frame- cut in Bazzill Blank Check, and then used CottageCutz Fancy oval (distressed )for the center sentiment.
Sentiment- Heartfelt Creations HCPC 3377 Sympathy Sentiments was stamped in memento black ink.
 
Design paper- once in awhile I will go through my scrap design papers to use them up, so I don't know who these are by.
Embellisments- Vintage Lace(Very OLD), Vintage Velvet Ribbon(also OLD), Vintage Pearls, and sewing to complete my card

 
Thank you for looking and have a lovely day!
hugs to all,
Cheryl