Showing posts with label CottageCutz. Show all posts

Wednesday, March 29, 2023

Mini Album Page 4 Panda baby

Hello everyone and Happy Wednesday to you all. Today's page was designed for Really Reasonable Ribbon using the gorgeous satin ribbons and flowers on my page. I also used the Darling baby girl panda SVG from KaDoodle Bug Designs. 

I've been slowly working on this round mini album with a pull out page for the photos. This one here has some fun as I left room for another slide out behind the baby layer. The panda in her crib is on acetate and is a pocket. Love this page and all the flowers and ribbon. Ribbon is Satin and the flowers I used are all Open roses, Rose buds, Sweetheart Blossoms. I also used lots of score tape and foam tabs on this page.

Really Reasonable Ribbon 

SVG KaDooodle Bug Designs Baby Girl Panda 
all dies are old dies from cheery lynn designs and cottagecutz , round album is an oldie and not sure where its from.


 Thank you so much for stopping by and have a lovely day!

hugs to all, Cheryl

Tuesday, March 7, 2023

Fun Easter Box and videos

Hello everyone and happy Tuesday to you all! Today I have another fun Hexagon Milk Carton Box I made for KaDoodle Bug Designs and Really Reasonable Ribbon 🎀 using the tutorial below. 

Easter Bunny Bear can be found here


Also this next video has the decorating on this box today! 

Happy crafting!


Tuesday, January 24, 2023

Valentines Chocolate Kisses Fox

 
Hello crafty friends and happy Tuesday to you all! Today's Valentines confectionery treat bag was designed for Really Reasonable Ribbon using the gorgeous ribbons and embellishments. 


To start I used a die to cut out my confectionery bag, and then used some design paper to run across the center. Next I punched out a heart border and glued it down using scor-tape, and then added some of the beautiful Satin Swiss dot ribbon over the border. Next I added some heart shaped filigree die pieces, and my darling Valentine Chocolate Kisses Fox from Kadoodle Bug Designs. To finish off the front I added the pretty pink ribbon bow with a flower embellishment in the center, a heart embellishment to the top left corner, and then a wood heart with the xoxo heart. These are super fun to create and perfect little gifts to give.

Really Reasonable ribbon supplies:

Thank you so very much for stopping by and have a lovely day!
hugs to all,
Cheryl

Sunday, November 13, 2022

Really Reasonable Ribbon November Blog Hop


Welcome to "Really Reasonable Ribbon's  November” Blog Hop if you arrived here from Kathy's Blog you are on the right track. If not , you will want to head back to the Really Reasonable Ribbon Blog that way you don't miss out on any of the FABULOUS Designs from the Design Team today! There is going to be lots of Beautiful projects to see today using the Precious Metals Collection Ribbon Assortment, so I hope you Enjoy


for my card today it measures 5 3/4" x 5 3/4" I used a dark brown for the card base, then did my layers using card stock and christmas design papers. I used the foam tabs to layer each layer so they would pop a little. Love the assortment of flowers that Really Reasonable Ribbon has, as I chose the dark brown Trellis Rose 35mm, then the white cherry blossoms , and then red cosmos daisy stem, also the sweetheart blossoms, and then little green 10mm open roses, lastly green and red rose buds. I thought it would look so pretty using the gold ribbon and then my gold bell that I cut out using a die. Super fun card to make. I forgot to add a Christmas sentiment , which I will do later.
Really Reasonable Ribbbon:


Thank you so much for stopping by, and hope you enjoyed my Halloween Scare Bear card for today.
Your NEXT stop for today's hop is Bonnies Wonderful Blog!!!
Hugs to all,

Cheryl


Wednesday, August 24, 2022

Fall fun Sweet Sunflowers & Video tutorial

 
Hello crafty friends and happy Wednesday to you all! Today's card was designed for The Robins Nest Creative using the beautiful dew drop in my Faux Glass Sunflowers, I do have a video on making these today as well as putting together my card. I do Hope you enjoy! please let me know what you think.

To start with I chose all my papers, and then card stock.
  • first layer- 5 3/4 x 5 3/4 this is the craft one, next is 5 1/2 x 5 1/2 for the wine, gingham blue is  5 1/4 x 5 1/4
  • second layer- 3" x 5" craft, 2 3/4 x 4 3/4" wine , 2 1/2" x 4 1/2" sunflower dp,
  • third layer- 4" x 4 1/4" craft, 3 3/4" x 4" wine, 3 1/2 x 3 3/4" blue design paper
  • 4th layer- 3 3/4" x 3 3/4" craft,  3 1/2" x 3 1/2" wine, 3 1/4" x 3 1/4" sunflower design paper
  • 5 th layer - is oval decorate frame and oval layers with sentiment. choose any for this layer.
  • 6th layer- sunflowers(VIDEO on this) and sweet Ticket to fall fun SVG file all put together
  • lastly I added The Robins Nest dew drops to the 2 corners making flowers.
  • inside was done using TLC stencil
Robins Nest Dew drops can be found here Yellow and brown 

other supplies are as follows- svg is scrapping bug designs, sunflower is cottagecutz, oval frames are old Justrite, tlc designs for stencil on inside. design paper is echo park.


Thank you so much for stopping by and have a lovely day!

Saturday, August 13, 2022

Really Reasonable Ribbon August Hop


Welcome to "Really Reasonable Ribbon's  August” Blog Hop if you arrived here from Kathy's Blog you are on the right track. If not , you will want to head back to the Really Reasonable Ribbon Blog that way you don't miss out on any of the FABULOUS Designs from the Design Team today! There is going to be lots of Beautiful projects to see today using the Autumn Collection Ribbon Assortment, so I hope you Enjoy


For my card today I chose to use the darling Sunflower and pumpkin satin ribbon, and the brown both are in this months ribbon club package. I thought this months ribbon went so perfectly with Carta Bellas fall collection of design paper. I made several layers, and then added my frame that I cut out, next I did add the darling Caramel Apple Goat that is from Kadoodle bug designs. I had distressed and colored all the pieces and glued them together. These I keep ready in a little book so when I want an image I have it. So fun! Next I chose a couple of sunflower dies from my collection, I think one is cottagecutz and the other is cherrylynn designs. Lastly I added sewing, and dots to each layer and then my double bows to both corners. Inside of my card is complete and ready for writing.

Really Reasonable Ribbon:


Thank you so much for stopping by, and hope you enjoyed my fall Caramel Apple Goat card for today.

Your NEXT stop for today's hop is Bonnies Wonderful Blog!!!
Hugs to all,

Cheryl

Friday, July 8, 2022

Paris theme Memorydex card


Hello crafty friends and happy Friday to you all! Today's Memorydex card set was designed for Really Reasonable Ribbon using the Gorgeous satins that are in the shop. I also used the beautiful flowers as well. Love making these and sure hope you enjoy my post for today.


 I started out with cutting my card stock, I do use a heavy card stock from Papertemptress as it holds up strong. I then picked this darling design paper from Carte Bella, and layered it on the black. Next I punched out my borders and layered them. The dies are all from different companies, but I used the darling poodle, lamp post, shaker heart, swirl, rosette, and circles. I then layered them all, and added my black satin with dots ribbon, and the pretty pearl pink satin with silver metallic edge ribbon. The flowers are Open roses in pinks, and sweetheart blossoms, and rose buds. I will link below for easy finding. 

Really Reasonable Ribbon:
others: white paint pen, makers movement shaker, cottagecutz, carte bella design paper, 


Thank you for looking and have a lovely day! Hugs to all,Cheryl


Friday, April 15, 2022

Springtime Gnome Flowerpot

Hello crafty friends and Happy Friday to you all! Todays Memorydex card is a flowerpot I made into a pocket for some journaling on this darling Gnome card. I figured it nice when your journaling is hidden sometimes. The flowerpot is an old cottagecutz die, and the gnome is a Christmas one i changed a bit.
for this memorydex card I added an envelope and then some shapes on top of it. Next layered the fence and then my flowerpot and gnome. Love all the fun colors for spring here. I just had to use some of my dew drops from The Robins Nest Creative, I need to purchase more of these soon.  I used a mixture of design papers on this one from American crafts and Echo Park "Welcome Spring" collection.  I used my copic markers for coloring the bunnies, flowers, window, door and stem on the flower top. White paint pen for dots, and different ink pads for distressing the edges of the pieces.

Hope you enjoyed another extra post for this week!
Hugs to all,
Cheryl


Monday, April 11, 2022

shabby chic window

Hello crafty friends and happy Monday to you all! Today I'm sharing a Memorydex card I made using this window I created years back and never put on anything. I figured I would enjoy it on the memorydex cards, and add photos soon. I love that I am able to do journaling on the tag that is hidden in the pocket behind the window. Hope you enjoy this extra post for this week.
All I did was cover my card with design paper, and a doily die cut. Next I placed the window and added a new tag as the one that was in there disappeared over the years. I did add a butterfly, and that is about it. I covered the bottom of the window using a floral border piece that came with the design paper pad, and added the rest of that border to the card below. super fun!


I hope you enjoyed my post for today! Thank you for stopping by
Hugs to all
Cheryl


Monday, March 21, 2022

Pretty In Pink Envelope Treat Holders

Hello everyone and Happy Monday to you all! Today I'm sharing a little envelope treat holder I designed for some friends. I will be gifting these at a get together next month and cant wait. These were super fun and I just had to share with you all today.
first I picked out my design paper, and then used an old envelope die to cut each one out. I made a total of 14 of these. Super fun! Next I used 2 stampinUp! old punches to punch out my circle layers, and then used wood buttons on these. The ribbon is from Really Reasonable Ribbon, and so are the roses, and heart gem. I Love how they turned out, and super fun to give. I just need to buy more Ghirardelli chocolates.

 Thank you for stopping by today! Have a lovely day! 

Hugs to all, Cheryl

Friday, January 28, 2022

Valentines Envelope treat Holder

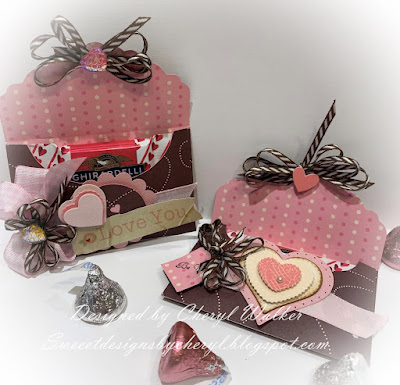
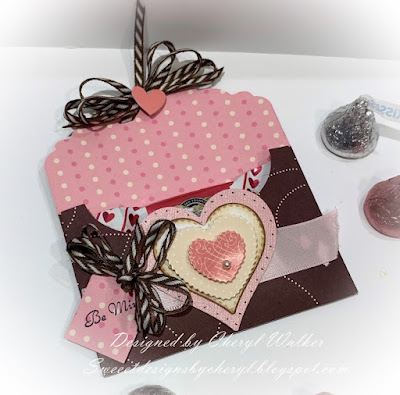
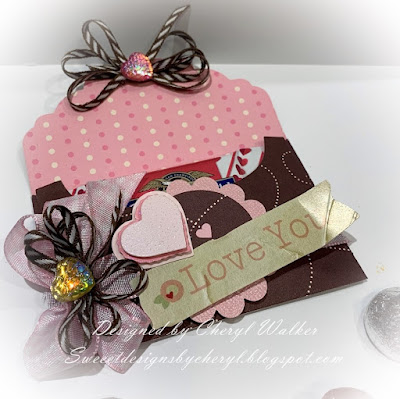
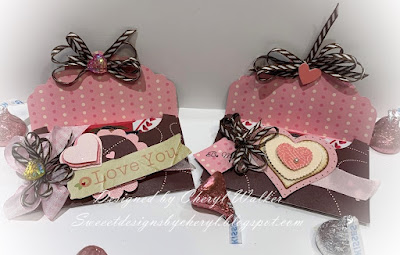
Hello crafty friends and Happy Friday to you all! Today Im sharing these darling Valentines Treat envelopes I made for Really Reasonable Ribbon. These were super fun and easy to make. Love them! Lately Ive been slowly working on lots of fun Valentines Treat holders, and excited to share them all with you.
So for the envelopes I used a die cut i had from cottagecutz. Next I chose the ribbons I wanted to coordinate with them. I chose the Satin Pink, Plaid Pink ribbon, and the striped brown, all will list below for easy finding. I also used the darling heart embellishments from Really Reasonable Ribbon.  

for my top envelope- I used die cuts heart shaped, then a tag punch, stampinup! sentiment, sticker hearts that are 3-D. I used the RRR pink satin across the envelope, and then added the bows using the Diagonal striped ribbon in brown. I put them together using scor-tape

For my bottom envelope-

I usded stampinup punches, heart 3-d, sticker that says Love You, Really Reasonable Ribbon Pink Plaid ribbon, Diagonal Stripe ribbon, and fish scale heart cabachon.

I will definitely be making more of these using different colors and die cuts. Love them! 


Really Reasonable Ribbon Supplies:


Thank you so much for stopping by and I hope you loved my Valentines Candy Holders for today!
Hugs to all,
Cheryl


Thursday, January 13, 2022

Really Reasonable Ribbon January Hop


 Welcome to "Really Reasonable Ribbon's  January” Blog Hop if you arrived here from Kathy's Blog you are on the right track. If not , you will want to head back to the Really Reasonable Ribbon Blog that way you don't miss out on any of the FABULOUS Designs from the Design Team today! There is going to be lots of Beautiful projects to see today using the Sweetheart Ribbon Assortment, so I hope you Enjoy

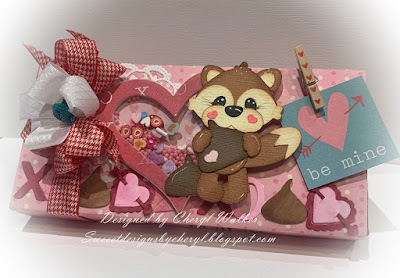
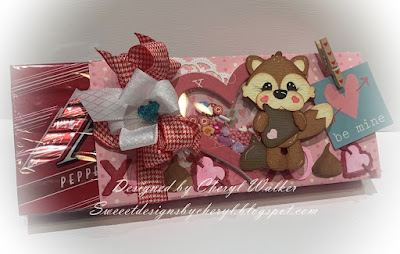
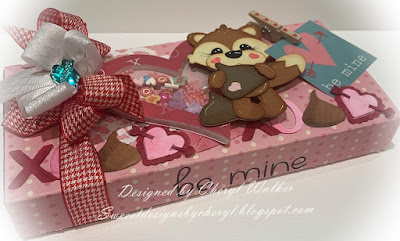
For My candy box cover I chose My design paper for my wrap first. Then did all the score marks and used the scor-tape to close it. Next I chose a doily die cut, my shaker heart, and my ribbons I wanted to use. I tied the red Ribbon around my box, and then tied my bow on. The white bow was hot glued, and then added a little blue heart. I put my little fox together using glue and distress inks. He is a SVG file from Kadoodle bug. My ribbons I chose are both from this months assortment and love them! Be Mine is a rub on, and the tag, be mine is from AC paper pad.  I enjoyed making this little cover for the Andes Mint box, super fun! Hope you enjoyed my post! thank you
Really Reasonable Ribbon: Heart embellishment, foam tabs, scor-tape, ribbon assortment, Ribbon Club, 
Thank you so much for stopping by, and hope you enjoyed my Decorated box for today.

Your NEXT stop for today's hop is Bonnies Wonderful Blog!!!
Hugs to all,

Cheryl


Friday, October 8, 2021

Beary Sweet Halloween Bags

Hello everyone and Happy Friday to you all! Today's  Halloween Treat Bags were designed for Really Reasonable Ribbon using the beautiful Shimmer Satin Ribbon they carry, and then a Cuddly Cute SVG Bear dressed as a spider. Love how these turned out, and Hope you do too!
The bags were purchased at one of the warehouse sales here in utah. I bought a ton of these bags so I could decorate them up to give. I started on this bag by using the spider ribbon from Really Reasonable Ribbon, and glued it to the bottom of each bag. Next I punched out the scalloped circles using a spider design paper ,and distressed it with orange, and then added black dots. the larger one was cut using black card stock and I added white dots. I used my New Cricut air machine to cut out 9 bears dressed like spiders, so cute! I airbrushed them and added eyelashes, and shadowing. the all have a little white flower on their heads. The Happy Halloween was cut using a die, and same with the bat. Next I chose to use the beautiful Orange Shimmer Satin ribbon. Love how these all turned out. May have to make some others using different designs, and ribbons.
Supplies Used:
Hot glue
SVG Bear
Punches
Dies , white gel pen, black pen, chalks, copics, air compressor , 


Sunday, June 13, 2021

Really Reasonable Ribbon June Blog Hop

 Welcome to "Really Reasonable Ribbon's  June” Blog Hop if you arrived here from Kathy's Blog you are on the right track. If not , you will want to head back to the Really Reasonable Ribbon Blog that way you don't miss out on any of the FABULOUS Designs from the Design Team today! There is going to be lots of Beautiful projects to see today using the Southwest Vibes Ribbon Assortment, so I hope you Enjoy


For My card today I chose this beautiful design paper from K&company as I absolutely love their designs. Next I added 3 layers, every layer is put together using the Scotch advance tape, and then popped up using the foam squares, then added my sewing. My sentiment layer, stamping my sentiment, and then added my die cuts and beautiful Delicate stitched ribbon from this months gorgeous ribbon collection from Really Reasonable Ribbon. I also added the beautiful flower embellishments that are also from the RRR store.

Really Reasonable Ribbon Supplies:

Thank you so much for stopping by, and hope you enjoyed my Card for today!


Your NEXT stop for today's hop is Bonnies Wonderful Blog!!!
Hugs to all,

Cheryl


Saturday, March 13, 2021

Really Reasonable Ribbon March Blog Hop

Welcome to "Really Reasonable Ribbon's  March” Blog Hop if you arrived here from Kathy's Blog you are on the right track. If not , you will want to head back to the Really Reasonable Ribbon Blog that way you don't miss out on any of the FABULOUS Designs from the Design Team today! There is going to be lots of Beautiful projects to see today using the Spring Fling Ribbon Assortment, so I hope you Enjoy 

For my card today I chose some old old design papers I have, and then layered them up using pinks and yellow card stock. I then cut out an oval and shaped die cut to layer my cupcake chick on. I stamped the Happy Easter using black ink and a stamp. I thought it would be cute to add some sweet flowers, and branches I cut out using the Martha Stewart punch. The ribbons I chose are from this months assortment and it was a hard pick for me, as i loved them all! 
supplies used:
other items used
sewing machine, pink threads, copics, hot glue, card stock, gel pen, dies

Thank you so much for stopping by, and hope you enjoyed my Easter card for today!


Your NEXT stop for today's hop is Bonnies Wonderful Blog!!!
Hugs to all,

Cheryl