Showing posts with label Funky Fold Card. Show all posts

Thursday, September 15, 2022

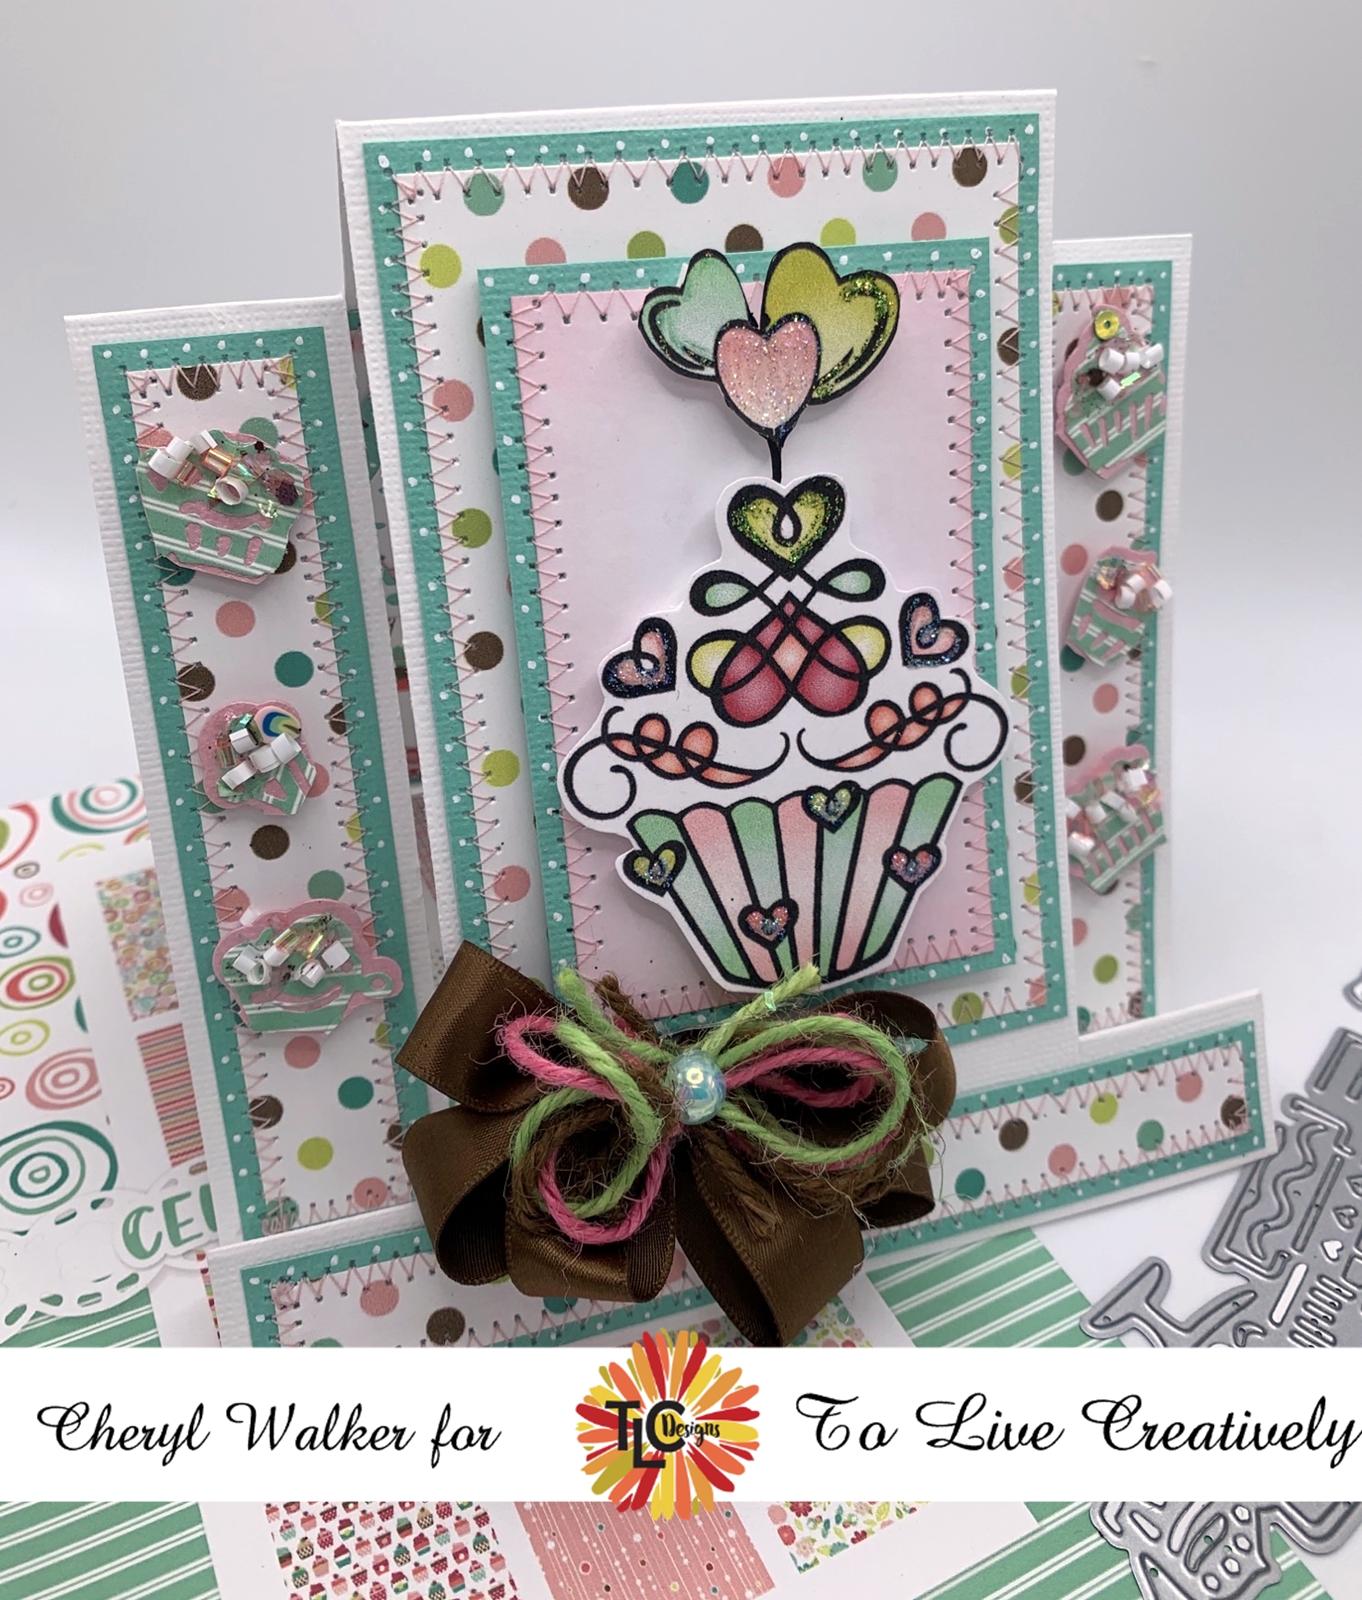
Celebrate Funky Fold card & video


 Hello everyone and happy Thursday to you all! Todays card was designed for TLC Designs Instagram Hop that has started today and will go through the week. Hope you will join us for some fun and inspiration. Link for hop here 

So for todays super fun hop we are using this absolutely darling Celebrate Suite, its the cutest ever, and you will fall in love with everything in this suite! I love the stamps, paper, ephemera pack, stencil, and dies, ooo even the darling sprinkle collection is so super cute. 

So for my card today I re-visted the funky fold cards as it was one of my favorite folds ever. I will show easy ways on how to do inside and decorate this fun card. Video can be found here .

Now on the inside of this one I did do a pocket, I dont show the pocket part but do show how to get the measurements and score and cut the pieces for the inside panel. Its an updated version and different measurements for inside. On this one here I did use the darling border die to create my pocket and layered it 3 times, love the look. I also used the border die to create my cupcakes on the front of my card.


TLC Designs supplies:
Celebrate Ephemera collection
Celebrate sprinkles
Celebrate twine


Thank you so much for stopping by and hope you liked my card for today! Also to view my videos you can see them all here


Thursday, July 4, 2013

Bella Baby Boy "Funky Fold Card"


Hello everyone and Happy 4th of July to all!!!
Today I wanted to share a Bella Baby Boy Funky Fold Card using the Darling CottageCutz Baby Release. For my card today I used the SWEET CottageCutz Baby Boys Clothes die cut for most of my images on my card. Most are colored with copics, and others are cut out in blue and brown card stock. Next I cut out some of the CottageCutz Diaper Pin Mini's to put along the bottom of my card.


 The FUNKY  FOLD card base has been around for many years, I do have some OLD video's on it, and you can find them HERE.

The design Paper I used is some of my Favorite Baby design Paper.Love the designs on it. However in the photo's its hard to see. I also used some Really Reasonable Ribbon Moss Green Leaves for the sides and the bottom.


Thank you for looking and have a lovely day!
Hugs to all,
Cheryl

Tuesday, December 18, 2012

Funky Fold Santa

Hello everyone, today I wanted to share this Christmas Funky Fold Santa card made for Creative Inspiration Paints & CottageCutz Dies.

First I used CottageCutz Holly Jolly Legs, and then I thought how cute would it be to use the CottageCutz Witch Cake plate, but decorate it up for Christmas :) So I did just that!! I used the CottageCutz Mistletoe & Holly Berry to use on the top of the cake plate :)

For the cupcake tops I used Resplendence Angel Dust, I love this as its super pretty in person and has such a glittery beautiful look. Next for the scalloped border on the bottom of the plate I used Creative Inspirations Deliquesce Super Sparkle Gold.

For the Inside I used the CottageCutz Holly & Berry Border, and thought it would be perfect fit for the inside and it was. I also used more of the Mistletoe & Holly for the front of my card as shown below. I did use some Creative Inspiration Paints on all my pieces, and glitter too!!!

I added some sewing, and there is NO ribbon on this card, Shocking I know....hehehehehe 

On the greenery I used Creative Inspiration Paints Evergreen to highlight and give some shimmer to the leaves, however I had a hard time getting the photo's to show it, but Love the look it gives. On santa's boots I highlighted with CIP's Onyx black, just on the top of the boot,heel, and bottom of the boots. For the white on Santa's pants I used CIP's Carmel to distress the white. 

Thank you for looking and have a lovely day!!
Hugs to all,
Cheryl

Tuesday, July 10, 2012

Thank you soo very much

Hello everyone, today I'm sharing my Funky Fold card designed for Helmar & Faber Castell using their wonderful products! Thank you Helmar & Faber Castell!!!
So for my card today I used Faber Castell's Mixed Media sets to color my flowers and create my background dp. I also used Helmars Scrap Dots and Premium Craft Glue, plus Acid Free Glue too! 

I will be having a LIVE USTREAM class this friday the 13th of July on HelmarLive Ustream, the link is HERE for my class that will start at 6:00 pm mountain time hope to see you there!!

You can find my class on the bottom of the page :)
I stamped and colored my flowers with Faber Castell Mixed Media, and I also stamped the leaves as well. The background dp is made using the same products and I will show how to on friday! I also used Helmar's Scrapdots for the 3-D effect you see with the flowers.
Supplies Used:
Glitz in blue

Here is a close up on the flowers, I really had a ton of fun designing these super sweet flowers, thank you again Faber Castell for providing me with such AWESOME products , im now HOOKED!!! :)

To view other DT members projects using Faber Castell please visit Helmar's Blog HERE! Enjoy!!!!

Thank you all for looking and have a lovely day!!

Hugs to all,
Cheryl

Sunday, May 6, 2012

Z-Fold Video/ & Video on Ribbon Rosette Flowers

Hello everyone and Happy Sunday to all! Cheryl here with my Shabby Chic "Happy Birthday" Z fold card for Really Reasonable Ribbon.


I had a few crafters ask how I made my Z fold card , so I decided to do a video on it, you can view it below :) Hope you enjoy and cant wait to see your Z-Fold Card!!!


Here are the written measurements I used
Card Base
1- 12 x 6 piece of card stock(base of card)
2 6 x 6 pieces of card stock (for base of card)
Card Layers
3- 5 1/2 x 5 1/2 pieces of colored card stock(for layering)
3- 5 1/4 x 5 1/4 pieces of design paper
1 5 x 5 piece of card stock(for smaller front piece) as shown in video
1- 4 3/4 x 4 3/4 piece of design paper
Hidden message pull tab 
5 x 5 1/4 in colored card stock
4 1/2 x 4 3/4 for white to layer on card stock for pull tab hidden message, you can cut a piece the same size for the back as well, to have more room for writing.
2- 6 x 6 pieces of card stock (Base of card)

For my card I used lots of Pink Satin Really Reasonable Ribbon(MY FAV). I also used the pink and white satin with polka dots for the one handmade flower on the front of my card and the inside of my card. I used 3 different widths of Pink Satin and they can be found here.


I love the fold of this card, it gives plenty of room for stamping, and writing. I did make the pocket for the pull card(secret writing), however I didnt make my pull card for this one yet. I did a lot of distressing on the CottageCutz Frames I used. I LOVE these new frame dies, they are sweet.


The Ribbon Flower Rosette was handmade using Really Reasonable Ribbon's Satin and Scor-Tape I will post my video below

I used the spooled Satin from RRR,however you can buy the ribbon in yardsinstead :)


Ribbon Rosette Flowers Video, super easy to make!
Used:
Really Reasonable Ribbon Satin 5/8" inch
Scor-Tape 1/2"
2 circle punches 1" or a little over 
and 3/4"
Bling, or a button, or brad for center


I will have to redo my video for the z-fold, I didnt realize that you cant upload on here that long of a video, so I will have to do a 2 part one :)
Card Open. I also used all unity stamps on my card, Buttons,flowers, and handmade roses. I wanted to run the ribbon through the tea time doily and loved using the 1/4" satin for this. I'm entering my card for the 1st time in Unity's Color challenge here/Pink Green andoff white

Thank you all for looking and have a lovely day!! Hope you enjoyed my video on the Ribbon Flower Rosette's :)
Hugs to all,
Cheryl Walker

Friday, August 5, 2011

Love your Kraft Funky Fold

Hello everyone todays card was designed for Victorine Originals using their beautiful sentiment stamp.
50% off all Victorine Originals, NO COUPON NEEDED :) AWESOME DEAL!! 
SALE goes through Sunday night! All Prices are adjusted and no coupon needed. 
For the shape of my card I used the Funk Fold technique and I have a few video's on this HERE! Love this fold for my card :) I also have a video on the measurement I did for the inside piece. On this one I added a border along the bottom to create a pocket for the scalloped circle journal pieces. I love this idea too. I used these for my moms Birthday card and it was super fun adding more writing to each of the circles :)
I used Really Reasonable Ribbon for my card, a mix of flowers & Buttons. My border pieces were cut with Heartfelt Creations Decorative Lace Die cut.
Thank you for looking and have a lovely day!
Hugs,
Cheryl
Victorine Originals 50% off SALE goes through Sunday night! I just placed my order be sure to check them out, tons of stamps for super CHEAP!!! You have the choice of Mounted,unmounted and wood mounted :) LINK to Victorine Originals

Tuesday, August 2, 2011

"Sweets" Funky Fold & Video

Hello everyone today Im sharing my Funky Fold card made for The Scrapping Cottage. I used the Carnival Release & the Pink Peony for my small flowers.
I'm LOVING the new Releases they are sooo SWEET! Its theCarnival Release and all the new die cuts are perfect for cards,layouts, and albums :) I LOVE THEM ALL and so will you :)

Here is a picture of the inside, I added some of the borders fromBoardwalk Canival Silhouette, it reminds me of Santa Cruz California, and I will be heading there this month :) cant wait!! I also used on the inside the cotton candy Cottage Cutz and the tickets from Ticket Booth. I figured you could add your own writing on them :) sweet messages... heheheh
For my Funky Fold card today I used:
Ribbon & Leaves are from Really Reasonable Ribbon

For my card I wanted to go with a soft girly look. Not your normal ticket booth, but I thought for a little girl this card would be perfect :) The video I have on the #3 peony is done real easy with 2 diecuts pieces,airbrushing,and a pearl and glue. You can use any tool for the folding of the flower, I chose to use the quilling tool.
f you would like to try the Funky Fold Card, its super easy and fun to make, I have a couple video's that you can view here :) that I did last year.


Video #3 on Mini Pink Peony Cottage Cutz & Cuddlebug


Challenges:
Cupcake Craftroom/Soft and Sweet
Craft Your Passion/Anything Goes
Make It Monday/Anything Goes
Crafty Pad/Use something clear(for the ticket booth window)
Thank you for looking and have a lovely day!
Hugs,
Cheryl
To visit The Scrapping Cottage Blog please click HERE :)

Thursday, October 7, 2010

I Believe in you(Video on Funky Fold)

"I Believe in you" Funky fold card was designed for Heartfelt Creations and updated Video on the Funky Fold and Inside is below!
I love making the funky fold cards and Im LOVING Heartfelt Creations Flowers and leaves with matching diecuts! These are sooo much fun and soooo easy to use! Emma Lou has some wonderful videos that you can view on the Heartfelt Creations Blog HERE!
Supplies:

6 x 12 for easel card(see video for details) Ive encluded links to each product used from HC
HCPC 3318 Daisy Patch Flowers (used Largest and 3 smallest from here)
HCPC 3314 Elegant Single Leaves ( stamped 13 leaves in 3 different sizes)
HCPC 3323 Large Elegant Word Background for dp (design paper)
HCPC 3304 Posy Patch Swirls(for sentiment and swirls on frame)
HCD 703 Daisy Patch diecuts
HCD 704 Perfect Petals Diecuts
Scallop Circle Large 415222
Standard Circle Large 354806
1.) I stamped flowers from HCPC 3318, 2 large flowers, 5 medium,2 small, 3 smallest in a blue ink, then colored with 2 different shades of copics (then cut with matching dies) then put together and added beads for centers. Set aside


2.) Stamped leaves HCPC 3314 in Olive and colored with copics(then cut with matching dies) I stamped 13 leaves in different sizes. Put leave clusters together and set aside.

3.) Cut pieces for layering on card and then stamped large background in blue again on faint blue design paper, and layer with blue cardstock, then added sewing.

4.) For circle I laid the flowers and leaves where I thought they would look best, and then moved to stamp sentiment from HCPC 3304. I added swirls as well, and then airbrushed now attach white circle to blue scallop circle. Lastly I glued flowers on and added leave clusters in place and set this piece aside for later.

5.) Now I put my card together and added my flower frame to middle of card. Then I added flourishes in pearls, and my bows with butterfly to complete my card!
Measurements for the panels on the card:

Challenges:
Freshly Brewed/Anything Girly
Paper Sundaes/Something from your stash(the beads)
No Time to Stamp/something in 3's
Raise the Bar/Flowers,2 ribbon,lots of leaves

Here is Funky Fold Re-make Video #1
My 1st video is here on the funky fold and I had converted the measurements for the fold from another site to inches :) I did all the measurements for the layers and inside myself! You can watch that video below this one!!
to show you how to do the funky fold for cardbase only
Funky Fold Video #2
To show you all the measurements for the outside layers and inside Layers


Measurements:
6x12 for easel card
Middle Panel- 4 3/4 x 3 1/4 (blue cardstock)
4 1/2x 3 (design paper)
2 Sides Panels-you will need 2 of each-
4 3/4 x 1"(Blue cardstock)
4 1/2 x 3/4"(design Paper)
Bottom Panel-
5 3/4" x 3/4"(cardstock)
5 1/2 x 1/2"(design paper)
Inside Panel
5 1/2 x 5 1/2 (Blue Cardstock)
5 x 5 (design Paper)
I hope both my video's are helpful, and sorry my post is sooo LATE today, but I had to make another 2 videos since I couldnt upload my last video :( I waited hours for it to upload and it never did !!
NOTE:if my Video #1 isnt working please view my 1st video HERE on the funky Fold :) Thank you!!!
Hugs to all,
Cheryl

Sunday, September 26, 2010

Heartfelt Creations "Daisy Patch"

 Lead Me in the right path O Lord!
Im sooo excited to share with you 1 of my 1st projects designed for Heartfelt Creations!! I will have many many more cards and projects to share with you!! :)

For my card today, or shall i say yesterday :) I used these stamp sets listed below, and matching diecuts!!
Im Sooooo in LOVE with all of Heartfelt Creations Products, the stamp sets and matching dies are sooo much FUN tooo use!!!!!

Each set is linked to the Heartfelt Creations Store for you to find them easy
HCPC 3318 Daisy Patch Flowers Precut set!( I used 4 of the flowers size stamps)
HCPC 3314 Elegant Single Leaves Precut Set(I used 3 of the leaves)
HCPC 3310 Trust In The Lord Precut Set( I used 2 of the verses)
Diecuts
HCD 703 Daisy Patch(to cut the flowers) I LOVE THIS!!!
HCD 704 Perfect Petals(to cut the leaves)
Oooo I also used the Scroll work die to create a scroll frame for my oval
To start I stamped all flowers in memento black, then colored with 2 different shades of pink(stamp as many flowers as you like to get a layered look)
Next I used the matching diecuts and ran them through my big shots. Then I did the same process with the leaves, and their matching dies!!
for my flowers I folded them upwards and then used pop squares to give them dimension. Next for my leaves I used tweasers to fold them up and in, and then Scrap dots glue in a tube to get them to stay the way I wanted them.
For my Funky Fold Card Please visit my Blog Post HERE!!

Thank you for looking and have a nice day!!!
Hugs,
Cheryl

Tuesday, September 7, 2010

Friends are special treasures!

This sentiment is sooo True!!!! My best friend Christina is like a sister to me, and is a special treasure!!! We've been best friends since we were 5 years old, we are now both 40!!! Just turned 40 this year both of us....heheheheehe

So I just had to make my Bestest friend a sweet card to give to her for the wonderful time we spent together this past weeekend!!! Christina You are a TRUE friend hun and the sister I never had! Love ya hun!!!!
Ok now onto my card!!
So this week the ABC Toys and Crafts DT will be focusing on Fall!!!
So for my card today I did the Funky Fold which I have a tutorial on HERE!!! I also did Shrink ART for my stick pin, and button! I used Penny Blacks In the Garden stamp set, and Hero Arts too. For my dp I chose Crafty Secrets its my FAVORITE!! Next I used some Vintage roses, and a Martha Stewart Branch Punch! I love this stamp set and love all the kitties in it!!! To see pictures of this set scroll down in this post!

SAVE 20% OFF your entire order at ABC Toys and Crafts use COUPON CODE: ABC20CW AT CHECKOUT all products I used are listed below!
Supplies used:
Penny Black Stamps & Hero Arts
Dp is Crafty Secrets
Copics to color
memento black ink(THIS INK WORKS PERFECT FOR COLORING WITH COPICS)
 and staz on!
Ribbon, Antique Flowers, Martha Stewart punch
sewing, and Shrink ART!!


Thank you for looking and enjoy your day!!! I also encluded a LINK above for the Funky Fold Video if you want to see!!!

Also dont forget my Discount Code for ABC Toys and Crafts is ABC20CW  if you are wanting to SAVE 20% on your order(Good for as many times as you used it for September only) ENJOY!!!
Hugs,
Cheryl