Hello Crafty Friends and Happy Thursday to you all!
Today I have a super fun and easy Christmas tag to share, and if you like fast and easy then this one would be perfect! Love the look of all the layers of the Cheery Lynn Dies use
All layers are cut out in white, I used 4 tags, and will list them below. I then just glued the Mandala Doily 1 to the Royal Scandinavia Doily, and then popped the Dusty Miller Square to them,using foam tabs, I did the same with the Mirror tag, after stamping my sentiment of course. Sentiment was stamped in black ink. Holly and berries were colored using copic markers, I did use a white on white design paper for those, that is why you see a print. Love the look it gives though.
Tag takes less than 10 minutes, and if you prep enough for more tags, it will go by ever faster. I think these are perfect for Christmas gifts. Last year I did at least 1 for each person.
Thank you so much for looking and have a lovely day!
Hugs to all,
Cheryl
Thursday, November 9, 2017
Sunday, November 5, 2017
Merry Christmas with Graciellie Designs and Really Reasonable Ribbon
Hello Crafty Friends and Happy Sunday to you all!
Today's card was designed for Really Reasonable Ribbon & Graciellie Designs using Beautiful Delicate Stitched Satin Ribbon & Graciellie's beautiful Digital Stamps and Design Papers! LOVE these!!! Also love that I'm getting some of my Christmas cards done, and should have enough to hand out for Christmas this year again :) Gotta LOVE that! hehehe
So for my card I started with using the design papers from Graciellie called "Holiday Traditions" and for the sentiment and poinsettia's I used "Christmas Poinsettia's" I layered each layer using Card stock that is already embossed with dots.
For the Poinsettia's I colored them with copic markers and then fussy cut them out. I also used Really Reasonable Ribbons Gold Stamens for the centers. I did layer 2 different sized poinsettia's to create a 3-D look.
Bows were done using the Forest Green Delicate Stitched ribbon. Talk about easy bows, this ribbon does the trick every time. Its so easy to create them as the ribbon flows and lays perfectly. Love that!! On my top bow I used Really Reasonable Ribbons "Colored Flower Rhinestone Embellishment"
For putting my card together I used Really Reasonable Ribbons
Scor-Tape,
Foam Tabs
Soctch ATG tape.
I absolutely love this design paper, the patterns are so beautiful in this collection. Its been a long time since I have used digital designs, and I have to say I did enjoy working with these, so thank you so much Graciellie Designs!!!
I really enjoyed creating my card for today using Graciellie Designs, and Really Reasonable Ribbon! I hope you enjoyed my post! Thank you for stopping by and hope you have a lovely day!
Hugs to all,
Cheryl
Today's card was designed for Really Reasonable Ribbon & Graciellie Designs using Beautiful Delicate Stitched Satin Ribbon & Graciellie's beautiful Digital Stamps and Design Papers! LOVE these!!! Also love that I'm getting some of my Christmas cards done, and should have enough to hand out for Christmas this year again :) Gotta LOVE that! hehehe
So for my card I started with using the design papers from Graciellie called "Holiday Traditions" and for the sentiment and poinsettia's I used "Christmas Poinsettia's" I layered each layer using Card stock that is already embossed with dots.
For the Poinsettia's I colored them with copic markers and then fussy cut them out. I also used Really Reasonable Ribbons Gold Stamens for the centers. I did layer 2 different sized poinsettia's to create a 3-D look.
Bows were done using the Forest Green Delicate Stitched ribbon. Talk about easy bows, this ribbon does the trick every time. Its so easy to create them as the ribbon flows and lays perfectly. Love that!! On my top bow I used Really Reasonable Ribbons "Colored Flower Rhinestone Embellishment"
For putting my card together I used Really Reasonable Ribbons
Scor-Tape,
Foam Tabs
Soctch ATG tape.
I absolutely love this design paper, the patterns are so beautiful in this collection. Its been a long time since I have used digital designs, and I have to say I did enjoy working with these, so thank you so much Graciellie Designs!!!
I really enjoyed creating my card for today using Graciellie Designs, and Really Reasonable Ribbon! I hope you enjoyed my post! Thank you for stopping by and hope you have a lovely day!
Hugs to all,
Cheryl
Monday, October 30, 2017
Happy Halloween
Hello everyone and Happy Monday to you all! Today I have a super cute Halloween card I made using all Cheery Lynn's Darling dies. Love how they look, and how they turned out, all were colored using copic markers, except the ghost and fence.
I used this darling design paper Tricks and Treats from pebbles. Next I layered with a purple and black card stock, then did sewing with an orange color thread. The Happy Halloween was cut using the Cheery lynn die B905 Happy Haunts and then colored using an orange ink, I did add some black dots to all the letters, thought it gave them some contrast. Next I colored the pumpkins using all copic markers, 2 oranges, 3 greens, and a tan color. Next the twisted tree was cut in white, and then colored with copic brown. The Wrought Iron fence was cut using black card stock. I glued everything using my favorite glue, Best Glue Ever, and it is! Just have to try to keep it off your hands....hehehehe I used foam squares for the ghost.
Super fun and fast card to make, as I haven't been feeling so well, so this need to be quick.
Cheery Lynn Designs Dies & Supplies Used:
B905 Happy Haunts
B827 Fall Pumpkin Patch
B904 Twisted Tree
B885 Wrought Iron Fence
Big Sister Machine
Best Glue Ever
Thank you for stopping by and have a lovely day, and a Happy Halloween!
Hugs to all,
Cheryl
Wednesday, October 25, 2017
Club Scrap Scandinavia Hop
Hello everyone and welcome to Club Scraps October blog hop featuring the New Beautiful Scandinavia Deluxe kit ! If you arrived from Josette's Blog then you are in the right place , if not you will want to start from the beginning at Karen(Club Scrap blog)so
you don't miss any of the wonderful inspiration from the Club Scrap
Artist Team! There is also a list of the entire line up there for you
with links :) Have fun & I hope you enjoy todays Hop!
On my layout for today i used the blue print 12 x12 for my background layer, next I layered it with the red 12 x 12 card stock, and added sewing. For layering on it i used the cut a-part for a banner across the bottom, and then cut out a large Cheery Lynn Doily using white card stock.
Photo mat's were done using the 8 1/2" x 11" design paper sheet and cut it down to fit the pre-cut Red photo mat's, i also added sewing to these.
Flowers and vines were cut using cheery lynn dies, and the green and red card stock from the Deluxe kit. I did distress the edges of the flowers using red ink, and added some white gel dots, along with pearls to the centers of each flower.
I love this months collection, and the colors in it are perfect! love all the beautiful designs too!
EXTRA SHARE- My Lollipop Card was already posted to my blog on Friday, but i wanted to share it today as well as it uses some of the new Scandinavia collection along with the pink from the Club Scrap Paradise collection, love how it works perfectly with this months kit. I did use lots of dies, and the Glass Flower technique on the Lollipop card! For all details on this please visit Here.
Your next stop is Deb's Blog Have fun!!! Thank you for joining us today!!
Hugs to all,
Cheryl
Tuesday, October 24, 2017
Hope your day blooms
Hello everyone and Happy Tuesday to you all! Today's card was designed for Really Reasonable Ribbon & JustRite Papercraft. is a super easy and simple card to make. Love when you need those last minute quick cards....hehehehe For this one I used 2 ribbons, and 2 embellishments, all from Really Reasonable Ribbon. Card takes less than 20 minutes to make.
To start I cut out my 2 design paper pieces that came from 2 different paper stacks called "Lemonade" and then Crate Papers "Open Book". I also used the black card stock from Club Scrap to layer with. Each layer does have some simple zig zag stitch on them.
Ribbons I used are Satin Swiss Ribbon Dots, for the bow, and then Diagonal Ribbon Striped Black for underneath it. I embellished my ribbon with a
For the stamping, I used the Mini misti tool to align my images and then stamped along wih Geranium Heart Song stamps, I colored the flowers with copic markers YG03,G99,YG95 these are the greens I used. Next I chose RV34,R85,RV11,RV02 all done on JustRite watercolor paper
Lastly I added 4 white Resin Flower cabochons to the corners of my card. I also added some white gel dots to each layer.
Really Reasonable Ribbon Supplies Used:
Satin Swiss Ribbon Dots Black
1/8" Diagonal Ribbon Striped Black
Mixed Colored flowers rhinestone embellishment
FoamTabs
Scor-Tape
Resin Flowers Cabochons
Thank you for stopping by and taking a peek! Hope you have a nice day!
Hugs to all,
Cheryl
Friday, October 20, 2017
Lollipop card
Hello crafty friends and Happy Friday to you all!
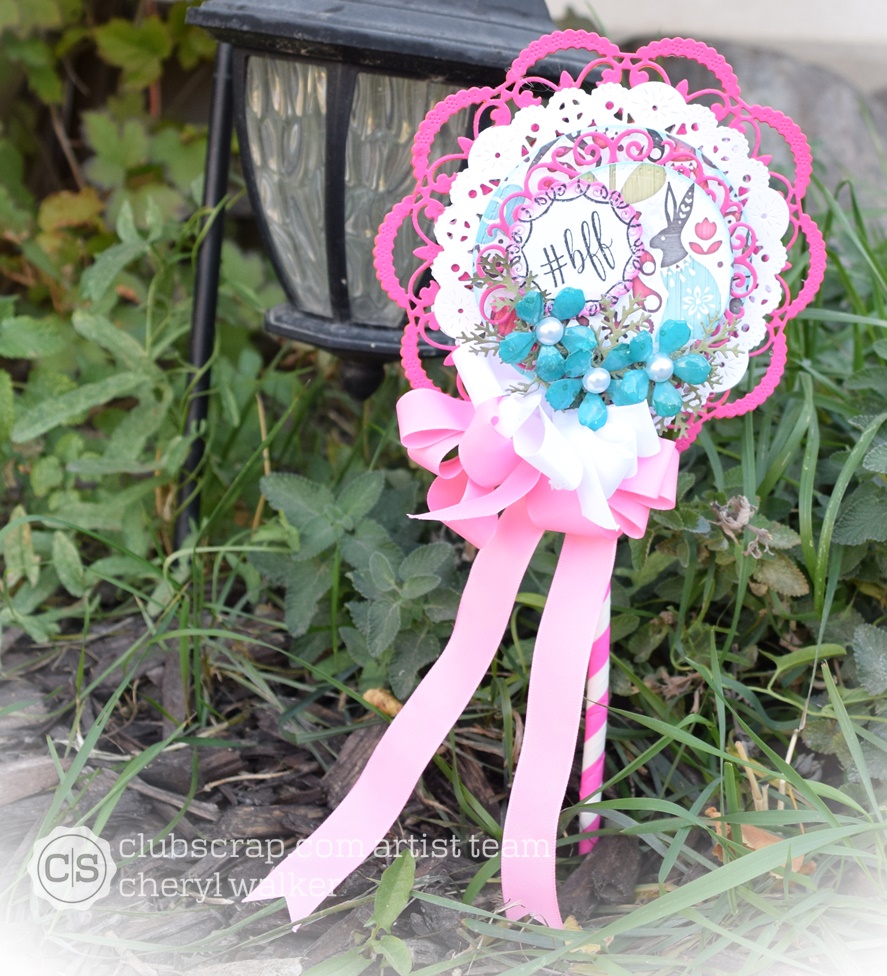
Today I have a super fun project I created for Cheery Lynn using their Beautiful dies & Club Scrap using their Beautiful Scandinavia Collection. I love how these turn out, and really need to make more of them as they are super fun to make! Anyways hope you enjoy my post for today!
So for the lollipop card you will need the DL184 Sophia's Heart die, its the large one done in fuchsia card stock from Club Scraps Paradise Collection. Next I used Cheery Lynn's DL102 French Pastry Die. and that was cut in white card stock. Next on top of that is a circle die cut in Club Scraps Scandinavia design paper love this design paper its absolutely darling! I also used it on the top layer. both those circles were cut using LPC4 Circle Pierce and cut tool LG silver. Next on top of that is the Flourish Frames B888, Large frame cut in pink card stock, and the little one is cut in a white, then distressed with pink to match. Flowers are the B436 Tea Rose Medium flower , then the branches are from the B216 wreath strip. These are super fun and pretty easy to make. Love how they come together so nicely. You can layer as much or as little as you like, but for me I LOVE lots of layers.....hehehehe Hope this inspires you and have fun crafting!!!
Cheery Lynn Dies/Supplies used:
DL184 Sophia's Heart die
Cheery Lynn's DL102 French Pastry Die.
LPC4 Circle Pierce and cut tool LG silver
Flourish Frames B888
B436 Tea Rose Medium flower
Wreath Strip B216
Big Sister Die cutting machine
Other Supplies Used:
Club Scrap Scandinavia Collection
Club scrap paradise collection for the pink
Club scrap black ink
Really Reasonable Ribbon and pearls
Stamps are The Project Bins BFF set
Lollipop sticks are from the store, used in baking I believe.
Foam squares
Hot glue
Mini Misti tool
Black , pink and blue inks
I do hope you enjoyed todays post, and thank you so much for stopping by!
Have a nice day!
Hugs to all,
Cheryl
Wednesday, October 18, 2017
BE YOU
Hello Crafty friends and Happy Wednesday to you all!
Today I have a sweet card I made for Club Scrap using the beautiful new October Deluxe Scandinavia Club Kit. I'm LOVING all the stamps in this set, and on my card for today I used Scandinavia Art Nouveau & Jumbo Unmounted set to stamp with.
To start with I layered my card using the 12" x 12" grey sheet of card stock, love this one, as it has a little weave embossing on it , its layered with the 12 x 12 pink card stock from the kit as well. Then I chose the DARLING 12" x 12" print and layered it with just the pink. For my main stamped panel I used the Mini Misti tool and that way I could place my stamps as I went, and keep stamping using different color pens.
Flowers were done using the 12" x 12" printed sheet and Cheery Lynn's Shasta Daisy die. I then distressed the edges using SU! cool Caribbean ink pad. For the centers of my flowers I used Really Reasonable Ribbons embellishments.
Lastly I punched out some branches using the Martha Stewart punch.
I had a lot of fun stamping these darling stamps up, and using the Mini Misti tool to do it. Love how it keeps everything in place, so you can stamp multiple times. Also LOVING Club Scraps sweet design paper with the darling animals on it. I had to place the top panel over to the side, so you could see the sweet owl on this paper. Cant wait to share some of my other projects with you all using this darling release.
Hope you enjoyed my card for today, and thank you so much for stopping by!
Hugs to all,
Cheryl
Monday, October 16, 2017
Cheery Lynn Designs "Baby It's Cold Outside Blog Hop"
Hello everyone and Welcome to Cheery Lynn Designs "Baby It's Cold Outside Blog Hop". Today all of the Cheery Lynn Designers will be showcasing the Beautiful dies from Cheery Lynn Designs. So grab yourself a cup of your favorite beverage and enjoy today's hop. You wont want to miss this one!!!
You should have arrived from Maggi's Blog. if not you will want to start at the beginning, The Cheery Lynn Designs Blog so you don't miss any of the designers posts for today
For my card today I chose to use the sweet New Sparkle Christmas Tree B913 , Window B Die FRM142, Fancy Reindeer, Poinsettia strip, wreath strip, Alpine flourish Doily. Love how they all look together for a super Pretty Christmas card.
I started with the Reindeer, cut him out in white card stock, and distressed him with inks. Next I cut out the Green tree, using a bazzill embossed card stock. The window was cut out in a swirl card stock white. Super fun, I backed the window using a design paper from pebbles home for Christmas collection. Next I backed the window with the Alpine Flourish Doily in brown.
Poinsettia's were cut using scraps leftover from the background design paper on my card. I then distressed with red club scrap ink, and then did the glass technique on them. I have several videos under my Tutorial tab that you can view. Behind the poinsettia's I used the wreath pieces, I cut 3 strips Bow was created using RRR Ribbon, and pearls.
Cheery Lynn Design Supplies Used:
Window B Die FRM142
Sparkle Christmas Tree B913
Fancy Reindeer 7piece set B843
Poinsettia Strip B324
Wreath Strip B216
Alpine Flourish Doily DL282
Big Sister Die cutting machine
Scrap perfect best glue ever
I hope you enjoyed my CARD for today!!! Please let me know what you think of my card, as I always enjoy reading the wonderful comments!! thank you all so much!!!
Cheryl
You should have arrived from Maggi's Blog. if not you will want to start at the beginning, The Cheery Lynn Designs Blog so you don't miss any of the designers posts for today
For my card today I chose to use the sweet New Sparkle Christmas Tree B913 , Window B Die FRM142, Fancy Reindeer, Poinsettia strip, wreath strip, Alpine flourish Doily. Love how they all look together for a super Pretty Christmas card.
I started with the Reindeer, cut him out in white card stock, and distressed him with inks. Next I cut out the Green tree, using a bazzill embossed card stock. The window was cut out in a swirl card stock white. Super fun, I backed the window using a design paper from pebbles home for Christmas collection. Next I backed the window with the Alpine Flourish Doily in brown.
Poinsettia's were cut using scraps leftover from the background design paper on my card. I then distressed with red club scrap ink, and then did the glass technique on them. I have several videos under my Tutorial tab that you can view. Behind the poinsettia's I used the wreath pieces, I cut 3 strips Bow was created using RRR Ribbon, and pearls.
Cheery Lynn Design Supplies Used:
Window B Die FRM142
Sparkle Christmas Tree B913
Fancy Reindeer 7piece set B843
Poinsettia Strip B324
Wreath Strip B216
Alpine Flourish Doily DL282
Big Sister Die cutting machine
Scrap perfect best glue ever
I hope you enjoyed my CARD for today!!! Please let me know what you think of my card, as I always enjoy reading the wonderful comments!! thank you all so much!!!
Your NEXT stop on the Hop is Laurie's Blog ! Thank you for stopping by! Don't forget to stop and leave a comment on each blog as there is a GIVEAWAY as well :) Enjoy!!!
Hugs to all,Cheryl
Saturday, October 14, 2017
Sweet Christmas Tag
Hello crafty friends, today I have a sweet Christmas tag I created for Really Reasonable Ribbon using some of their gorgeous ribbons from this months club, and then some embellishments as well. I picked 2 ribbons and then the lace from this months kit. Love them all!!!
On my tag I chose to use Graphic45 design paper to cover this large tag, then cut one of the design papers that had little tags and added this one using the foam tabs, and that is where the Santa and Sentiment came from. I had some red Poinsettia's that I had cut extra for my card yesterday and thought they would be cute on this tag, so I added what I had left. I also added some 8mm pearls, metal leaves, and green leaves to the cluster of poinsettia's. I added lace across the bottom, and then used the large diamond satin to tie through the hole, and then used the other satin to create my bow.
I had a lot of fun creating this sweet little Christmas tag, as it took very little time, and was super easy to make. Love when you can make tags fast, and they turn out cute! :)
Really Reasonable Ribbon Supplies Used:
Hugs to all,
Friday, October 13, 2017
Really Reasonable Ribbon October Blog Hop
Welcome to "Really Reasonable Ribbon's" October Blog Hop!

If you arrived here from Ginny's Blog you are on the right track. If not , you will want to head back to the Really Reasonable Ribbon Blog that way you don't miss out on any of the FABULOUS Designs from the Design Team today! There is going to be lots of Beautiful projects to see today using September Ribbon Assortment, so I hope you Enjoy!!!
Poinsettia's -Were done using Cheery Lynn's Poinsettia strip die. I cut out a coordinating design paper from the same stack called "Merry & Bright" from Pebbles. I then distressed the edges of the poinsettias using a red ink, and then using the Glass Flower Technique, which can be found under my tutorials tab on the top of my blog. Stamens were used, and are the RRR gold ones. I punched holes in the poinsettia flowers so i could put the stamens through and hot glue them together, this was done last. Leaves I used 2 different sizes on this card.
Sentiments- were stamped using The Project Bins stamp sets called "Joyful Song" & "Maybe Christmas" and were stamped using the Mini Misti tool and club scrap Moss ink.
Bow- was created using the beautiful red from this months gorgeous Ribbon Club Collection
Hugs to all,
Cheryl

If you arrived here from Ginny's Blog you are on the right track. If not , you will want to head back to the Really Reasonable Ribbon Blog that way you don't miss out on any of the FABULOUS Designs from the Design Team today! There is going to be lots of Beautiful projects to see today using September Ribbon Assortment, so I hope you Enjoy!!!
I LOVE all the Christmas ribbons in this months assortment , and I always LOVE each month, as Bonnie puts together an AWESOME assortment! On my card for today I did use 1 of the ribbons in this kit. I also used RRR Foam Tabs & 1" Scor-Tape for the layers, also used some embellishments! It was a hard choice as I wanted to use them all, but the design papers i chose looks perfect with this red.
Sentiments- were stamped using The Project Bins stamp sets called "Joyful Song" & "Maybe Christmas" and were stamped using the Mini Misti tool and club scrap Moss ink.
Bow- was created using the beautiful red from this months gorgeous Ribbon Club Collection

I hope you all are enjoying today's hop, and hope you enjoyed my post as well! :)
Your NEXT stop for today's hop is Bonnie's Wonderful Blog!!!Hugs to all,
Cheryl
Subscribe to:
Posts (Atom)