Thursday, March 31, 2011

Especially for you!

Todays card was designed for SCS WT Flower Frenzy Challenge and for Heartfelt Creations, using the Posy diecut and Special Kitty Stamp 631E
I stamped the Special Kitty Stamp in memento black ink and colored with copics( W-1, W-5,RV21,R20,R85,B14,B41), next for the flowers I used the Posy diecuts 3 smallest flowers and cut 3 large blue,1 medium blue,and 2small blue, then for the Pink I cut 6 medium pink,and 4 small pink. I used clear glue to put them together and then added pearls to the centers.
Card Measures 6 x 6
Challenges: ABC Challenge/R is for Roses(the rose the kitty is holding),Ambers Crafts and Stuff/Use flowers, Clear it Out/Flowers,flowers and more flowers , Partytime Tuesday/Handmade flowers, Top Tip Tuesday/Nature Inspired ,Tuesday Throwdown/Florals

Wednesday, March 30, 2011

Pop up Slider Card & Video

Hello everyone todays post is for Heartfelt Creations and I promised a video on the Pop up Slider card, so I've attached 2 video's at the end of todays post. 
Supplies Used:
HCPC 3377 Sympathy Sentiments PreCut Set
HCD 701 Posy Patch Die
Really Reasonable Ribbon Lace
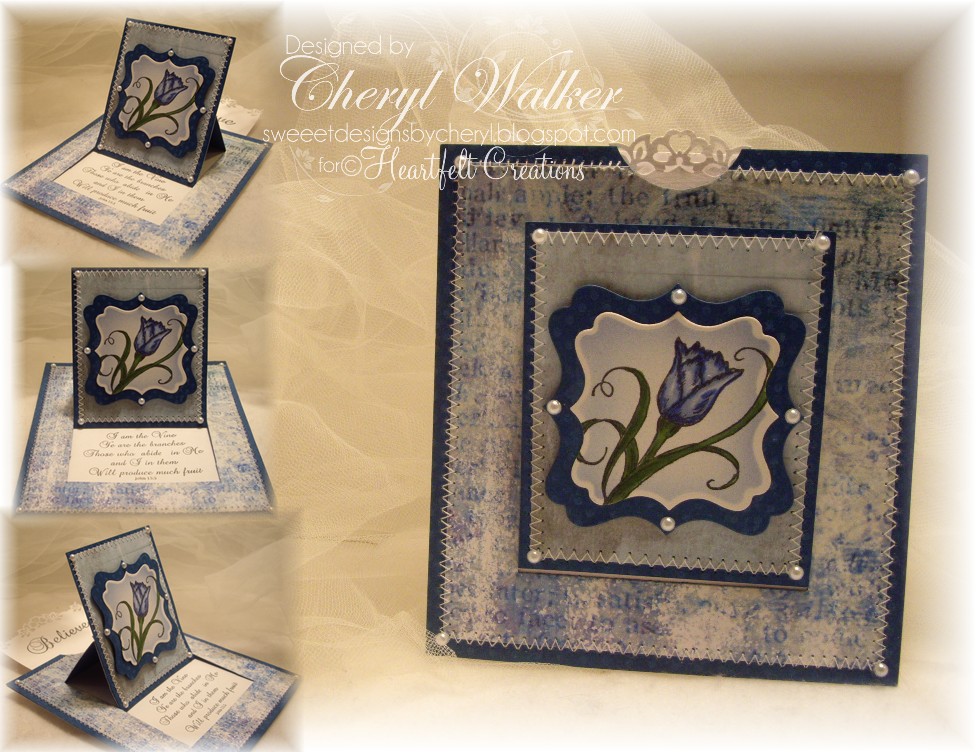
Other: Copic E43 for airbrushing around oval Scalloped oval Oval spellbinders Dries Clear Glue Card Measures 6 x 5

2 cream 6 x 5 card stock pieces 1 for front and 1 for back 1 5 1/2 x 4 1/2 Design paper, and attach to front cream 6 x 5 piece now add sewing Now for cutting Measure 1" in from the side and 1" up from the bottom and cut from 1"-4" do this on both sides Now you will cut along the bottom 1" up(meet both sides so you will have a flap) cutting from 1" -5" will do this. Now to score, I used the scorpal and scored at 2 1/2" from the botton of the card. Pull tab piece
4 x 4 1/2 this will be attached to the back of the piece you just scored, attach it to the bottom with red tape you can now add lace around the edge of your front piece and then add the backing. for the main image panel cut a piece of cardstock at 3 x4 and I distresssed it and added sewing and lace, and then attached it to the bottom part of the fold this is so it will move up and down. I used the posy patch diecut for the 4 smallest flowers. The center flower is 2 large, the 1 next size down, then 1 of the next size down. For the 4 small pink in the corners, I used the smallest flower die cutting 8. Now for the 2 cream I used the 2 smallest diecuts and cut 4 of the bigger, and 2 of the smallest to make them. I distressed all flowers using pink ink and then antique linen from tim holtz. I glued pearls in the centers. All sentiments are stamped in memento black ink, 1 on the pull tab, next is under the pop up panel and then the other is on the oval
 I came across this You tube video that Dawn had done, so I thought since I do larger cards that it would be nice to change it up a bit. I think I've done the slider a little different too.
Video Part 1

Video Part 2

Here is another card that I believe measures 5 x 5 1/2 its the smallest one I've done yet.
I will be back in the morning to add my challenge list for my slider card above, thank you for looking and have a lovely day!
Hugs,
Cheryl

Tuesday, March 29, 2011

Pop Up Slider Card

Hello everyone and Happy Tuesday! Todays Pop Up Slider card was designed for Michelles Scrapbooking and More.
I will have 2 more slider cards for tomorrows HC post and a video showing how I did this. I had come across a video, of course I changed the size and layout and such, but will have links tomorrow on this :)

Supplies Used:
Tim Holtz Design Paper
Sentiments/Heartfelt Creation HCPC3354, HCPC3363, 1115D
Wild Orchid Roses
Wedding stems, Border Punch,sewing

challenges:
Craft Your Passion./Grin and Bear it
Make it Monday/Anything Goes
Paper Playtime/Anything Goes
Totally Gorjuss/Spring has sprung
Wee Memories/Anything Goes
Paper Cutz/use 3 pattern papers(1 for the scallop circle,one for the layer behind that, and 1 for the polka dots frame)
The design paper I used is a new paper pack I bought last week its Tim Holtz Vintage Shabby and I LOVE all the dp in this pack. I also bought the wedding stems and placed them behind the roses. My DARLING image is from Michelles Scrapbooking and More, and she is one of my many favorites :)

All sentiments are from Heartfelt Creations, I used one on the pull tab,1 on the circle, and 1 on my card.
Thank you for looking and have a lovely day!
Hugs,
Cheryl

Saturday, March 26, 2011

Sewing station Lamp

Hello everyone, today I wanted to share a Lamp I bought at Hobby Lobby and then altered a bit. When I saw this lamp I LOVED the base, but the shade looked kinda YUCK! It had tulle and ribbon and looked like it was thrown on  :)
So the Dotted tulle was sewn up by my mom in about 5 spots, to give some poofyness to the tulle,, and then I made some Pink Ribbon Roses, and White Rosettes out of Really Reasonable Ribbon Satin ribbon. I replaced the ribbon that was on here with RRR Satin Ribbon with Grosgrain edge.

For around the roses I used RRR Scalloped Trim Green and then hot glued them onto the rosettes I made with the hot glue gun. I did this around the entire lamp I think my last picture on this post you will see a side view of the lamp.

Next I added some gems,with beads that I also bought at Hobby Lobby in the wedding section, I cut them down and hot glued them to behind the bow.
On this last picture you can see the side view, and more of my handmade ribbon roses. I also took this last pic, because I wanted a picture of my kitties resting by our new lamp
Boots & Boomer are resting! Hehehehehe
Thank you for looking and have a lovely weekend!
Hugs,
Cheryl

Friday, March 25, 2011

Some Birdy Loves You Giftset!

Hello everyone todays giftset was designed using Create a Critter! I made a Treat Bag, Giftbox, and a matching card.
Supplies used:
Lots of Ribbon(Really Reasonable Ribbon)
DP,White Cardstock, Pink Cardstock,Brown Cardstock
Pearls,flowers,gems,stamps, martha stewart punch, and TONS of ribbon
Box-for giftbox(was given to me by my mom ) thanks mom!!!
*************************
Card-Designed for Really Reasonable Ribbon-

my card was cut 5 x 10 and then folded in half, next I cut a 4 3/4 x 4 3/4 " piece of dp and then added a border punch down the side. for the top its part of the Top Note die. I added ribbon acrossed it and added a bow and flower. Next my tag was cut with the quickutz and then airbrushed and stamped. All ribbon is Dots and I used a ton :)
 
Treatbag- Designed for Scrapbookpal.com
First I made the treatbag with heavy design paper. I cut it 4 1/4 x 10 1/2 and then scored in the middle at 5 1/4 using the scorepal, then 1/2 inch on each side of that(would be 5 3/4",4 3 /4"), then folded the middle up, and the other 2 scores down. For the top fold I used a SU! die, but you can use any shape you like. for the inside I put a package of mixed nuts, but you can use candies, or whatever :) Have fun!!!
Create A Critter
Woodland Critters Pink by Design
Tombow Markers

challenges:
Color Create/Pastels, Crafts and Me/Anything goes , Creative Cottage/Spring, Creative Craft Friends/Spring , Stamp with Fun/Spring
Thank you for looking and have a lovely day!
Hugs,
Cheryl 

Thursday, March 24, 2011

2 Lara Ladybug cards

Happy Thursday to all! Today Im sharing 2 cards made with Lara Ladybug from Digital Delights! & Ribbon from Really Reasonable Ribbon.

My cards were designed for Digital Delights Delightful Challenge to use Pastel Colors and Ribbon! For my 1st card I used Lara Ladybug & colored her in copics and then airbrushed around the frame. the ribbon is Satin ribbon from RRR. The flowers are from Wild Orchid. The DP is some leftover Baby dp that I have.


For my 2nd Card I used the same DARLING Lara Ladybug and colored her again with copics. On this card I used Really Reasonable Ribbon called Organza with Satin Stripe Pastel Multi
Right now you can SAVE 10% off your  Really Reasonable Ribbon order by using Coupon Code WELCOMESPRING in the promotional code area on the first page of checkout to get 10% off your entire order including sale items from now through midnight (Eastern time) on Thursday 3/24
Thank you for looking and havea lovely day!
Hugs,
Cheryl

Wednesday, March 23, 2011

HC Altered Container

Todays Crystal Light covered container was designed for Heartfelt Creations, using HC Stamps and Matching diecuts.
First I stamped all blue flowers with blue ink, and then cut them out with the 3 smallest dies(amount listed above). Then I glued them together with dries clear glue and added pearls to the centers. For the pink I just used the diecut and then put them all together and did the same and added a pearl to the center. My container is a leftover Crystal Light container. I used design paper,cardstock,sewing, and lace to this panel. For the front frame I used spellbinders Label 4. And then added pearls. for my lid I added some looped ribbon and more flowers. Measures 6 1/2" tall x 3" wide
Supplies Used:
RRR-Lace,Ribbon,Pearls
Flourishes
Spellbinders
Sewing
SU! Design Paper
To see other projects from my DT sisters visit the Heartfelt Blog HERE

challenges: Creative Craft/Lace,Tuesday Throwdown/anything but a card, Creative Craft Friends/Spring, House of Gilli/Pastel Colors with bling, Crafty Cardmakers/special birthdays, Bunny Zoes Craft/Happy Birthday with Lots of pearls, Spoonful of Sugar/Ribbon,pearls and flowers, Make it Monday/Anything Goes, Stamp with Fun/Spring, Stamps R Us/Spring,

Thank you for looking and have a lovely day!
Hugs,
Cheryl

Tuesday, March 22, 2011

Welcome Baby

Hello everyone, and Happy Tuesday to all! Well shaelynn(my niece) is sleeping and Im now doing my post at 9:41 am....heheheeh kinda late, but I wanted to post for today :)
On my card I used this DARLING Image from Doodle Dragon Studio Zoo 10 . I colored my giraffe with copics and then cut it out. The ribbon I used is from Really Reasonable Ribbon found HERE
Right now SAVE 10% off using coupon code WELCOMESPRING at Really Reasonable Ribbon!!! SALE is through Thursday the 24th of March

I had to do another short post for today since I 've been super busy with my niece,she is sooo DARLING I will be back to add a picture I took of her this morning playing with Auntie's Ribbon...hehehehehe

Thank you for looking and have a lovely day!
Hugs,
Cheryl

Monday, March 21, 2011

A little Something Chipmunk

Hello everyone and Happy Monday to all! Wow it seems like its been awhile since Ive posted :) Anyways today I wanted to share a card I had made for Angels Landing using this DARLING new image from Chipmunk Vinca 1
Ive colored my image with copics and then cut out with spellbinders circles, and scalloped circle. I then airbrushed around the main image, using the spellbinder circle as a frame for the airbrushing. The sentiment is SU! and the Lace is Really Reasonable Ribbons found HERE!

Todays post is kinda short, since I have my niece today and she is napping, now im off to shower...hehehehehehe
Have a wonderful day and thank you for looking!
Hugs,
Cheryl

Thursday, March 17, 2011

2 cards for todays post

Hello everyone and Happy Thursday to all! Today I have 2 cards to share with you :) 1 was done for Alota's Challenge that is going on right now, and the other was done for todays WT challenge
SMILE!
For my card I used Alota's Basket of Eggs , and colored it with copics. The Spellbinders came from Michelles Scrapbooking and More! I used some old scraps and my tag is from Quickutz.
Ribbon is from RRR(Really Reasonable Ribbon)!

Next Card was designed today and I used Mini Wall and the little Girl both are from Alota Rubber Stamps and can be found HERE!!
 I colored the wall and girl with copics and then used the spellbinders frame to airbrush the sky. The SMILE is done with stickers! YEP stickers, Im try'n to use some of the Hundreds of stickers up this year. The flower is also a sticker :) I just layered it. Ribbon I used is from Really Reasonable Ribbon, its single faced satin.
Also LUCKY BUG SALE 25% off order of 10.00 or more LuckyBug2011 is the coupon code!

Thank you for looking and have a lovely day!
Hugs,
Cheryl

Wednesday, March 16, 2011

HC 12 x 12 Grad Page

Hello everyone today im sharing another 12 x 12 Grad page for Heartfelt Creations using the Dutch Iris Collection. To see other Creations designed by my DT sisters and myself please visit the Heartfelt Creations Blog.
Supplies Used:
Other: copics-B18,B34, B41(Blues), G99, YG03(greens), Y08(yellow) sewing

I stamped 8 iris's and colored them with copics listed above, and then used the matching diecut to cut out 4 of them. The rest were cut out by hand. I stamped 5 large leaves, 2 smaller, and 2 of the other small leaves(these 2 were cut using the matching die) the others were cut by hand. My page measures 12 x 12

I made a copy of my sons graduation picture for this year to use on my page. He will Graduate in June, and I'm sooo happy, he is my second to graduate, and then I have 1 more...hehehehehee

I thought using the blue and yellow and the Iris's would be perfect for his page. Ive also used Hope in the Lord precut stamp too. all stamps and diecuts to match can be found at Heartfelt Creations Here!
Thank you for looking and have a lovely day!
Hugs,
Cheryl

Tuesday, March 15, 2011

A Little Something & Video on Ribbon Storage

Hello everyone and Happy Tuesday to all! Today my card was designed for Really Reasonable Ribbons Challenge #20 'One for the Boys' and this weeks Sponsor is Doodle Dragon Studios
On my card I used this DARLING Giraffe from Dustin Pike found HERE! He came from the ZOO 10 set and all the animals are just tooo CUTE!! The ribbons I used are all from Really Reasonable Ribbon. The blue is seam binding and the yellow is Diamond Ombre Yellow. Ive added some flowers-Wild Orchid, and tag-Quickutz, dp is from crafty secrets.
I also wanted to share 1 last storage video :) This is using the Spool & Store from Creative Touch.
Challenges:Incy Wincy Designs/for the boys, Karber Weekly/Flowers , Karens Doodles/spring, Make it Monday/anything goes, Squigglefly/Spring theme , Woodware USA/Spring is coming, Cheerful Stamp Pad/spring,.Creative Inspiration Paint/Animals
Thank you for looking and hope you will join us for RRR's 'One for the Boys' Challenge.
Have a wonderful day!
Hugs,
Cheryl

Saturday, March 12, 2011

Really Reasonable Ribbon March Blog Hop

Hello everyone and welcome to Really Reasonable Ribbons March Blog Hop! Be sure to grab your favorite drink and hop along to all my DT Sisters blogs today to see some wonderful projects :)

The Really Reasonable Ribbon Blog Hop starts at the RRR Blog HERE! If you get lost along the way here is the complete lineup for todays hop!

Really Reasonable Ribbon Blog
Jacque Blog
Aphra
Kerri
Connie
Cheryl (Me)
True
Tilly
Erika

Supplies List: Really Reasonable Ribbon Monthly Ribbon Club Kit I used the white lace and white checked ribbon from this kit.Heartfelt Creations HCPC 3374, HCPC 3375 , HCPC 3376 Distressed Leaves. I airbrushed the flowers and leaves and then cut them out. In the centers I used Gala Glitz to give a glitz to the flowers. I used the diecuts for swirls and then added alphabet squares for the writing.


Thank you for Joining us today and your next stop is True's Blog. Have a lovely day!
Hugs,
Cheryl

Friday, March 11, 2011

My Ribbon Station Video & 12 x 12 LO

Hello everyone and Happy Friday to all! This week Really Reasonable Ribbon is focusing on Ribbon Storage and I've included a video on all my ribbon storage. I also wanted to share a 12 x 12 Layout with you
For my layout I used Really Reasonable Ribbons Seam Binding Grape, LOVE this stuff!!! It's perfect for bows and making small flowers. On my 2 pages I used the seam binding for all the bows and little flowers. The bears I used are Tear Bears from The Beary Scrap Shop and I love these tooo. You can dress them in satin ribbons and laces
The design paper is from Colorbok "Dena's Closet" paper pack. I also used the alphabet circles and tags from this paper pack.


I've added sewing to all layers. On this layout there is 4 photo mats, and 2 journaling tags. All flowers are from Wild Orchid Crafts.


I thought I would take a picture for those of you that don't feel like watching a video...LOL hehehehehe


Challenges: Creative Belli/animals , Creative Cottage/Tags, FabNFunky/Girly, Simon Says Stamp/Anything Goes , Flourishes/Real of faux stitching ,
Video on My Ribbon Storage
Hope you enjoyed today's post & my video!
Hugs,
Cheryl

Thursday, March 10, 2011

"Irish You A Happy St. Patrick's Day Card &

Video on Ribbon Storage for today!Hello everyone today I'm sharing a card and a short video on Ribbon Storage. This week at RRR we are focusing on Ribbon storage, I will have a total of 3 video's on how I store my ribbon!
I wanted to share a card, this one was designed last week for a SCS challenge, but thought I would share it today. I used Alota Rubber Stamps Lucky Terry Bug. The dp is leftover scraps of green that I used. And my Ribbon is from Really Reasonable Ribbon.
I had to share a picture of Boots my Kitty. He loves CRAFTING!!!!! hehehehehe He spends most of his time down here with me :) Just LOVE him, he's my baby :)
Here is a video I did on the Ribbon Ring! Love this , it holds TONS of RIBBON!!!!
 Ribbon Ring can be found at Ribbon Ring.com

 Ooooo to see more Ribbon Storage Idea's head on over to the Really Reasonable Ribbon Ramblings Blog to see :_) We would LOVE to see your idea's on how to store ribbon as well!!!
Hugs,
Cheryl

Wednesday, March 9, 2011

HC Dutch Iris Collection

Hello everyone and happy wednesday to all! Today I have 3 Iris Cards to share from Heartfelt Creations AWESOME new Releases today!
Really Reasonable Ribbon sheer organza with satin center

I stamped my image 3 times, and colored all 3 iris's. I then stamped the sentiment, and all leaves from HCPC3373, and colored them with greens. I cut all pieces out and popped some off the main image and around. Ive added some bows, and buttons to complete my card. copics G24, G99(greens for leaves ) BV00, V09(for iris) YR31, Y11 for yellows in iris. Card measures 6 x 6


HCPC 3371 Dutch Iris Oval PreCut Set

HCPC 3373 Dutch Iris Medley PreCut Set
HCD 710 Decorative Oval Window die
copics RV21, R85,E93,G24,G99

I stamped the Dutch Iris Oval and colored it with copics, and then I cut it out. I airbrushed around the edges with RV21. Then I stamped the Iris from HCPC 3373 and colored it and cut it out to pop off the other Iris. Next I ran the oval window die HCD 710 through my die cutting machine, and glued the oval to the window diecut piece. Next I cut a tag and airbrushed it, and then stamped my sentiment

HCPC 3373 Dutch Iris Medley Precut Set

HCPC 3377 Sympathy Sentiment PreCut Set
Really Reasonable Ribbon(dots)
copics R34, R85, RV21, E93 for my iris, and G24, G99 for the stem

I stamped the Iris 3 times and only colored 1 full image. Nexted I colored pieces of the top of the iris on the other 2 images and cut them out to layer my Iris 3 layers on 1 side and 2 layers on the other. For my tag I stamped the sentiment and then airbrushed it and the circle. Ive added 2 bows,2 gems,2buttons to complete my card
6 x 6 is card measurement
To view other wonderful projects from the DT please visit Heartfelt Creations Blog :)