Wednesday, September 28, 2022

Gift card Purse/video

Hello crafty friends and happy Wednesday to you all! Today's gift card purse was designed for The Robins Nest using the beautiful dew drops on my purse and flowers. I do have a video on this, and lots of photos over at The Robins Nest Blog. See my video below. Happy crafting to all!

My video on purse


Thank you for stopping by and have a lovely day!

Hugs to all,

Cheryl
 

Monday, September 26, 2022

Autumn Unicorn Thank you card


Hello crafty friends and Happy Monday to you all! Today I'm sharing this sweet Autumn card designed for Really Reasonable Ribbon using all the gorgeous flowers and ribbons.

For my card today I chose to use some darling design papers that are fall and from Echo park, and then my sweet autumn unicorn svg file I bought. I distressed all her pieces and glued her together, and then added her eyelashes, and dots and so on. I absolutely love fall as well as summer , but I'm so ready for fall colors now. I chose lots of flowers that RRR carries in the shop, and will list them all below for easy finding.  I do plan on giving this card to a dear friend, I hope she loves it.

Really Reasonable Ribbon:

Thank you so much for stopping by and have a lovely day!

Hugs to all, Cheryl

Tuesday, September 20, 2022

Turtle-ee Day

 
Hello crafty friends and happy Tuesday to you all! Todays sweet card was designed for TLC Designs using the darling stamp set called Turtle-icous , design papers, stencil, and dies. 

On my card for today I chose to stamp up the sweet turtle, and color her with copics. Next I used the Loving Petal Square die and then distressed the edges and stamped my sentiment. Super easy. On this card I kept the layers to 3 of the design papers, and then the fourth is the die. Lastly I added some RRR flowers. 
TLC Designs supplies used:

Thank you so very much for stopping by and have a lovely day!
Hugs to all, 
Cheryl

Thursday, September 15, 2022

Celebrate Funky Fold card & video


 Hello everyone and happy Thursday to you all! Todays card was designed for TLC Designs Instagram Hop that has started today and will go through the week. Hope you will join us for some fun and inspiration. Link for hop here 

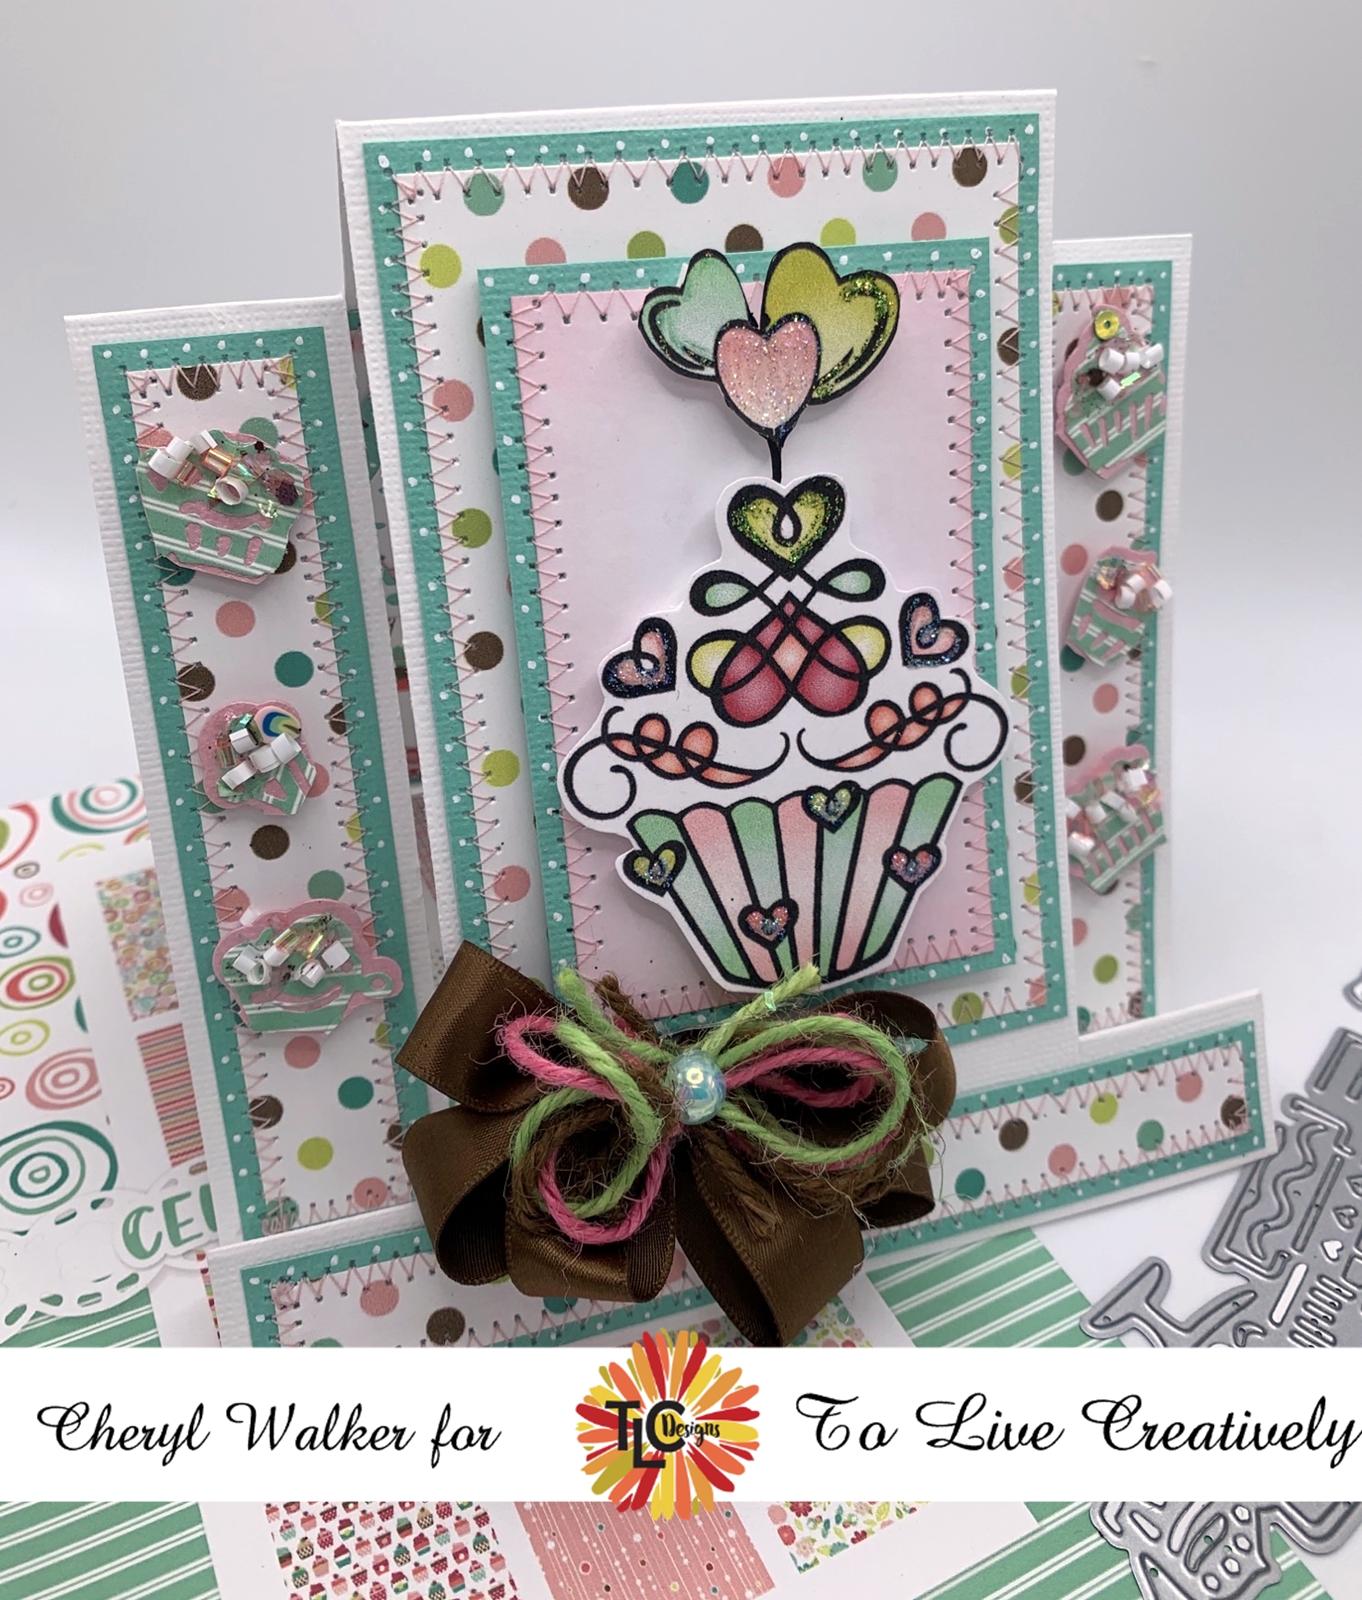
So for todays super fun hop we are using this absolutely darling Celebrate Suite, its the cutest ever, and you will fall in love with everything in this suite! I love the stamps, paper, ephemera pack, stencil, and dies, ooo even the darling sprinkle collection is so super cute. 

So for my card today I re-visted the funky fold cards as it was one of my favorite folds ever. I will show easy ways on how to do inside and decorate this fun card. Video can be found here .

Now on the inside of this one I did do a pocket, I dont show the pocket part but do show how to get the measurements and score and cut the pieces for the inside panel. Its an updated version and different measurements for inside. On this one here I did use the darling border die to create my pocket and layered it 3 times, love the look. I also used the border die to create my cupcakes on the front of my card.


TLC Designs supplies:
Celebrate Ephemera collection
Celebrate sprinkles
Celebrate twine


Thank you so much for stopping by and hope you liked my card for today! Also to view my videos you can see them all here


Wednesday, September 14, 2022

Beautiful Autumn


Hello crafty friends and happy Wednesday to you all. today's card was designed for The Robins Nest using their beautiful dew drops. 


Making the card

  • First I picked the orange card stock 5" x 12" and score in half to make 6" x 6" this is the card base
  • First Layer- I picked my yellow card stock, cut that to 5 5/8" x 5 5/8" , black is cut to 5 1/2" x 5 1/2" , green design paper is 5 1/4" x 5 1/4"
  • Second Layer- 4 5/8" x 4 5/8" yellow, black is 4 1/2" x 4 1/2" , design paper is 4 1/4" x 4 1/4"
  • Third layer - 4 1/4" x 2 5/8" yellow, black is 4 1/4" x 2 1/2" , 4 1/4" x 2 1/4" then cut the one end on each side to the center.
  • Fourth layer - spellbinders dies and then stamped my sentiment, and distressed edges using the die on top to keep the white edge.
  • Fifth Layer- cardinal stamped , colored and fussy cut out.
  • Lastly I decided the darling yellow dew drops would be perfect for the flower centers, so I glued those on using liquid glue.
  • I also used some Really Reasonable Ribbon to make my bows.
Thank you so much for looking and have a wonderful day!
Hugs to all,
Cheryl


Tuesday, September 13, 2022

Really Reasonable Ribbon September blog hop

Welcome to "Really Reasonable Ribbon's  September” Blog Hop if you arrived here from Kathy's Blog you are on the right track. If not , you will want to head back to the Really Reasonable Ribbon Blog that way you don't miss out on any of the FABULOUS Designs from the Design Team today! There is going to be lots of Beautiful projects to see today using the Halloween Collection Ribbon Assortment, so I hope you Enjoy

For my card today I went with some cute Halloween papers I had from my collection, and made up 3 layers adding sewing and dots to each. Nest I use foamed tabs to pop each layer and then cut out my ovals and stamped and distressed them. Next I keep some sweet svg files already made and put together so I can just grab when I want one, and I chose this sweetie, she is super cute she is from cuddly cute designs and is part of the scare bear release. I popped her up on the card and then added all of Really Reasonable Ribbons flowers and a couple of ribbons from this months collection. Love them! Lastly I added Robins Nest dew drops to the corners of ,my layers. All flowers and such will be listed below for easy finding. thank you


Thank you so much for stopping by, and hope you enjoyed my Halloween Scare Bear card for today.


Your NEXT stop for today's hop is Bonnies Wonderful Blog!!!
Hugs to all,

Cheryl

Twinkling Alicorn & Video tutorial

 
Hello everyone and happy Tuesday to you all! Today's interactive card was designed for TLC Designs using the darling Alicorn stamp set, and interactive dies. Love this! Also I will be having 2 post for today, so be sure to check back later for another. Video Tutorial is here

  • First for my card I started with a white card stock 6" x 12" scored in half to make a 6" x 6" card base. 
  • Next design papers I chose are from the Blooming Medley Slimline design papers, and were cut as follows- purple is 2" x 4"(black is 2 1/4" x 4 1/4") floral is 3" x 4 3/4"(black is 3 1/4" x 5") pink is 2 1/4" x 4 1/4"(black is 2 1/2" x 4 1/2") layer using scor tape, or tape runner and then added sewing. I staggered these doing the purple and pink on bottom and then popping up the floral. 
  • Next I cut out my TLC Designs Tiny Vine Oval pieces in white and black, then using the die on the white to give an edge, and then did my stenciling using the TLC Designs Happy Bloom day & Clouds stencil. I did airbrush these clouds using the copic airbrushing system.
  •  Next I used the See You in the Center Interactive die set to create my moving pieces for the Alicorn and clouds. 
  • Now I hot glued my flowers and vines on , and lastly I stamped the Twinkling and the "with Alicorn Specialness using a stamping misti tool.
  •  Inside was airbrushed as well, using the stencil 
TLC Designs supplies used:

Thank you for stopping by and have a lovely day!
hugs,
Cheryl

Friday, September 9, 2022

Sweet Happy Birthday card

 
Hello crafty friends and Happy Friday to you all! Today's happy birthday card was designed for Really Reasonable Ribbon and for a friend who needed a birthday card so I made 2 for her to choose from. I'm loving these colors together and have used this design paper and flowers on other items as well. 
so for my card I chose to use 3 different design papers for the front, and then the chevron for the inside. I added 5 layers to the front, and then decorated using the gorgeous flowers from Really Reasonable Ribbon. I love the large chrysanthemums that RRR has to offer, and there are so many colors and assortments to choose from. Next I chose to use the Red Open roses, and then the yellow cherry blossoms, white sweetheart blossoms, and rose buds. I hot glued all my flowers on top of my two bows made with the Chevron twill and swiss dots ribbons. For the 2 corners I used dew drops from The Robins Nest to create some flowers. Love making these for my cards. Lastly I added dots and sewing to all layers.
Really Reasonable Ribbon supplies used:
Open Roses Mixed Color 20mm for the greenish blue color
other items used, hot glue, sewing machine, The Robins Nest dew drops, stamps from stampinup!, dies, ink, white paint pen

Thank you so much for stopping by and have a lovely day!
hugs to all,
Cheryl


Tuesday, September 6, 2022

Trolling by to say hi!

Hello crafty friends and happy Tuesday to you all! Today's card was designed for TLC Designs using the darling Troll Cricket Fun stamp set. Love this sweetie.

  • For my card I stamp the sweet Troll in black memento ink and then colored her with copic markers and then fussy cut her out. 
  • Next I cut out my sentiment frames from the Loving petals square die and then airbrushed around the frame using the die. I stamped my sentiment also using the Memento ink, and then layered it on the black frame, and lastly added some white dots.
  • For the large oval I used the Tiny Vine Oval dies to cut those out, I did the same thing using the die as a template to dust around the edges of the white. These were cut to use for my main image and sentiment.
  • I love the Celebrated Times slimline paper collection and chose to use that for one of my layers. I also used a bubblegum pink, and some black cardstock for layering.
  • Inside I chose to stamp up the little sweet mushroom that is also in this stamp collection, isn't it just darling!?


TLC Designs supplies used:

other supplies:
RRR for ribbons, white paint pen for dots, copics for coloring, black ink pen, stickles, card stock.

Thank you so much for stopping by and hope you have a lovely day!
Hugs,
Cheryl