Tuesday, January 31, 2017

Club Scrap January Artist Team Challenge


Hello everyone, and welcome to Club Scraps January Artist Team Challenge! This month the January Challenge was to use the Faux Batik technique for one of our projects, as this months Color Me Happy Club Kit was inspired by this.. So I chose the technique using stamps and ink :) 
 
Now you should have arrived from Josette's Blog , however if you did not come from there, you might want to start at the beginning with Karen's Club Scrap blog that way you wont miss any of the Design Teams beautiful creations. All design paper, card stock, Stamps used are from Club Scraps Color Me Happy Kit.

1st card here I chose the white card stock from Januarys Color Me Happy Club Kit. I stamped my Floral stamp from the Club Scrap Girlfriends set, in the Glue Pad and then added vintage ice embossing powder, and heated. Next I sprayed Gold, Walnut Gold, Walnut ink Antiquing Solution,and tiger lily on the backing, using the Batik technique.

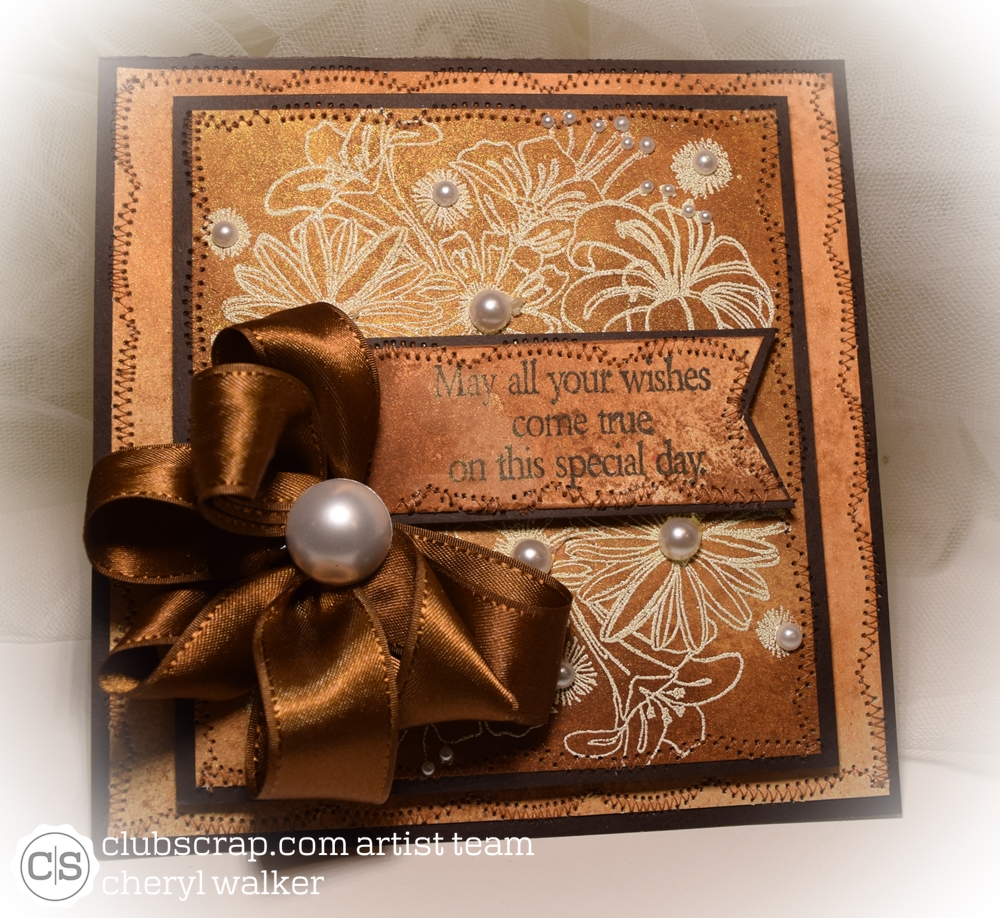
The sentiment is from Oct 2016 Club Scraps Literature Greetings, it is stamped in club scrap black ink.

The back layer on this card was done with just sprays, no stamps. I did add some pearls to give dimension to my card. Also added some ribbon and a pearl/ all brown card stock on this card is also from the Color Me happy Deluxe Club Kit!

 
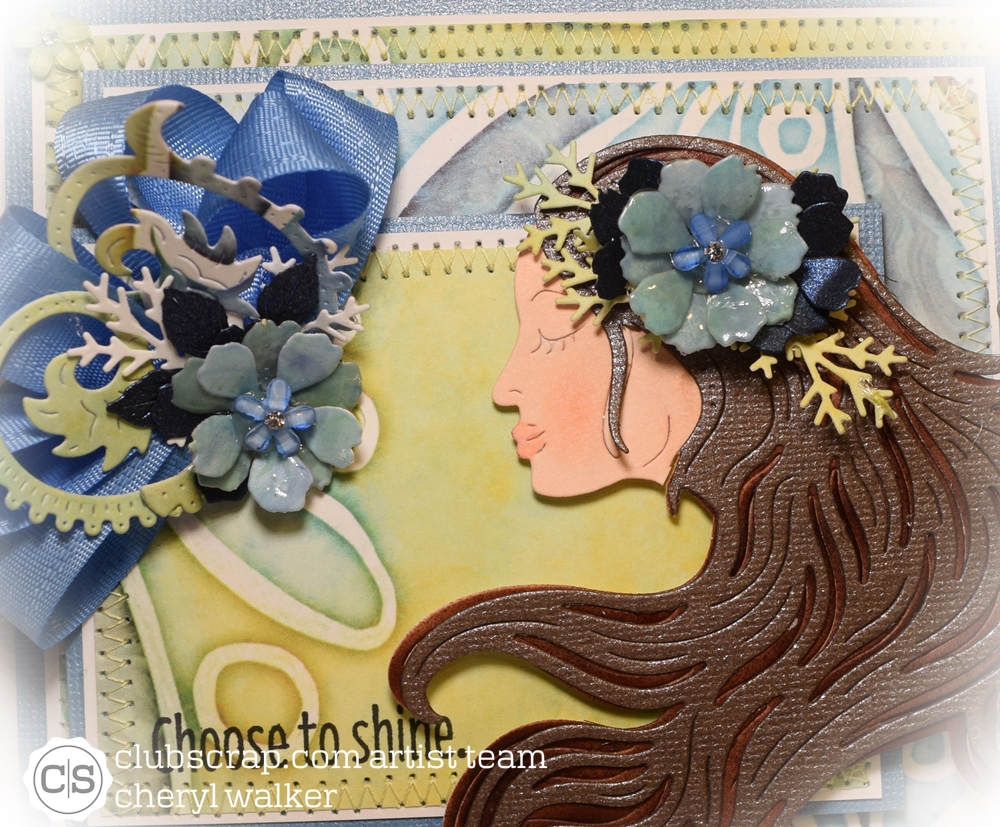
 2nd Card -sweet fairy , I chose fun colors to use the Batik technique and the darling Club Scrap Enchanted Forest Set. I LOVE how this one turned out. it was my 1st card made for today.
 
I used Memento Pear Tart, Memento Angel Pink, Brilliance Orchid, Brilliance Purple, Brilliance Lavender all to create the Batik Technique. LOVE the results of this one.
 
Background design paper was created using Shades of Winter design paper, and using a distressing on it, no stamping.

 
3rd card- I chose the darling stamp set from the Club Scrap Girlfriends un-mounted rubber stamps set.  It was stamped in glue pad, an also has vintage lace embossing powder using the Batik Technique.

On this card here I chose the brown shimmer text weight card stock from the Literature Deluxe Club kit. I LOVE this brown card stock, its absolutely gorgeous in person. The ribbon is from January Color Me Happy Deluxe Kit. I added some sewing, and a cabochon to the card. The Thank you is a tag I had on hand.
 
I hope you enjoyed my post for today, and all my projects, as I had fun designing each and every one of them using this super fun technique! Please let me know what you think as I always enjoy reading your wonderful comments!
Thank you so much for joining us and stopping by!!!
Your NEXT stop is Debbie's Blog!

Hope you enjoyed todays hop!
Hugs to all,
Cheryl

Monday, January 30, 2017

Choose to shine


 Hello everyone, and Happy Monday to all! Today's card was designed for Club Scrap & Cheery Lynn Designs. I sent this card off to Cheery Lynn so they can use it for CHA this year! Super exciting!!!!! woohooo, its been a LONG time since my work has been featured at CHA, and I am one proud crafty gal!hehehehehe

Anyways for my card today, I used Cheery Lynns NEW dies, from the Bohemian collection, and Club Scraps January "Color Me Happy " kit. Love how these both work perfect together.
The layers of my card are done with 1 sheet of the Color Me Happy Design paper. I layered with 3 layers and added sewing to all layers. Next I cut out the Botanical Stems, and tea roses in the same design paper, so they would all coordinate together.

Tea Roses have the Glass Technique on them, and that Tutorial can be found here. The darker blue ones do not have the glass technique, but still look Gorgeous. I love the dark blue text weigh card stock I used, you can see it under the light blue flower.

My Hippie Heroine was cut out 2 times, 1st she was colored with copics, then I cut her again in a shimmer card stock from my stash, for her hair.

Cheery Lynn New Bohemian dies Used are :
Hippie Heroine 3 piece die
Mehndi Botanical Stem 5 piece set
Other Cheery Lynn dies used:
Wreath Strip
Tea Rose small

Challenges:
I hope you enjoyed my card for today! thank you for stopping by!
Have a wonderful day!
hugs to all,
Cheryl

Wednesday, January 25, 2017

Club Scrap Color Me Happy Blog Hop

 Hello everyone and welcome to Club Scraps January blog hop featuring the New Color Me Happy Collection !  If you arrived from Deb's Blog then you are in the right place , if not you will want to start from the beginning at Karen(Club Scrap blog)so you don't miss any of the wonderful inspiration from the Club Scrap Artist Team! There is also a list of the entire line up there for you with links :) Have fun & I hope you enjoy todays Hop!
 Todays cards were created using all the same design paper, card stock, and colors, but all look different. Love how they all turned out using the Club Scraps Color Me Happy Deluxe Club Kit for these.

1st square card-
On all the cards I used the same sheet of design paper, Grey card stock, and white card stock. For my Dragon fly I stamped him from Club Scraps Color Me Happy Art Nouveau Unmounted stamps, also the Happy came from this stamp set as well. They were both stamped in Club Scraps Black ink, and the dragon fly was colored using copic markers. I did use the Metallic Dot Stickers on this card as well.
2nd Square Card-
So Happy Together was stamped from Club Scraps Color Me Happy Jumbo Unmounted stamps.

Circle card I used Color Me Happy Greetings Unmounted Rubber Stamps for the Happy Birthday, and the Club Scraps Black ink pad. I LOVE the design paper, and used it for the flowers as well. I alsoused the Metallic Dot Stickers to put in the centers of the flowers, and around my doily. all layers were cut using Cheery Lynn dies. Ribbon on this card is vintage seam binding.
 I absolutely LOVE this kit, and really had a lot of fun designing my cards for todays Hop! Hope you enjoyed them as well, and thank you!!

Your next stop on the HOP is Josette's Blog! Have fun!!! Thank you for joining us today!!
Hugs to all,
Cheryl

Tuesday, January 24, 2017

Valentines Telescope fold card


Hello everyone, Cheryl here today with a super fun fold Telescoping Valentines card I made for Really Reasonable Ribbon using their BEAUTIFUL Ribbon, Flowers, and embellishments, & The Project Bin using stamps and coordinating dies from the "In My Heart" stamp set.These cards are so much fun to make, and are super CUTE! Perfect for any holiday, or just because.

 On my card I used Really Reasonable Ribbons Sweetheart Blossoms, Leaves, and Bead berry sprays cluster pink to create a flower swag around the heart and sentiment.

Sentiment and heart are from The Project Bin.

Little pearls are from Really Reasonable Ribbon Embellishments "Imitation heart pearl bead flatback"


In the photo above, you can see where you can add writing on the white, and it will be hidden. LOVE that!!!
 

I so enjoyed making my card to share with you all today! Hope you enjoyed my post, and if you haven't made one of these yet, you should, as they are so easy and super fun!!! Enjoy!!!
Thank you for looking and have a lovely day!
hugs to all,
Cheryl

Friday, January 20, 2017

Lollipop Card/Pencil

Hello everyone, and Happy Friday to all!
Today I have a super fun Lollipop card I made using the beautiful Cheery Lynn Dies, The Project Bin Stamps. & Club Scraps "Shades of Winter Collection". I absolutely LOVE the way this turned out, with all the dies, and the stamps I used.
The Lollipop part of this was made up using Cheery Lynn's Sohphia's heart die, I cut it out in Bazzill shimmer card stock. Next I cut the Priscilla Doily die out in Club Scraps card stock( I added Viva Pearl pen dots in silver along the edges) , then the next one cut is the Cheery Lynn DL272 Horizon Circle Boutique Stacker frame, and cut in the same shimmer card stock., I then hot glutted some lace to the back of that. Next I cut the Mehndi Botanical 3 out and cut it into pieces to frame the circle pierced die that was cut in club scraps shades of winter collection as well. The tag with The Project Bins stamped sentiment is called Cheery Lynns CABD-108 Tags #3, it was cut in the same coordinating design paper from Club scrap.

Flowers - were cut out using the NEW Mehndi Botanical 3 flower, and I cut it in another design paper in the Shades of winter collection. Love the look of them. I also placed a RRR matching flower in the center. LOVE how they look! I backed the flowers with the Mehndi Botanical Stems.

Bows- Made using Really Reasonable Ribbons Delicate Stitched Satin, and lace.

Stick- is a pencil painted in white with ribbon wrapped around
Cheery Lynn Dies Used:
Sophia's Heart Doily Die
Priscilla Doily Die
DL272 Doily Dies Horizon Circle Boutique Stacker Frames
Mehndi Botanical 3 NEW
Mehndi Botanical StemsNEW
Cheery Lyyns Tags #3 CABD-108

Challenges:
Vintage Journey /Going Round in Circles(use lots of circles)
A Day for Daisies/ 2 or more layers
Craft Rocket Challenge/Add a bow
FabNFunky/use ribbon
Craft Dee Bow/anything goes with a handmade bow
 
I hope you enjoyed my Lollipop Pencil/Card for today! Please let me know what you think, as I always love reading your comments!
Hugs to all,
Cheryl

Thursday, January 19, 2017

Cheery Lynn January Blog Hop

 Hello everyone, and Welcome to Cheery Lynn Designs January Release Blog Hop! There are sooo many Beautiful designs in this Bohemian Release , , You wont want to miss all the inspiration, so grab a cup of your favorite beverage, and enjoy todays hop!

Today each of the Cheery Lynn Designers will be focusing on using the dies from the NEW Bohemian Collection that will be at CHA along with my projects, super EXCITED and proud to have my work on display at CHA, wish I could be there too, as I have never gone to CHA!.

I used 4 dies from this collection on my easel card today. I also used some of cheery lynn's other dies as well. I will list them all below.

You should have arrived from Maggi's Blog.  if not you will want to start at the beginning, The Cheery Lynn Designs Blog so you don't miss any of the designers posts for today.
 For My Easel card today I used so many beautiful Cheery Lynn dies to create this beauty!

Layer 1 is Sophia's Heart Doily die cut in white, next I cut a design paper piece in the Cheery Lynn Circle die.
Layer 2 is the Madala Doily 1 die cut in white, and then layered with another circle design paper piece.
Layer 3 is the Paris signs I used it to cut a sticker and then cut the oval off the sign part, as it fits perfect in this area of the card. Then layered around it using these dies:
Wreath strip(branches), Botanical Stems , Mehndi Botanical 3 for layering around flowers.


Flowers done with Mehndi Botanical 3 flowers using Glass flower technique
Cheery Lynn  NEW Bohemian Collection Dies Used:
Madala Doily 1 Die
Mehndi Botanical 3
Mehndi Botanical Stems

Cheery Lynn other dies used:
Sophia's Heart Doily die DL184
LPC4 Circle pierce  and cut tool LG Silver
Wreath Strip Die B216
Paris Sign 1 B547


 Ribbon and pearls used are from Really Reasonable Ribbon
Design paper is Basicgrey Sugared design paper pack

I hope you enjoyed my post for today!!! Please let me know what you think of my card, as I always enjoy reading the wonderful comments!! thank you all so much!!!
Your NEXT stop on the Hop is Laurie's Blog ! Hope you have enjoyed today's hop and Thank you for stopping by!
Hugs to all,
Cheryl

Wednesday, January 18, 2017

How Beautiful a day

 Hello everyone, and Happy Wednesday to all! Today I have a special card I made while crafting with my nieces last night. My card was created using I Brake for Stamps "How Beautiful a Day" stamp. Love this sentiment, its gorgeous!


I started with stamping it in black ink, and then airbrushing around it in pink and blue. Next I layered it on pink and red card stock. Shaelynn wanted to add some little flowers to the sentiment area, so her and I pick out the 3 little flowers. Then I made the bow, and Shaelynn picked out the red button in the center for the bow.

I used some Valentines design paper, and some red ribbon , that we both chose together.
 I so enjoyed making my card to share today, and hope you enjoyed it too!
Thank you for stopping by, and have a lovely day!
hugs to all,
Cheryl

Saturday, January 14, 2017

Live Laugh Love


 Hello everyone, and Happy Saturday to you all! Today's card was created for Club Scrap(using the Beautiful "Color Me Happy" Kit) & Really Reasonable Ribbon (using the Beautiful Shimmer Satin, in Electric Blue) What gorgeous color this ribbon is, and it goes perfect with the Beautiful design papers I used.

The bow I made is a double bow. I like the fullness of it. I did add a beautiful RRR Embellishment Rhinestone to the center of my bow.

I also wanted to add of Really Reasonable Ribbons Mulberry flowers, as I miss seeing them in bloom. So I added some Sweetheart Blossoms in yellow,orange, and blue to my card. The leaves I used are the green leaves, and everything is hot glued on.

All of the beautiful layers of my card were put together using Club Scraps Color Me happy kit(2 design papers, and 2 card stock)I then added sewing, its funny, because my sewing machine for quilting has an automatic thread cutter, and this one I use on paper crafting doesn't, so it took me a moment to think about that, as I have been sewing with material a lot lately, and haven't so much on paper, anyways just had to share that :) Each layer was put together using Really Reasonable Ribbons Scor-Tape  in the 1" thickness. This made putting my card together super quick. as I just tore off 3 long pieces for each layer. Foam tabs were used to add a 3-D to a couple of the layers, and  both adhesives can be found here.

The sentiments are both from Club scrap Color Me Happy Kit, and can also be purchased separately , the 2 sets I used are(Live Laugh Love) "Color Me Happy Jumbo Unmounted Stamps" and for the (Happy)is "Color Me Happy Art Nouveau Unmounted Stamps".

I stamped them using markers from SU! and then airbrushed using copics. Love the look!

I hope you enjoyed my post for today! Thank you for looking and have a lovely day!
hugs to all,
Cheryl

Friday, January 13, 2017

Really Reasonable Ribbon January Blog Hop


Welcome to "Really Reasonable Ribbon's" January Blog Hop!

If you arrived here from Judy's Blog  you are on the right track. If not , you will want to head back to the Really Reasonable Ribbon Blog that way you don't miss out on any of the FABULOUS Designs from the Design Team today! There is going to be lots of Beautiful projects to see today, Enjoy!!!
 I LOVE all the ribbons in this months assortment! they are Gorgeous!!! I used 3 ribbons and the lace out of this months assortment, and love them all!!!  I also used lots of RRR Flowers, and Embellishments as well.
 The stamps and Heart die are from The Project Bins NEW line " In My Heart" Set, and LOVE it! These beautiful stamps have matching dies :) On the heart I stamped the heart with dots in red, and cut out using the die cut. Next I stamped my Happy Valentines Sentiment on top of the dots. Super fun and cute!!

My Valentines has a pocket that is holding 3Andies mints that are covered with coordinating design paper, and stamped with The Project Bin stamps < I also ran some ribbon across 2 and added flowers.

For my bows I used 2 different ribbons and then added a large flat backed pearl. For the flower cluster I used Sweetheart blossoms, Flowers, pearl daisy flower white

The large doily die is called Sophia's Heart from Cheery Lynn

I really enjoyed creating my project for today. I hope you enjoyed todays post, and the rest of the hop!
I hope you all are enjoying today's hop, and hope you enjoyed my post as well! :)
Your NEXT stop for today's hop is Bonnie's Wonderful Blog!!!

Hugs to all,
Cheryl

Monday, January 9, 2017

So Glad Card


Hello everyone, and Happy Monday to all!
Today I have a super fun card to share with you all, using the BEAUTIFUL Cheery Lynn Dies. For this card here I wanted something with Spring colors, as its been so COLD here in Utah :) hehehe so this worked perfect and the Cheery Lynn dies are so fun to work with, I truly enjoy using them on all my projects!
 
I started with the Cheery Lynn Nesting Doll die, cut it out in pink, and white, and then stamped my sentiment on it. Next I cut out the sweet B155 Large Rose die strip from Cheery Lynn, in coordinating design paper. I did do the Glass Flower technique, and have tutorials on my blog here.  The green branches were cut using my favorite branch die, its actually a Wreath Strip, but I love using it for branches and fillers.
 
Underneath my main sentiment layer, is a border layer using the Cheery Lynn Butterfly Border die. I cu it in white, an layered it on the design paper in blue. You cant see it too well, as I covered it with my sentiment layer, by accident...hehehe I should have moved it all up some, and left the border lower. Next time!
 
Cheery Lynn Dies Used:
 
Ribbon used is Really Reasonable Ribbons Satin. I also used foam tabs, and some embellishments, all can be found here at RRR.
 
Sentiment is Heartfelt Creations
Design paper is from Pebbles


To embellish I used some Polka Dot Yellow Satin ribbon for a bow, that I stuck underneath my flowers and branches.
 
I hope you enjoyed my card for today, as I had a lot of fun creating it.
Thank you for looking and have a super awesome week!!
hugs to all,
Cheryl

Friday, January 6, 2017

Happy Valentines Day

 Hello everyone , and Happy New Year to you all!
Today I'm super EXCITE to share a card created for The Project Bin & Really Reasonable Ribbon's Challenge. My card was created using the DARLING NEW Stamp & Coordinating Die set called "In My Heart" from The Project Bin. LOVE it!!!  It not only has the stamps, but matching dies to coordinate with them, super fun!!! Now for the Really Reasonable Ribbon challenge ,its anything goes with ribbon or trim, and I used both :)

My card measures 6" x 6" with a white card base
Layer 1 Red card stock 5 3/4" x 5 3/4" , Next is the design paper 5 1/2" x 5 1/2"
Layer 2
Layer 3 Cheery Lynn Doily cut in white card stock, layered with a circle dp piece.
Layer 4 Cheery Lynn tag and oval(stamped the sentiment and dots on it.
Heart Layers- The Project Bin "In My Heart" set to cut out design paper heart shapes, and stamp Happy Valentines day on the center one.

Ribbons used:
Really Reasonable Ribbon Textured Two tone baby pink
Really Reasonable Ribbon Pink Ric Rac
Also used Really Reasonable Ribbon Foam Tabs & Embellishments
 So glad to be well enough to craft today, as it has seemed like forever with this flu. I really enjoyed creating my card for todays challenges, and hope that you enjoy it too!

Other challenges:
Dies R Us Challenge/Anything Goes
Scrappy land Challenge/ anything goes using their brand of dies they carry
In the Pink Challenge/anything goes with pink
Inspiration Destination Challenge Blog/Anything goes


Thank you for looking and have a lovely weekend!
hugs to all,
Cheryl

Tuesday, January 3, 2017

LOVE

Hello everyone and Happy New Year to you all!
I'm writing this while in bed sick with the flu, its been 4 days now, and hubby and I are both sick :(  not fun!!! Anyways I am super excited to share this sweet tag I created using lots of sweet goodies from Really Reasonable Ribbon. I used flowers, ribbon, leaves, foam tabs, and embellishments. I also used the Darling Stamp called "Wrap Love" from I Brake For Stamps
 The base layers of my tag are created using all Cheery Lynn dies. Next I stamped my SWEET sentiment from I Brake For stamps in black ink, and then hot glued the rhinestone flower to the center of the O. hehehee  I LOVE this sentiment, its so sweet!!!

Next to start the cluster of flowers and ribbon, I started with the 1/8" striped ribbon, glued it down, and then my looped bow made out of the DARLING Really Reasonable Ribbon "Hearts & Bows on pink pearl satin"  . After that I glued down the brown leaves, and some branches, and then the rose, and other flowers, all listed below. I really had a lot of fun creating this fun tag, and will add it to a birthday gift, I think I know just the one.
 
Really Reasonable Ribbon Supplies Used:
3-D Foam Tabs
Sweetheart Blossoms Pink and Brown
Sweetheart Blossoms Miniature
Brown Leaves
Apple Blossoms White
Aster Daisy 2 tone baby Pink flower
Hearts and Bows on Pearl Pink Satin Ribbon
1/8" Diagonal Stripe Ribbon Pink Ribbon
14mm white flower shaped flatbacked round pearl
Resin Flower with Rhinestone cabochon (pink)

Cheery Lynn Dies Used:
Priscilla Doily cut in white
Pierced Stacker #3 for the Pink design paper piece
Oval Stitch and Cut tool - LG Silver Stitch tool 6 Piece Die Set - LSC7
Pierced Stacker #2 6 Piece Die Set - XL20  cut in brown bazzill for behind the doily
Pierced Stacker #3 6 Piece Die Set - XL21

I Brake For Stamps
Wrap LOVE Stamp
I hope you enjoyed my post for today!! Thank you for looking and have a lovely week!!
hugs to all,
Cheryl