Friday, April 28, 2023

Luncheon Table Setting with treats

 
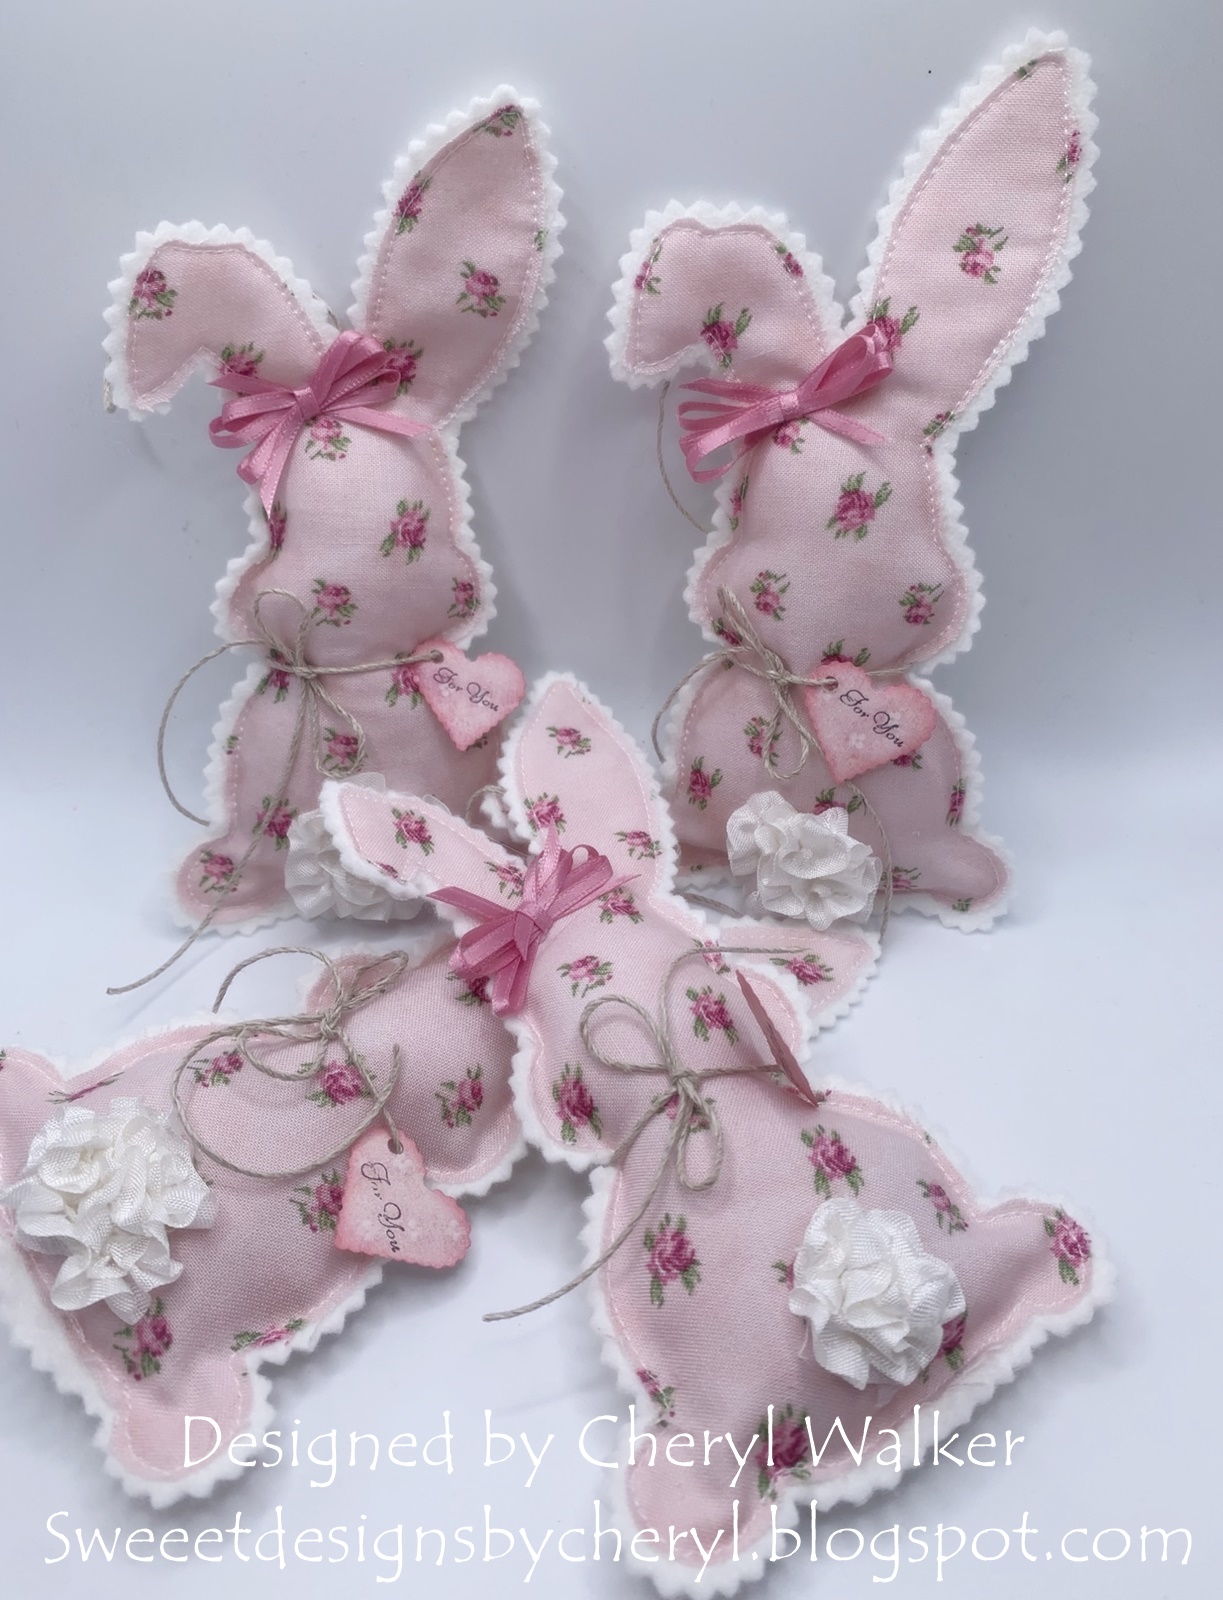
Hello everyone and Happy Friday to you all! So over the last couple of weeks I've shared some of my projects with you for my Luncheon table setting I was working on, well here it is. I had so much fun making all the little goodies to gift to my friends in club, and they loved them all! 

So the bunnies you see on the plates I did make and those have hangers on them so if they want they can hang them from a tree or whatever they choose. Next they each also received a mini Hexagon box, which I do have a video tutorial on and it can be found here. I've made these boxes in several different sizes, and this on the table by each plate is the smallest of them all. Below you will see the larger ones.

Next I gave each a little pink cup filled with Homemade Italian ToTo cookies that I made, love these! 

Now the bigger Hexagon Boxes you will see next held the gifts for our raffle we do. I had three of those done up for the gifts. Love making all the fun goodies for this.


Video on Hexagon Box can be found HERE
I do hope you enjoyed my post for today and thank you so much for stopping by!
hugs to all,
Cheryl

Thursday, April 27, 2023

Sweet Shabby Chic Bunnies

Hello crafty friends and Happy Thursday to you all! Todays post will be a super short one. So today I'm sharing the darling bunnies I made for my Luncheon I did on the 13th of this month. I did these to place at each place setting on my table for the gals in club. Each of them received one of these little darlings and a couple of other treats. Tomorrow I will share the entire table setting along with all the fun goodies. I also made some for my Easter Tree and will add a photo below.


 Thank you so much for stopping by and hope you have a wonderful day!

Hugs to all, Cheryl

Wednesday, April 26, 2023

Shabby Chic Mother's Day boxes

Hello crafty friends and Happy Wednesday to you all! Todays project was designed for The Robins Nest Creative using dew drops to decorate my Gift box. 

To Start

To start I made this box small so it could hold some goodies for my table setting I'm doing for Mother's Day. I picked some pretty Design paper that I bought years ago its K &Company. Next I picked my die cuts, and it was a flourish that I have and some ready to go, and then picked my flowers they are from RRR and are absolutely beautiful.

Decorating My Shabby Chic Box using dew drops

I started with adding My design paper to my Box before putting together, that made it easy. Then once together I added my flourish and Hot glued my flowers on, that helped hold the flourish in place. For the dew drops I used the light pink dew drops in the tear drop shape, and then green dew drops in different sizes. I also added the diamond shaped ones to the lid, as I thought they added that little extra to my box. Then I added lots of Really Reasonable Ribbon to close the top, and for my double bow. I love how the dew drops add that extra embellishing that my box here needed.

think later on I will add a tag to the top that says Happy Mothers Day, and distress it so it will coordinate with this box, as these will be part of the gifts on my table. I cant wait to do my Mother's Day Table setting, will be fun!. I do hope you enjoyed my post today and please let me know what you think in the comments below.


Items used:
The Robins Nest Dew drops in pinks and greens
K&Company old design paper pack
Card Stock AC, and StampinUp!
Really Reasonable Ribbon (Peony Delicate Stitched)
Really Reasonable Ribbon flowers (Open Roses, and Sweetheart Blossoms)
Hot Glue
Art Glitter Glue
Scor-Tape (Really Reasonable Ribbon)

Thank you so much for stopping by and hope you enjoyed my post for today. happy crafting to all

Hugs ,Cheryl


Tuesday, April 25, 2023

Mother's Day Paper cracker/Favor box tutorial

 
Hello everyone and happy Tuesday to you all! Today I have this fun favor I made for Really Reasonable Ribbon using the gorgeous flowers, ribbon and embellishments. Also made these for my table setting for Mother’s Day. 

I do have a video tutorial on this Popper/cracker favor and it can be seen here 

Items used are Really Reasonable Ribbon Delicate stitched satin Peony for the ties on both ends . The lace is Gabrielle , it’s beautiful! I used 2 tone pink with dusty pink centers for the 3 (10mm, 15mm,20mm) , sweetheart blossoms . The design paper I chose is the K & Company 

I made these to put on my table setting for mothers day this year, and thought these would be so pretty on the place setting for each of the moms. I think I;m going to add some truffles to the inside of them. They are super fun to make and if you havent tried to make them yet, you can watch my VIDEO here on them.


Thank you so much for looking and have a lovely day!
hugs to all,
Cheryl

Thursday, April 13, 2023

Really Reasonable Ribbon April Blog Hop


Welcome to "Really Reasonable Ribbon's  April” Blog Hop if you arrived here from Kathy's Blog you are on the right track. If not , you will want to head back to the Really Reasonable Ribbon Blog that way you don't miss out on any of the FABULOUS Designs from the Design Team today! There is going to be lots of Beautiful projects to see for Mothers Day, So each DT member will showcase a Mothers Day project or card.

Be sure to comment on the blog hop post on the RRR Blog for a chance to win a $10 gift certificate to Really Reasonable Ribbon 


Today's Project is a Large Milk Carton Gift Box with Lid that I made, I should have a video up showing this project share soon, so you can view it here, and I also have other fun fold box tutorials you can see on my channel here.  these are super fun to make and perfect for gift giving, or even table favors. this one is the Large Box with Lid. 

  1. I chose a heavy duty card stock from paper Temptress in black, then chose my design paper which is echo parks Flower Garden.
  2. Next I did all my cuts for the box base and design paper pieces and glued & Scor-Tape them on before putting the box together.
  3. Now I put the box together and added the velcro for the closer on it.
  4. I used Really Reasonable Ribbon Satin Swiss Dots in 5/8"   for my big bow on the top.
  5. I then cut a tag using an old spellbinders die and distressed it using pink ink and then a black pen around the edges. then popped it using RRR Foam Tabs
  6. Next I used some flourish branches that were cut in green and placed them where I wanted them to be and then glued on lots of Really Reasonable Ribbon flowers. ( sweetheart blossoms in white and pinks, mini sweetheart blossoms, open roses in 15mm , 20mm , Tea Rose 40mm , open rose ivory and pale pink 20mm) Leaves 30 mm 


I used Really Reasonable Ribbons beautiful Swiss Dots in Light Pink 3/8" and  7/8"  I also used the scor tape, and then a little heart embellishment both from RRR . The Panda is KaDoodle Bug Designs. Design paper piece on front is from Echo Park Easter collection. dies used are cheery lynn dies
Be sure to comment on the blog hop post on the RRR Blog for a chance to win a $10 gift certificate to Really Reasonable Ribbon 

Your NEXT stop for today's hop is Bonnies Wonderful Blog!!!
Hugs to all,

Cheryl

Wednesday, April 12, 2023

Milk Carton Hexagon Gift Box Large

Hello crafty friends and happy Wednesday to you all! Todays Project is a Hexagon Milk Carton Gift box I made for The Robins Nest Creative, you can see my post over on their site here.


I love making these darling little boxes as they are so much fun and perfect for gift giving or treats. I have a video on the medium size box and that can be seen here. 

  • 1st thing I do is always pick my card stock color first, then the design paper I want to use and coordinating card stock as well.
  • next I cut all pieces the size they need to be and then score my main box pieces.
  • Now its time to glue all the design papers and card stock to each panel.
  • Put together
  • now decorate
Items Used:
Dew Drops for the eggs around the bottom, these are from The Robins Nest Creative. Love usng these for different things. The grass, fence, and eggs are all dies used to cut them. The darling Bunny Chick is from kaDoodle Bug Desigsn and is super cute. Its Called Eggsploding Sweetness SVG file. I did use Really Reasonable Ribbon in a satin pink for the closer, and then I used Gingham, and pink dots for the bows. The sentiment Im not sure who its by, as it was a random red rubber stamp I had in my stash.


 Thank you so much for stopping by and have a lovely day!

Hugs to all, Cheryl 

Friday, April 7, 2023

Easter Hexagon Milk Carton Box (small one)/ Video tutorial

Hello crafty friends and Happy Friday to you all! Today's Milk Carton Hexagon Box is a Mini one, and was designed for Really Reasonable Ribbon using the gorgeous satin ribbon's, and embellishments. I made this box in a bigger size, and just wanted to make some small ones for Easter Favors.


I do have a video on how to make the bigger one of these, it can be found here. Love making these and I've made tons of them for gifting. On this one here I kept it simple and just added a printed image, and then punched it out using stampinUp! punches, next I added some fences and grass that I cut out using dies. The ribbon I chose is the gorgeous ribbon from Really Reasonable Ribbon in Pink Satin 3/8" and 5/8" ribbon. I then added a flower embellishment to the tag. if you havent made one of these yet, you definitely want to, as they are so much fun.

Really Reasonable Ribbon:


 Thank you so much for stopping by and have a lovely day!

To see my video on this box (larger one) please click here.

Happy Crafting! Hugs, Cheryl

Thursday, April 6, 2023

Precious Little Lady Layout

Hello everyone, I just wanted to stop by and share a quick post , I did layout using the darling Precious Little Lady SVG file from KaDoodle Bug Designs, aren't they super cute? 

Design Papers are from American crafts, and I do have videos on the sweet Precious Little Lady, it can be found here.  the SVG file can be found here 


 Hope you enjoyed this short but sweet extra post for this week!

Hugs to all, Cheryl