Monday, December 30, 2013

Mr. Snuggles Hugs!


Hello everyone, today I am sharing CottageCutz Mr. Snuggles, he is absolutely DARLING!!! I just love this little bear!


Mr. Snuggles is cut with white card stock and colored with copics. Next all the Woodland Pine tree's were cut with a green from American Crafts Card stock "Earth Tones" pack. I then distressed them with a distressed ink in green.

My design paper is also American Crafts, and was sewn with brown thread. Next I added some Really Reasonable Ribbon seam binding in blue and brown to create a big bow! The HUGS is a brad, i just cut the shank off the back and glued it on. I love the colors on this card, withe the darling Mr. Snuggles and all the Woodland Tree's.


To view all CottageCutz dies released for Black Friday, please visit here!


Thank you for looking and have a lovely day! 
Hugs to all,
Cheryl

PS dont forget to check out the NEWEST CottageCutz 
they are absolutely DARLING too!

Thursday, December 26, 2013

Mr. Snuggles Treat Box

Hello everyone, Cheryl here today with a sweet lil' treat box designed for Really Reasonable Ribbon, & The Scrapping Cottage, using the beautiful Diamond Satin in Moss Green Ribbon & Mr. Snuggles Die Cut. I hope you all had a Very Merry Christmas!!! Mine was AWESOME!!! :)


I made my bow separate from the one that ties around the box. This lil' Treat box was made a a get together , and I just added the ribbons, and die cut Mr. Snuggles with his present. :)

I love the Diamond Satin, its so pretty and easy to work with! Bonnie Carries several different colors and they can be found here! As for the Mr. Snuggles and Present, they are CottageCutz dies, and are from The Scrapping Cottage. They were colored with copics, and then glued together. I popped him off the box with foam dots. 


Thank you for looking and have a lovely day!
Hugs to all,
Cheryl

Tuesday, December 17, 2013

Polar Express Candy Container


Hello everyone, 
today I wanted to share this darling Polar Express decorated Pringle's Chip container that I recycled to hold candy for Christmas. I also used Really Reasonable Ribbon & Candy to make my Polar Express Container.

Really Reasonable Ribbon Supplies Used:
Double Faced Poppy Red Satin

Other Supplies
Pringle's Container Recycled
Wrapping Paper to cover the container
Candy Bar Mini's (4)
1/2 of Life Savers Roll
Reeses Peanut Butter Cup mini
Reeses Bell
Suckers
Tootsie Roll, 
Red Pom Pom for nose
2 eyes
Fill with Candy of choice


I used a leftover Pringle's Container, and whipped out the inside of it. Next I took wrapping paper and covered the container. I just measures the width and then cut a piece and used the Scor-tape to hold it on. Then I hot glued all the face pieces, and set it aside. Next I added the four candy bars to the back end, then the bell, and then the smoke stack(life savers)with a reeses cup on top. The the wheels are suckers, I hot glued those as well.

All Really Reasonable Ribbon is listed above and linked for easy finding! :) This was super fun to make.

My mom and I made these the other night, and we had fun with it. They are pretty simple to make, and super fun project for the family! Also would make for a nice gift or to place on a side table. Be sure to fill with candies :)


Hope you all enjoyed today's post, and have a lovely day!!
Hugs to all,
Cheryl

Friday, December 13, 2013

Really Reasonable Ribbon December Hop

Hello everyone and Welcome to 
♥♥♥Really Reasonable Ribbon's♥♥♥
December Hop!

You should have arrived here from Nicoles Blog If not you will want to start out at the Really Reasonable Ribbon Blog so that you wont miss anything.

I hope you have enjoyed our Hop so far today as there is a LOT of inspiration using the December Ribbon Kit from Really Reasonable Ribbon. I just LOVE all the ribbons in this months assortment!


Today's Project Life was made for my Son! I'm new to Project Life, and it has been a challenge for me,as its so simple, and I love detailed stuff....heheheheehe  This is my 2nd page I have made, and I love this one! 

I used the Ribbons and Lace from this months Ribbon Club assortment. LOVE the colors as they worked perfect for my sons page. All the ribbons in this assortment are Beautiful, and I enjoyed working with them. 

 For the Pennants I used CottageCutz Pennants, and the lettering is also CottageCutz Alphabet too. I think these also were perfect for my page. I added some of the white lace behind the pennants, and then glued them onto the blue satin with sheer ribbon. For the bows I used the Satin Polka Dot that is in this kit. Next for the photo, I used MS punch, and then added the RRR striped ribbon along the top and bottom.
So for the bottom inserts I used the Satin Polka Dot, and then the lace on the photo. Next for the right side insert, this will be where the writing will go. I added some Brown Satin, Blue Polka Dot Satin, the Blue Satin w/sheer, and the stripe , then added buttons for embellishing. The circle die cut is from Spellbinders. I want to add 6 months to the bottom right corner. 


Your NEXT stop on the HOP is Jenn's Blog , Thank you so much for joining us this month, and hop you enjoyed all the inspiration from the DT so far!


Thank you for joining us today, and hope you had fun!!
Hugs to all,
Cheryl

Tuesday, December 10, 2013

CottageCutz Nutcracker


Hello everyone, and Happy Tuesday to all! Today's Nutcracker was designed for The Scrapping Cottage using the Beautiful New CottageCutz Nutcracker Die. I absolutely LOVE all the CottageCutz Christmas dies that have been released, and this Nutcracker is way too cute!!!


For my card I cut the Nutcracker out with White Card Stock, and then colored all the pieces with Copic Markers. He was super easy to do, as I kept his color combo traditional Christmas colors. 

The CottageCutz Winter Pine Branch was cut using American Crafts Colored Card Stock from the Earth Tones Paper Pack. I then added some Really Reasonable Ribbon Flowers in red to those.

The Dp I used is BoBunny, and the Border Punches are MS! I also used some AC Pop Dots to pop up each layer of my card.
The ticket stamp is from SU!

Supplies Used:
CottageCutz Dies
Really Reasonable Ribbon flowers & Buttons
BoBunny Dp
American Crafts Card Stock
Martha Stewart Punces
Copics to color
Pop Dots for dimensions 
Stampin Up for Stamp


Thank you for looking and have a lovely day!
Hugs to all,
Cheryl

Monday, December 9, 2013

VO Merry Christmas

Hello everyone, and Happy Monday to all!

Today's card was designed for Victorine Originals Red & Green Plus Embossing challenge that can be found here on the VO blog!


We are to use Red & Green, Plus some dry embossing. So for my card I did the color combo and dry embossed the Cardinal Image after I colored it with copics, to look like snow. Both my image and sentiment are from Victorine Originals and can be found here.

The ribbon I used is from Really Reasonable Ribbon, and is the Diamond Satin scarlet. I added a green flower to the center of my bow. For the Dp I used BoBunny dp and added some red sewing to each panel. The card Stock I used is American Crafts Card Stock, and is what I mostly use on all my cards.

Supplies Used:
BoBunny Dp
American Crafts Card Stock
Cuddlebug Embossing Folder
Copics to color
Helmar Glue 
American Crafts Pop Dots

Thank you for looking and have a lovely day!!
hugs to all,
Cheryl

Please be sure to Join us for our super fun challenge, and to be entered to WIN a gift Certificate to Victorine Originals. You can Join us Here!

Friday, December 6, 2013

1st Project Life


Hello everyone, Cheryl here with my 1st Project Life page designed for Really Reasonable Ribbon. This will be for my youngest daughter Breanna. 


I have never thought of making project life before since its a simple way of scrapbooking. But just recently I started working at American Crafts Warehouse Sale, and everyone is buying it up. So I thought maybe I could get creative and add stuff I love working with in this album. For my 1st page this is a little simple, but I will be working on adding other goodies to these pages for this album. 

I left off all writing, it will go on the insert with the B. Next The title will go where my watermark is. I'm going to combine this with layouts as well, so it wont be a weekly journal like most are doing, its going to be more like a scrapbook, but done a little differently...hehehehe

I used Really Reasonable Ribbon,Lace, and trim on my inserts here.
Supply List:
Bead Trim (Pink)

Other supplies Used:
Project Life Page Protector
Project Life Baby Girl Insert Cards
CIP's Angel Dust
Glue Pad
American Crafts Pink Polka Dot flowers
Flower buttons with shanks removed
Sticker 
Vintage White Lace, My stash

For the  CottageCutz vanity I colored it with cip's pink, and then used the glue pad to add glue to my pieces, and lastly added the Angel Dust Glitter to give the look to the vanity. The mirror was colored with a blue and grey copic marker, and then again rubbed the glue pad over it, and added clear embossing powder and heated, to give its look.
Next the cushion top for the stool,I added glitter glass to it.

For the area with the White Vintage Lace, I just glued the lace down first, then added the brown RRR Lace, then the Bead trim. I will add a Title to this area later on. I was thinking of Playtime. Not sure though yet :)

I hope you enjoyed today's post, this is very new to me, as I have never done Project Life before, but again was inspired by so many customers to try it out :) Also I think this would be a better way for me to scrap for my son, as I need it to be pretty simple. However We can always add Beautiful Really Reasonable Ribbon to any project :)


Hugs to all,
Cheryl

Sunday, December 1, 2013

Bella Curly Horn Reindeer

Hello everyone, and Happy Sunday to all! Hope everyone had a Happy Thanksgiving!!! Ours was super nice, it was just my family,Mom and Maddie(my sons girlfriend), 6 of us!

On to my card :)

On my card for the Bingo challenge I used the Twine,Image,flower plus Ribbon. And for the Non Traditional Colors I used Pink,grey and White :)

Both challenges were super fun!!! for my VO image, I stamped my deer onto the glue pad, then added some CIP's embossing powder, and heated it up. Next I used Viva Pearl Pen to add the dots around my scalloped circle. The DP is a leftover sheet I had mixed in my Christmas Design Paper.
For Really Reasonable Ribbon I used the pink Gingham Ribbon, Pink Cosmos Flower, and Pink Twine, all can be found at the RRR Store!


Thank you for looking and have a lovely day!
Hugs to all,
Cheryl

Challenges can be found HERE at

Tuesday, November 26, 2013

We OWL Give Thanks /Place Card&Treat Holder

Hello everyone, today I am sharing my Treat/Place Card settings for Thanksgiving Day at our house! These were designed using Toilet Paper Rolls, Really Reasonable Ribbon, & CottageCutz Dies!

To start with, I cut 1 toilet paper roll into 3 pieces, this will give me 3 bases.  used a total of 3 Toilet Paper rolls for 9 of these. Next I covered them with DCWV Design Paper, and used Really Reasonable Ribbons Scor-Tape in 1/2". it made it easy to attach the dp to the rolls. Next I prepped all my CottageCutz Acorn OWLs, and added TURKEY Feathers by using all CottageCutz Mini Leaves. Next I used Really Reasonable Ribbon Mini Ric Rac along the bottom in brown, and then added some RRR Buttons. OOoooo I forgot to add the darn BOWS to these, omgosh! LOL oh well, they are going BowLess....hahahahahahaha

Next I used Plastic Saran Wrap to wrap up 4 Reese's mini cups, tied them up with Brown Seam Binding, and then added a ticket for the NAME using Hemp in Natural


Supplies Used:
Buttons Ivory

Other supplies Used:
Copic Markers
DCWV Dp
Toilet Paper Rolls
Hot Glue
SU! ticket punch and ticket stamp


My brief video on how to!


These were SUPER FUN to make, and my 1st year doing a place card setting for Thanksgiving! :) I thought it would be neat to add some candy for a treat! Super FUN!!! You will have to try these!
Thank you for looking and hugs to all,
Cheryl

Sunday, November 24, 2013

CottageCutz Merry Wishes /Tussy Mussy's

Hello everyone and Happy Sunday to all! 
Today I have 2 more CottageCutz Tussy Mussy's to share with you all :)


Again I used the sweet CottageCutz Filigree Reindeer, and then some CottageCutz winter pine branches. I hope you all arent getting tired of my 12 days of Christmas Tussy Mussy's.....hehehehehee. I have a couple more to share.

The tag was stamped with SU! stamp, and then punched out with SU! punches. Next I added some white gel dots, love this look!

For the branch and Reindeer's I colored them all with copic markers. The trim is from Really Reasonable Ribbon and the lace is vintage and from my stash.

DP used is DCWV and the container for this tussy mussy is a Toilet Paper Roll.


Thank you for looking and have a lovely day!
hugs to all,
Cheryl

Saturday, November 23, 2013

Christmas Ornament Tussy Mussy's


Hello everyone, and Happy Saturday to all!
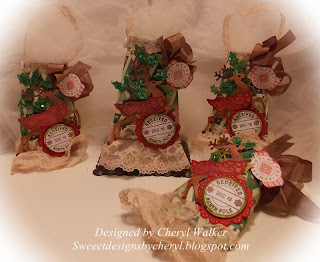
Here are 3 more Tussy Mussy's I designed for the 12 days of Christmas swap. For these 3 I used CottageCutz Filigree Ornaments, and CottageCutz Winter Pine Branches from The Scrapping Cottage.

I used the Toilet Paper rolls, and covered them inside out outside with DCWV design paper. Next I used some Vintage White lace for the bottoms. Then added the Beautiful Sheer Really Reasonable Ribbon Trim in red.
The Gingham red Ribbon is also from Really Reasonable Ribbon, and I used the 1/2 " Scor-Tape to add the paper to the outside of all my Tussy Mussy's! The Stamp sentiment is SU! stamp, and I used the SU! punches to punch out the sentiment.

I LOVE the look of the ornaments with all the Glitter glass, and beads glued on them. I think they turned out super pretty!

Thank you for looking and be sure to stop back by to see some more Christmas Tussy Mussy's and I will also have another fun surprise for my table setting on Thanksgiving :) Cant wait to share!!
hugs to all,
Cheryl

Friday, November 22, 2013

Tussy Mussy's "Merry Christmas"


Hello everyone, today I am sharing 4 more Tussy Mussy's I made for the 12 Days of Christmas Swap that I am in. For this group I decided to use the Sweet CottageCutz Filigree Reindeer die. I also used the CottageCutz Winterland Holly and used some vintage glass on it. 
 For the stamped image on the circle tag I used the CottageCutz stamp from the Homemade Gift Set that The Scrapping Cottage carries. This set will be on SALE for Black Friday! 

Next I used design paper from DCWV and the laces I used are Vintage from my stash.
 The brown Seam Binding and the Buttons are from Really Reasonable Ribbon and can be found here!

I really enjoyed making this set here too, and love using all the CottageCutz dies on these! Also think these are perfect for little handmade gifts,and cant wait to give these for the swap! I will be adding some candies to the inside for a sweet treat :)

Thank you for looking and have a lovely day!
hugs,
Cheryl

Thursday, November 21, 2013

Christmas Tussy Mussy Treat Holder

Hello everyone, short post for today, as I wanted to share another Christmas Tussy Mussy made out of Toilet Paper Rolls that I decorated using CottageCutz Dies & Really Reasonable Ribbon.


I used the Beautiful CottageCutz Filigree Reindeer from The Scrapping Cottage, and the Winterland Holly too. Next I used some Really Reasonable Ribbon, Beads, trim, and jute. The lace is vintage and comes from my stash.

Supplies Used:
Really Reasonable Ribbon/ Bead Trim
Really Reasonable Ribbon /Red Jute
Really Reasonable Ribbon/ Mini Pom Pom Trim
Really Reasonable Ribbon /Sheer box pleated Red Trim
Really Reasonable Ribbon /Scor-Tape 1/2"
CottageCutz /Filigree Reindeer
CottageCutz/Winterland Holly


Will have more to share over the next few days, so be sure to stop back by and take a peek!!!
Thank you for looking and have a lovely day!
hugs to all,
Cheryl

Wednesday, November 20, 2013

Build-A-Christmas Stocking Tussy Mussy


Hello everyone, today I wanted to share 3 Tussy Mussys I made for a 12 day of Christmas swap i'm in. For these 3 I used the CottageCutz Build- a -Christmas Stocking, and the CottageCutz Winterland Holly. LOVE the look of these. I will be adding some candy inside of all my Tussy Mussy's/


The tussy mussy was made using the Toilet Paper Rolls, I covered them in design paper around the outside and also added design paper on the inside of the top part. Next I added some really reasonable Ribbon Brown Crocheted lace, and Brown Seam Binding, and then added the stocking and Holly, and lastly the ribbon bow and tag. My CottageCutz Build-A-Christmas Stocking was colored with copics and then I added some Glitter to the top part of my stockings.

I have others that I have made for this swap, a total of 13, and will have to share them later :) 

Thank you for looking and have a lovely day!!
hugs to all,
Cheryl