Friday, December 24, 2021

Merry Christmas to you

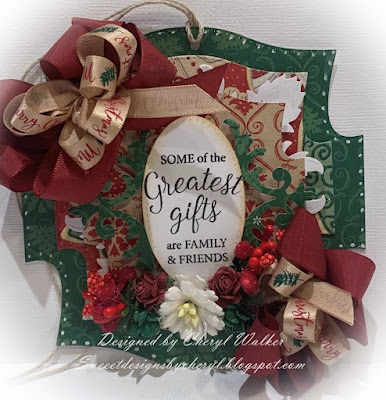
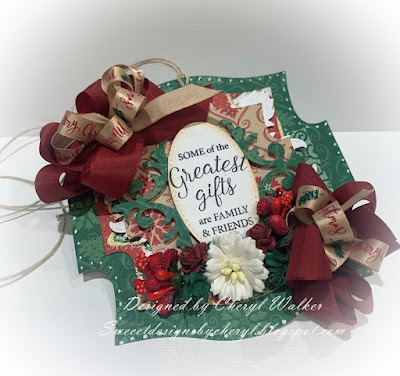
 Hello everyone and Merry Christmas Eve to you all! Hope you're all ready for Christmas and ready to celebrate with your family and friends. Today I have a quick post to share with you all, its another fun and easy tag I designed for Really Reasonable Ribbon.

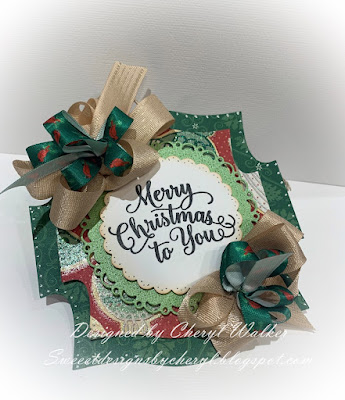
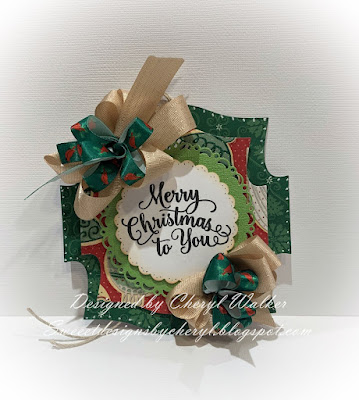
On my tag I chose to use some of the DCWV design papers, and then some of my die cuts. I stamped the Merry Christmas in black ink, and then hot glued my 2 bows using 2 different ribbons. Love the delicate stitched as it makes for easy bows. I also chose to use the cardinal ribbons that came in the Ribbon club assortment for I believe November. Lastly I tied some Jute for the tag to tie on my gift.

Really Reasonable Ribbon Supplies: Delicate Stitched Ribbon, Ribbon club assortment  , satin Ribbon cardinals, foam tabs, twine , other supplies DCWV design papers, bazzill card stock, hot glue gun, crossover die cutting machine, white gel pen, black ink, stamp just right paper crafts.

Thank you so much for stopping by and Merry Christmas to you all! Hugs , Cheryl

Monday, December 13, 2021

Really Reasonable Ribbons December Hop


Welcome to "Really Reasonable Ribbon's  December” Blog Hop if you arrived here from Kathy's Blog you are on the right track. If not , you will want to head back to the Really Reasonable Ribbon Blog that way you don't miss out on any of the FABULOUS Designs from the Design Team today! There is going to be lots of Beautiful projects to see today using the Winter Wonderland Ribbon Assortment, so I hope you Enjoy

For todays hop I wanted to do this darling Christmas tag that will be used on a gift for Christmas. I chose to do several layers of design paper, and then added the darling Christmas mouse. The mouse was cut using my cricut machine. I used the Gorgeous Ribbon from this months ribbon club. Love this white with the silver edges, just beautiful! Next I added some of the Bead Berry Sprays and flowers. Super fun and easy tags to make for the holidays.

Thank you so much for stopping by, and hope you enjoyed my tag for today!


Your NEXT stop for today's hop is Bonnies Wonderful Blog!!!
Hugs to all,

Cheryl

Wednesday, December 8, 2021

Christmas Tag

Hello everyone and Happy Wednesday to you all! Today I made a super fun Christmas tag using Really Reasonable Ribbon Club Assortment that was in November . I chose the Sherry Taffeta Ribbon & Merry Christmas on Tan satin . Love how this one turned out.

For my tag I chose some larger die cuts , and did different layers, using foam tabs to give it some dimension. Nest I stamped my sentiment on the oval frame using black ink, and then hot glued the flowers, and bead berry sprays. My bows were done using the Taffeta and Satin, tied together using the stem from the flowers. I love using those to tie my bows. Lastly I added some bakers twine to tie onto my package.

Supplies :

Thank you for stopping by and Hope you enjoyed my post for today!

Hugs to all, Cheryl
 

Monday, November 22, 2021

Thanks Gift box

Hello crafty friends and Happy Monday to you all! Today I'm sharing another fun box designed for Really Reasonable Ribbon, this one I used as a gift box at my luncheon.

On my box I used some fall design papers to cover it, then added some RRR Ric Rac in brown. Next I chose a few oval frames and layered them using the foam tabs. I stamped the Thanks! and then distressed the oval. This box was super easy to put together. I made 2 bows using Really Reasonable Ribbons Delicate Stitched ribbon, and then the gingham ribbon. Love how simple this was to make! Perfect for those little gifts we give.

Really Reasonable Ribbon Supplies:


Thank you for stopping by and have a lovely day!

Hugs to all, Cheryl

Monday, November 15, 2021

Welcome Autumn Small Gable Box


Hello crafty friends and Happy Monday to you all! Todays Small Gable box was designed for Maker's Movement using the darling New Woodland Friends Stamp & Die sets, along with Give Thanks Stamp set. I made this box to give as a gift at my luncheon this past Thursday

The gable box I bought, and then decorated using the New Autumn Breeze design paper pad, and then stamped up the darling bear from Woodland friends set. I colored him with copics, and added some white dots, and little eyelashes. Welcome Autumn cam from the Give Thanks Stamp set, and I will list it below with link. Lastly I added some trim, feathers , and ribbons to my box.

Supplies Used:


Saturday, November 13, 2021

Really Reasonable Ribbons November Hop


Welcome to "Really Reasonable Ribbon's  November” Blog Hop if you arrived here from Kathy's Blog you are on the right track. If not , you will want to head back to the Really Reasonable Ribbon Blog that way you don't miss out on any of the FABULOUS Designs from the Design Team today! There is going to be lots of Beautiful projects to see today using the Vintage Christmas Ribbon Assortment, so I hope you Enjoy


So for todays Hop I decided to do a recipe card, as I'm tired of printing out recipes/or looking them up on the internet. this recipe card is for Pumpkin Chocolate chip cookies, and I added the rest of the directions to the back. I love all the ribbons in this months collection, and chose to use 3 on this recipe card. I also added some embellishments from RRR and the little gingerbread baking boy is a cricut SVG file that I cut out on my machine.

Really Reasonable Ribbon Supplies:

Thank you so much for stopping by, and hope you enjoyed my Recipe card for today!


Your NEXT stop for today's hop is Bonnies Wonderful Blog!!!
Hugs to all,

Cheryl


Monday, November 8, 2021

Give Thanks Treat box

Hello crafty friends and happy Monday to you all! Today I'm sharing a treat box, or gift box I made using Really Reasonable Ribbon and this darling little turkey. I love decorating these boxes as they are so much fun! These will be used on my table as place name tags for seating.
For my box I bought these at Hobby Lobby, and then cut design paper to cover the front and back of the box. You can use design papers for the entire box, but I wanted to do this one different. I then layered some oval shapes, and this darling turkey that I cut on my cricut using Kadoodlebug Svg. Next I made the big bows using Really Reasonable Ribbons Plaid Cream and brown Tartan Ribbon, and then the Shimmer Satin Tangerine with gold. Each piece was popped using the Foam Tabs, and paper was added using the scor tape.

My image was airbrushed and then colored using copics. Name was done with Thickers.

Supplies :

Thank you so much for looking and have a lovely day!

Hugs to all, Cheryl

Friday, October 29, 2021

Ghost Trick Or Treat Bags/Maker's Movement

Hello crafty friends and Happy Friday to you all! Today I'm sharing another fun Treat bag I designed for My Makers Movement using several of their dies. Love this little Ghost and hope you love my post for today!
So for these bags: I used store bought bags that I picked up at our local warehouse sale this past summer. I then used some of the old shape dies from Makers Movement for layering my main image "Spooky Buds Die Set". Next I cut out 3 Ghost, and then stamped up 3 of the candy corn candies to fussy cut out. I also wanted to add eyelashes and some distressing to my ghost. 

Tags: were done using the Nested Square Tags die set, and then I stamped the Trick or Treat stamp from the Trick or Treat set. The candy corn also came from this set as well. I had to add some fun embellishments, so I chose to add the Tricks and Treats shaker sprinkles , they are so darling and I glued on the bats and pumpkins from the sprinkles. Lastly I added some Really Reasonable Ribbon to my tag and main image layers. I Love how these bags turned out! 

Maker's Movement Supplies:

Thank you for stopping by and have a lovely day!
Hugs to all,
Cheryl


Monday, October 25, 2021

Sweet Tea cup w/Really Reasonable Ribbon

Hello everyone and happy Monday to you all! Today's Tea cup was designed for Really Reasonable Ribbon and for a class I'm doing for my doll club meeting in November , that I'm hosting. I thought this would be a fun project for the ladies to all do.
 
My tea cup was cut using a die and Matt board to give it some strength I used scor tape to hold together. I then glued all the design papers to each matt board using scor tape and a little liquid glue. I had bought a huge pack of this design paper at our local warehouse sale, it cost me 1.00 for like 25 sheets. super awesome deal. The die I used is an Old Sizzix die. I added Really Reasonable ribbon's Gabrielle Lace My flowers were done using my Glass Flower techniques found HERE on my blog. I have a few different ones, hope you enjoy! I then hot glued the pearls to the centers of all my flowers. I added some feathers, and some branches for some embellishing on my cup. The ribbon bow was added on to hang the tag. I forgot to stamp a sentiment on my tag, oops!

Really Reasonable ribbon Supplies:
other supplies , liquid glue, hot glue, pearls, distress ink, feathers, punches, and dies.

Thank you so much for looking and hope you love my post for today!
Hugs,
Cheryl

Wednesday, October 20, 2021

Halloween Tag / Maker's Movement

 
Hello everyone and Happy Wednesday to you all! Today I have this fun Halloween tag made for  Maker's Movement using the Spooky New"Spider Die Set" , "Tricks and Treats Paper Pad" & "The Nested Square Tags", super easy and fun tag to make!

Makers Movement Supplies Used:


For my tag today I cut out the Nested tag using black card stock, then cut a piece of the new design paper to layer on top. The spider and its web were cut using the New Spider die set from Makers Movement, and I glued them on. The Happy haunting stamp came from the Trick or Treat set, and ws stamped in black ink, and then airbrushed the tag. Next I added some dots, and a heart gem to my spider. The ribbons are all from Really Reasonable Ribbon, and went perfect with this tag. lastly I added some dots to the bottom of my tag.

Thank you so much for looking and have a lovely day! Hugs to all, Cheryl

Monday, October 18, 2021

Spooky Treats

Hello everyone and Happy Monday to you all! Today I have a super cute treat bag I made for my Grandson for Halloween.  Hope you enjoy todays post!

On my bag I used the darling Mummy Bear I cut out using my cricut, and then distressed all the pieces and glued them together. The coffin is a felt embellishment I had purchased years back, and thought it would work perfect on this. All the shapes were cut out using my Crossover II machine, and then layered. Spooky Treats is a tag from one of my design papers. Super fun bag to make, hope he loves it!

bag was cut out using the score board. Ribbon is from Really Reasonable Ribbon, all shapes are old Cheery Lynn designs, ghost is a sticker, Mummy Scare Bear is from Cuddly cute

Thank you for stopping by and have a lovely day!

Hugs to all, Cheryl

Friday, October 15, 2021

Happy Haunting Tag/Maker's Movement

Hello crafty friends and Happy Friday to you all! Today's tag was designed for Makers Movement using their "Spider Die Set" & "Trick or Treat Stamp & Die Set". Hope you enjoy todays post!

Super easy and fun tag to make. I used Maker's Movement Nested square tags and cut one in white card stock. Next I cut out some of the older dies to layer up(black card stock, and orange & black polka dots). Then used the New Spider Die set, and cut out the spider web and spider in black. I added white dots to the spider, so it gives it some extra fun. The little heart is a flat backed heart gem, I glued it on using the Tombow Multi liquid glue. I made my bow using Really Reasonable Ribbons Delicate Stitched ribbon, and then hot glued the spider on it. The "Happy Haunting" sentiment came from the Trick or Treat stamp and die set. All item links are listed below for easy finding.

Maker's Movement Supplies Used:

Thank you for stopping by! Hope this gives you some inspiration to make some fun & easy tags.

hugs to all, Cheryl

Wednesday, October 13, 2021

Really Reasonable Ribbon October Blog Hop

Welcome to "Really Reasonable Ribbon's  October” Blog Hop if you arrived here from Kathy's Blog you are on the right track. If not , you will want to head back to the Really Reasonable Ribbon Blog that way you don't miss out on any of the FABULOUS Designs from the Design Team today! There is going to be lots of Beautiful projects to see today using the Christmas Ribbon Assortment, so I hope you Enjoy


For my Box today I used these boxes I bought from Hobby Lobby to decorate up using design papers, and different die cuts, punches, and cricut SVG file. I love this months ribbon collection and thought the ribbons I chose went perfect with these designs. I love the checked ribbon, its absolutely Gorgeous in person! I made several bows and hot glued them on my box. The little Ginger Christmas cup is an SVG file that I cut out and then airbrushed. I added all the eyelashes, and dots to him, and he sure is sweet! The sentiment tag was punched out using 3 punches, and a stampinUp stamp. I enjoyed making this sweet little treat box, and will be sharing more of them soon. 
Really Reasonable Ribbon Supplies:

other supplies :SVG file, punches, dies, stamps, white gel pen, design paper, gable box, copics, airbrushing, 


Thank you so much for stopping by, and hope you enjoyed my Halloween card for today!


Your NEXT stop for today's hop is Bonnies Wonderful Blog!!!
Hugs to all,

Cheryl

Monday, October 11, 2021

Halloween Treat Bags

 
Hello everyone and Happy Monday to you all! today I have these darling treat bags I made using this darling SVG file Scare Bear Witch that I cut out using the cricut machine. Isn't she Darling? These were made for my granddaughters as I will give them to them for Halloween filled with candy.
these little bears were cut using different color card stock, and then distressed by me. I added all eyelashes, and dots and all. I fell in love with this little file, and bought lots of them! heehehe the tag is hanging using a Pear Shaped Metal clip from Really Reasonable Ribbon. the Happy Halloween tag is from StampinUp! as well as the for you. The pumpkin is a felt embellishment sticker type. I added RRR beads, stemans and ribbon. The doily and all the other shapes are from My Makers Movement the the witch is on.

for the bags, I just used a 12" x 12" piece of design paper and my score board, and started scoring and came up with these. The tops are held closed with the paperclip that has the ribbons on it.

I hope you enjoyed my treat bags for today! thank you for stopping by! Hugs!

Friday, October 8, 2021

Beary Sweet Halloween Bags

Hello everyone and Happy Friday to you all! Today's  Halloween Treat Bags were designed for Really Reasonable Ribbon using the beautiful Shimmer Satin Ribbon they carry, and then a Cuddly Cute SVG Bear dressed as a spider. Love how these turned out, and Hope you do too!
The bags were purchased at one of the warehouse sales here in utah. I bought a ton of these bags so I could decorate them up to give. I started on this bag by using the spider ribbon from Really Reasonable Ribbon, and glued it to the bottom of each bag. Next I punched out the scalloped circles using a spider design paper ,and distressed it with orange, and then added black dots. the larger one was cut using black card stock and I added white dots. I used my New Cricut air machine to cut out 9 bears dressed like spiders, so cute! I airbrushed them and added eyelashes, and shadowing. the all have a little white flower on their heads. The Happy Halloween was cut using a die, and same with the bat. Next I chose to use the beautiful Orange Shimmer Satin ribbon. Love how these all turned out. May have to make some others using different designs, and ribbons.
Supplies Used:
Hot glue
SVG Bear
Punches
Dies , white gel pen, black pen, chalks, copics, air compressor , 


Wednesday, October 6, 2021

Makers Movement Trick or Treat card

Hello crafty friends and Happy Wednesday to you all! Todays card was designed for the Makers Movement using the New Spooky Buds Die Set & Tricks & Treats Paper Pad. Love these little Ghost!
On my card for today I chose to use white embossed card stock I had in my stash to cut my Ghost out with. I did not emboss this card stock, it came that way. Next I distressed lightly the edges on my ghost with chalk, and then added some eyelashes, and dots and such to them. I then hot glued a flower to each ghost. My Trick or Treat stamp was stamped in a purple ink, and then I airbrushed 2 different purples. Each layer of design paper came from the New paper stack and I LOVE them all! I used a cute candy one on the inside too. Lastly I added some white dots to all layers. Love how this one turned out with all the purples. 


 Makers Movement supplies used:

I hope you enjoyed my post for today, as I loved making this card to share with you all! Hope you have a lovely day , and thank you for stopping by!

Hugs, Cheryl