Showing posts with label Giftbox. Show all posts

Thursday, July 13, 2023

Really Reasonable Ribbon July Blog Hop


Welcome to "Really Reasonable Ribbon's  July” Blog Hop if you arrived here from Kathy's Blog you are on the right track. If not , you will want to head back to the Really Reasonable Ribbon Blog that way you don't miss out on any of the FABULOUS Designs from the Design Team today! There is going to be lots of Beautiful projects to see using Summer theme, So each DT member will showcase something using Beach or Beach colors.

Be sure to comment on the blog hop post on the RRR Blog for a chance to win a $10 gift certificate to Really Reasonable Ribbon  


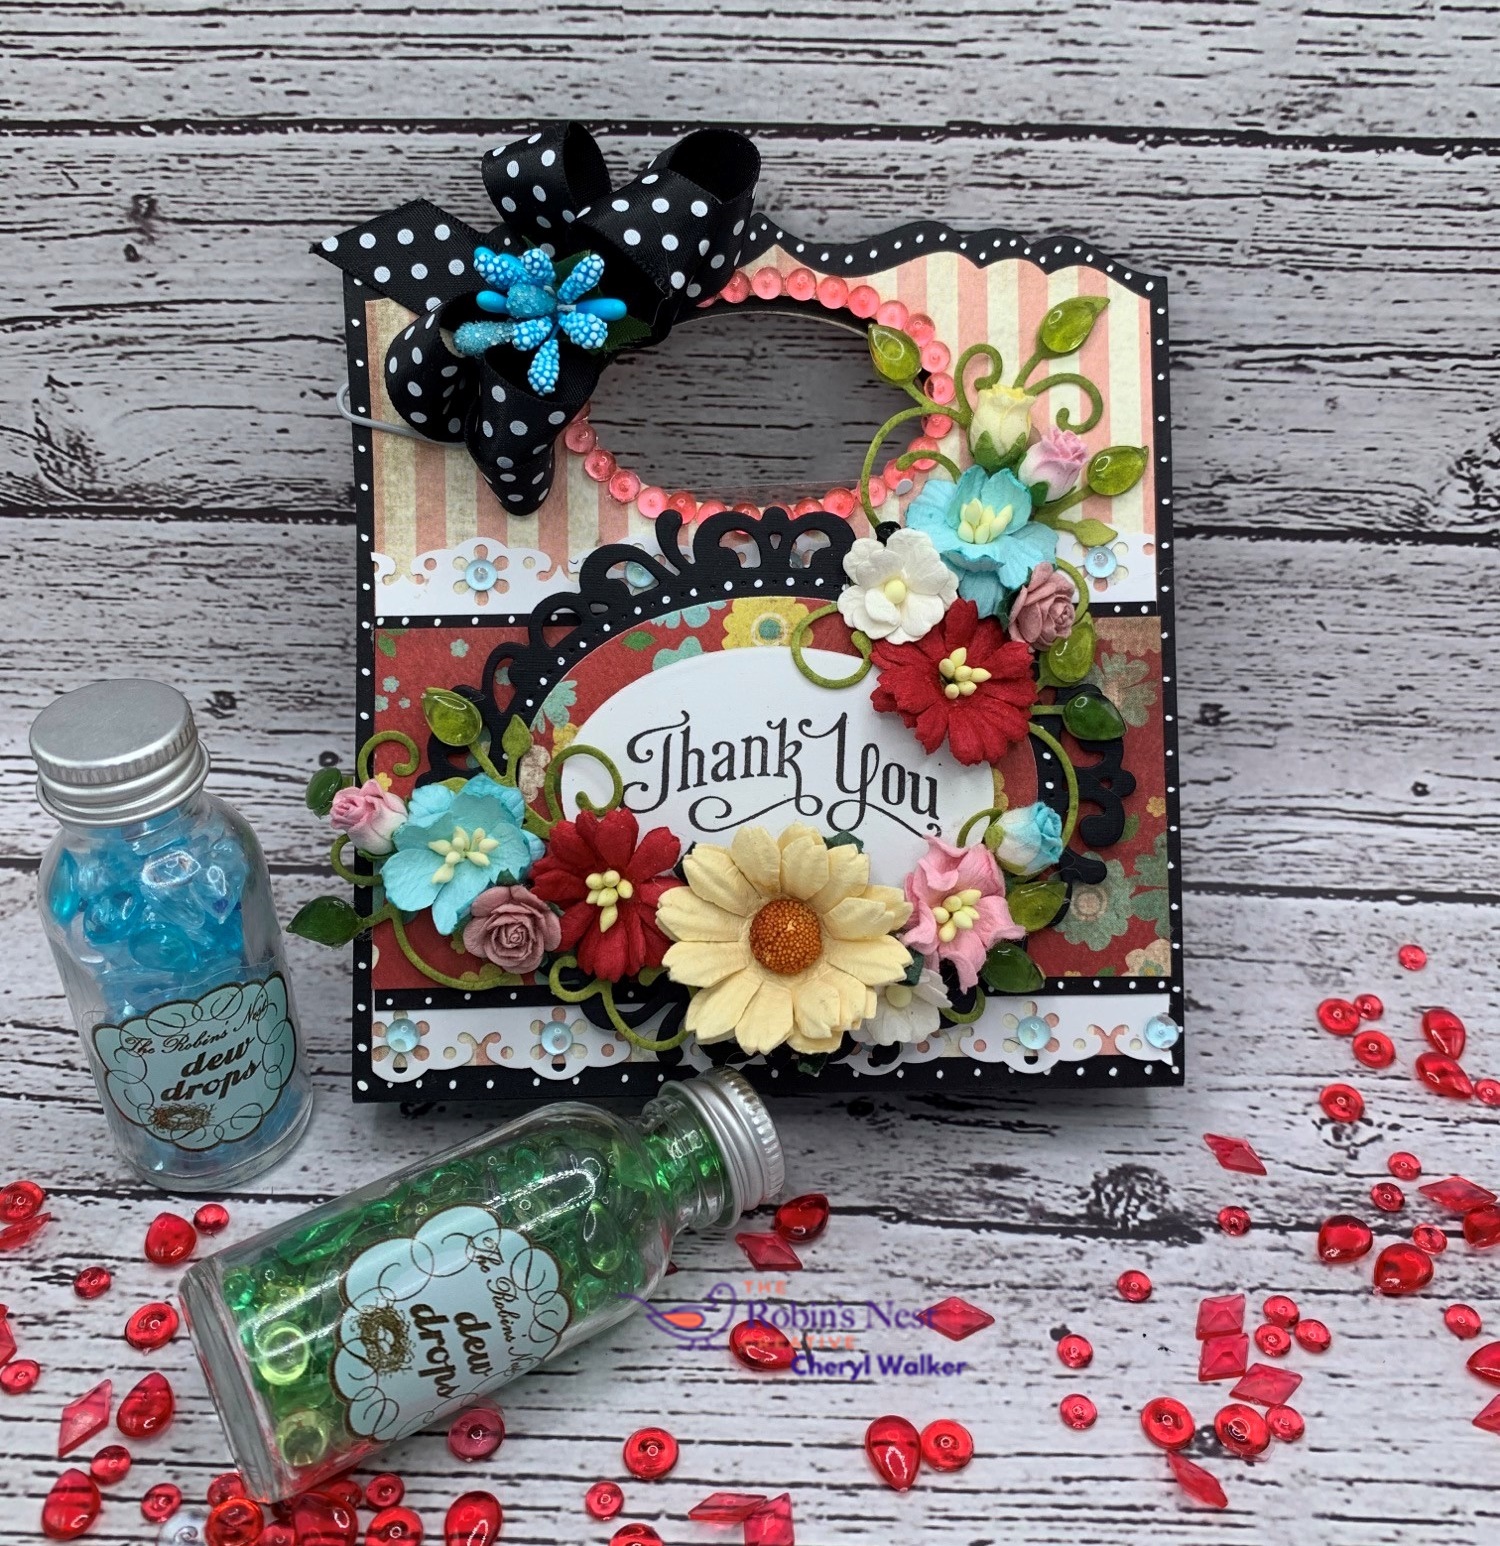
So for my project today I made a Nautical Theme Carry Caddy with side compartments . I absolutely had so much fun making this sweet caddy. I used some dies, and made up a box as I figured out how large I wanted it to be. The measurements on this caddy are 4 5/8"w x 5 1/4" H x 3 1/4" D. The sides can hold any crafting goodies, gift cards, candy, or office supplies. The inside can hold a little gift or whatever you choose. These would be fun to make for co-workers, crafting swaps, or whatever you choose. I will be making more of these and may do a video tutorial on this as well.

I used lots of Really Reasonable Ribbon for my Caddy today, and also lots of flowers. The paper collection I chose to use is By the Sea by Carta Bella . The little Sailor dog is by KaDoodle Bug Designs.
Ribbons and flowers used:


Be sure to comment on the blog hop post on the RRR Blog for a chance to win a $10 gift certificate to Really Reasonable Ribbon


Your NEXT stop for today's hop is Bonnies Wonderful Blog!!!
Hugs to all,

Cheryl

Friday, April 28, 2023

Luncheon Table Setting with treats

 
Hello everyone and Happy Friday to you all! So over the last couple of weeks I've shared some of my projects with you for my Luncheon table setting I was working on, well here it is. I had so much fun making all the little goodies to gift to my friends in club, and they loved them all! 

So the bunnies you see on the plates I did make and those have hangers on them so if they want they can hang them from a tree or whatever they choose. Next they each also received a mini Hexagon box, which I do have a video tutorial on and it can be found here. I've made these boxes in several different sizes, and this on the table by each plate is the smallest of them all. Below you will see the larger ones.

Next I gave each a little pink cup filled with Homemade Italian ToTo cookies that I made, love these! 

Now the bigger Hexagon Boxes you will see next held the gifts for our raffle we do. I had three of those done up for the gifts. Love making all the fun goodies for this.


Video on Hexagon Box can be found HERE
I do hope you enjoyed my post for today and thank you so much for stopping by!
hugs to all,
Cheryl

Wednesday, April 26, 2023

Shabby Chic Mother's Day boxes

Hello crafty friends and Happy Wednesday to you all! Todays project was designed for The Robins Nest Creative using dew drops to decorate my Gift box. 

To Start

To start I made this box small so it could hold some goodies for my table setting I'm doing for Mother's Day. I picked some pretty Design paper that I bought years ago its K &Company. Next I picked my die cuts, and it was a flourish that I have and some ready to go, and then picked my flowers they are from RRR and are absolutely beautiful.

Decorating My Shabby Chic Box using dew drops

I started with adding My design paper to my Box before putting together, that made it easy. Then once together I added my flourish and Hot glued my flowers on, that helped hold the flourish in place. For the dew drops I used the light pink dew drops in the tear drop shape, and then green dew drops in different sizes. I also added the diamond shaped ones to the lid, as I thought they added that little extra to my box. Then I added lots of Really Reasonable Ribbon to close the top, and for my double bow. I love how the dew drops add that extra embellishing that my box here needed.

think later on I will add a tag to the top that says Happy Mothers Day, and distress it so it will coordinate with this box, as these will be part of the gifts on my table. I cant wait to do my Mother's Day Table setting, will be fun!. I do hope you enjoyed my post today and please let me know what you think in the comments below.


Items used:
The Robins Nest Dew drops in pinks and greens
K&Company old design paper pack
Card Stock AC, and StampinUp!
Really Reasonable Ribbon (Peony Delicate Stitched)
Really Reasonable Ribbon flowers (Open Roses, and Sweetheart Blossoms)
Hot Glue
Art Glitter Glue
Scor-Tape (Really Reasonable Ribbon)

Thank you so much for stopping by and hope you enjoyed my post for today. happy crafting to all

Hugs ,Cheryl


Thursday, March 2, 2023

Panda Milk Carton box with Lid

Hello crafty friends and Happy Thursday to you all! Today I have another fun Milk Carton box, this one is tall, and super fun to make! Love making these in different sizes. This one has flap lid, super fun! I designed this one for KaDoodle Bug Designs using the darling Cutie KaToodles Panda, love her! I have videos on the panda and showing how I put her together and inked her up. you can find it below on this post.

The design paper I used is from Pebbles its called Ever After, and its darling! I thought it would look so cute on this with the panda and fence, eggs, and grass. super fun to make! My ribbon is from Really Reasonable Ribbon, and it worked perfect this box.


Thank you so much for stopping by and have a lovely day!
Hugs to all,
Cheryl


Monday, August 8, 2022

3-D Sewing machine with storage

Hello crafty friends and Happy Monday to you all! Today I have this super darling sewing machine storage box that I made for Really Reasonable Ribbon, and to keep on my work area. Love making these and will have many more to share on my blog . Ive used lots of Really Reasonable Ribbon flowers and ribbon on this and will list items below.


In the picture above you see both drawers, there is also a storage box under the spool of thread. And another storage under the base. super fun. I used this darling strawberry design paper and card stock. Then used punches, dies , buttons, and such to decorated. I loved using all the RRR flowers and will list them below for you.

Really Reasonable Ribbon 
Flowers-
Ribbons-
Extras-
White flat backed pearl n a 10mm or 12mm for top of spool
the sewing machine tutorial is on youtube from Kristiannes crafty adventures
Thank yo so much for stopping by and have a lovely day!
Hugs to all,

Thursday, July 21, 2022

Tutorial on Picnic Basket/Gift box

Hello crafty friends and happy Thursday to you all! 

Today I'm sharing this darling Picnic Basket Gift box & Video Tutorial on how I made it. This was made for a dear friend and she loved it! I added her birthday gifts inside for her, and made a card to go with it. I will have the card posting on next Monday, so be sure to check back.

Below is the video tutorial on how I made this, so I hope you enjoy!


I used lots of Really Reasonable Ribbon on this box. 

Thank you so much for stopping by and have a lovely day!
Hugs to all,
Cheryl
 

Wednesday, July 13, 2022

Gift bag & Video Tutorials using Creative Dew drops

 
Hello everyone, and Happy Wednesday! Today I am sharing my 1st post for The Robins Nest Creative using the beautiful dew drops they carry. I'm super excited to be part of their amazing design team!


 Todays project is a Gift bag/treat bag I designed and decorated using the dew drops , flowers, punches, and dies. I do have 2 video tutorials, and also links to The Robins Nest Creative Blog.


Thank you for stopping by and I hope you enjoyed my videos and post ! Please leave a comment letting me know what you thought, as I'm starting out again to share videos, and would love to hear your feedback on them.

Hugs to all,

Cheryl

Monday, November 15, 2021

Welcome Autumn Small Gable Box


Hello crafty friends and Happy Monday to you all! Todays Small Gable box was designed for Maker's Movement using the darling New Woodland Friends Stamp & Die sets, along with Give Thanks Stamp set. I made this box to give as a gift at my luncheon this past Thursday

The gable box I bought, and then decorated using the New Autumn Breeze design paper pad, and then stamped up the darling bear from Woodland friends set. I colored him with copics, and added some white dots, and little eyelashes. Welcome Autumn cam from the Give Thanks Stamp set, and I will list it below with link. Lastly I added some trim, feathers , and ribbons to my box.

Supplies Used:


Wednesday, February 20, 2019

Sweet Gift Bag & Gable Box Gifts

Hello everyone, 
Today I wanted to share a couple of the bags and boxes I made for last weeks Valentines Day. The 2 here were made for My friend Jennette, and the Gable box was made for My husband. I had also Made another bag for my Dr. and then another Gable Box for my Mom. I used Lots of fun Really Reasonable Ribbon flowers, Lace, Leaves, Stamens, and goodies on these boxes and bags, I really just enjoyed making them to give away, it felt so good!


The bags, they were up in my cabinets, you know I had these for a long time, they were kinda flimsy , but after adding the good design paper around them, they ended up being super sturdy and very very nice bags, strong enough to hold a heavy large chocolate candy kiss and several other items.

Adding Paper- after  gluing and using Scotch tape runner and 5/8" Scor-Tape(helps to keep paper on WELL)  to put my paper on, I added the beautiful Really Reasonable Ribbon Gabrielle Off White Lace , I also used the Beautiful Pearl Pink Delicate Satin Ribbon to create a beautiful big bow, then added the darling Strawberry Brownie Stitch grosgrain ribbon on top of that. I then made my glass flowers using Cheery Lynns flower dies(my makersmovement) and placed an 8mm white flatbacked pearl in the center of it.

Cluster of flowers and dies-
So I cut out a heart filigree piece using shimmer card stock, then added my white swirls (cheery lynn) placed my Really Reasonable Ribbon White Leaves, Chelsea Rose, Rose buds, Stamens, carnation, Sweetheart Blossoms and such by using hot glue. The CottageCutz Hedgehogs were colored using copics and then placed using RRR foam tabs. I really had so much fun decorating up the bag here. I will link all supplies used below from the Really Reasonable Ribbon store.

Really Reasonable Ribbon Supplies Used on gift bag & Gable Box:
Gabrielle Off White Lace
Pearl Pink Delicate Stitched Satin Ribbon
Strawberry Brownie Stitch Grosgrain Ribbon
8mm Pearl Flatback
Rose Buds
Carnation
Mini Sweetheart Blossom
Stamens
Heart Embellishment
Scotch Refill
Foam Tabs
Brown Satin
Rose open
White leaves
Resin Flower Embellishment
Swiss Dot Red Satin Ribbon
1" or 5/8" scor-Tape

Other supplies Used:
CottageCutz dies
Cheerylynn dies(Mymakermovement)
Thickers for the lettering
Stickles
copics
ink pads
gable box and gift bag
design papers
my favorite glue

For the Gable Box for my Husband I used more of the really Reasonable Ribbon supplies listed above but added all reds and browns to this one, and a tad of pink. I made him a cute little coupon book for a dinner out, movie out, free lawn mowing, and back rub :) also there are lots of chocolates in the box and a gift card. The Rose was from the Roses he had sent to me, I figured it would be nice in the photo.

I hope you enjoyed my post for today! Thank you for stopping by, and have a lovely rest of the week!
Hugs
Cheryl

Saturday, December 5, 2009

Giftbox with drawers for 2 challenges!


Hello again this is my second post for today :) LOL if you would like to see my Tile mini tutorial please see post below this one!!


This giftbox with drawers was made for 2 challenges.

1st challenge on SCS Inspiration Challenge

2nd challenge The Pixie Cottage get stitchy
The tutorial for this box came from Kristins blog here

On my box I used the stamp called What a Doll from the pixie cottage stamps.


This box was designed for a Christmas gift for a dear friend and I will put some crafting embellishments inside the drawers for her!!


For the Pixie Cottage Challenge you were to do sewing on your project. So I did sewing around the 2 panels. The top part of this box is a card attached to the box itself.


For embellishments I added flowers, gems, ribbon, and buttons for the drawer pulls.


Thank you for looking and have a very nice weekend!!
Hugs,
Cheryl