Hello everyone, and Happy Thursday to all! So today I just had to share this beautiful Christmas sentiment that I used on my card from the NEWLY released stamp set called "Luke 2" from The Project Bin! Awww I just LOVE designing Christmas cards, they are so much fun! Cant wait to share some more with you all soon. :)
So on this card I kept the sentiment simple , by just stamping it in Distressed ink Black Soot. Love that using the Mini Misti tool helps to get that perfect look on your sentiments. Omgosh this is the best tool ever for stamping! I love how if you missed an area, you can just stamp directly over it again and again, or if you want a deeper darker look, the same applies. Ok so enough about the mini misti and on to my card for today
Card base-
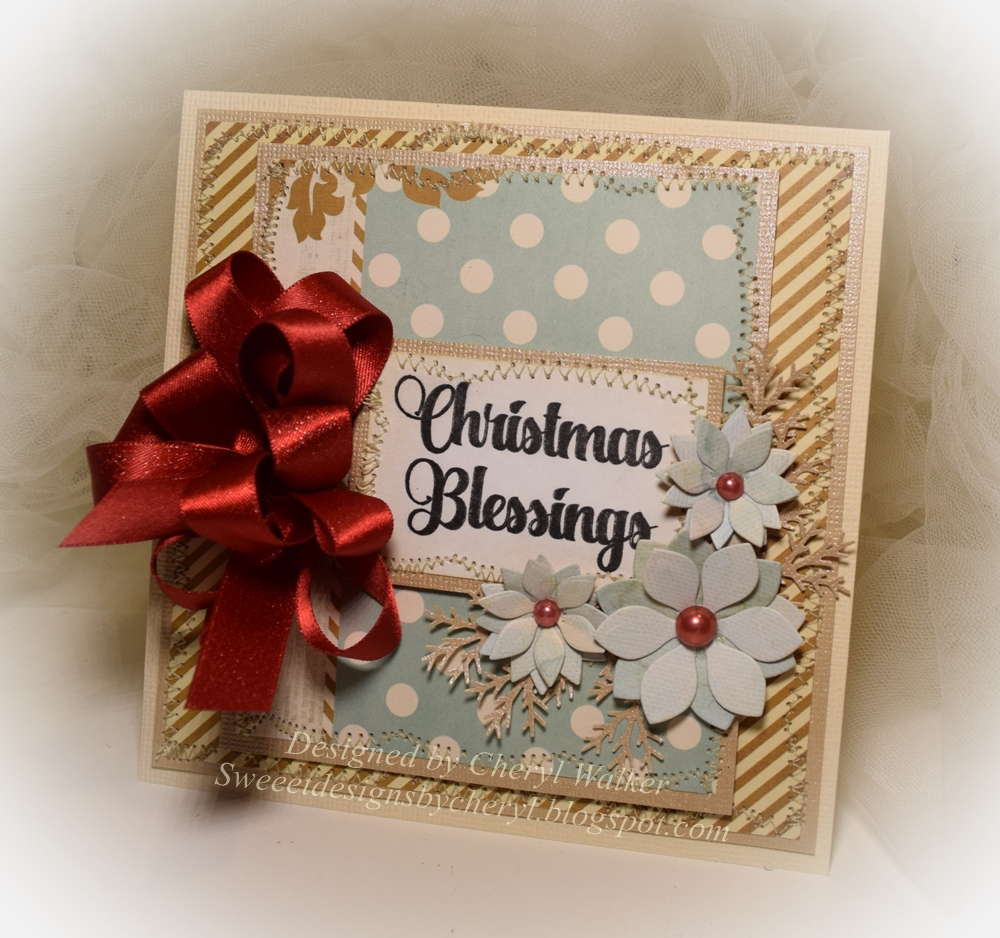
ream card stock cut at 5 1/2" x 11" and then scored at 5 1/2" to create my card base.
Layer 1- 5 1/4" x 5 1/4" bazzill then dp is 5" x 5"
Layer 2- 4 3/4" x 4" then design paper is 4 1/2" x 3 3/4"
Layer 3- 2 3/4" x 1 3/4" for the card stock, then design paper is 2 1/2" x 1 1/2" sentiment stamped in Black Soot using the Mini Misti tool(LOVE THIS)
Layer 4- flowers from JustRite Papercraft, and the branches are from Martha Stewart. I used the glue gun to take those down to the card, then the flowers were put together using a liquid glue.
BOW- the big bow was made using Really Reasonable Ribbon Shimmer Satin, and is 2 bows placed on top of each other.
Supplies-
The Project Bin Luke 2 sentiment
Really Reasonable Ribbon Foam Tabs
Pink Paislee Snow Village for design paper
Scotch Glue (liquid)
Sewing
JustRite Floral Trio Two die
Half backed pearls Red
Really Reasonable Ribbon Shimmer Satin
Challenges :
Crafty Halzelnuts Christmas Challenge
Sweet Stampin Christmas/Christmas die cuts( my flowers for poinsettias)
Crafty Gal Corner/Punches and die cuts
Craft Rocket Challenge/Ribbon and or lace
Thank you so much for stopping by and looking! Please let me know what you think of my card for today!
Hugs to all,
Cheryl
Showing posts with label Pink Paislee. Show all posts
Thursday, October 6, 2016
Wednesday, July 13, 2016
Really Reasonable Ribbon July Hop
Welcome to "Really Reasonable Ribbon's" JULY Blog Hop!

If you arrived here from Judy's Blog you are on the right track. If not , you will want to head back to the Really Reasonable Ribbon Blog that way you don't miss out on any of the FABULOUS Designs from the Design Team today!
This months assortment is PERFECT,LOVE all the pink and Purple in this collection! Isn't this a fabulous assortment!!
Mini Flip Book Album measures 4" x 5 1/2" x 1/2"
My Flip Book Mini Album was constructed & I used Pink Paislee paper line "Vintage Vogue" for inside and out. I kept it simple for the inside, as there isn't much room for flowers and ribbon. All the decorating is done on the cover as you can see in my 1st photo. There is plenty of room in this little mini album flip book for photo's as the pages all flip and flap open.
I hope you are enjoying today's hop, and please do let me know what you think of my little flip book here!
Really Reasonable Ribbon/ July Ribbon Club
Really Reasonable Ribbon/Mini Sweetheart Blossoms
Really Reasonable Ribbon/Flowers Cherry blossoms
Really Reasonable Ribbon/White Mini Pom Pom
Pink Paislee Paper line Vintage Vogue and embellishments
Your NEXT stop for today's hop is Bonnie's Wonderful Blog!!!
Hugs to all,
Cheryl
Friday, February 12, 2016
Movie Night Invites
Hello everyone, I'm super EXCITED to share with you all some Movie Night Invites I designed using the CottageCutz Lights , camera , Action Release.
Absolutely LOVE these, as they turned out super CUTE! Will have to have a MOVIE night, and use them to invite Family & Friends over.
Supplies Used:
Film Strip- cut in white card stock, and colored with copics
Clapboard-also cut in white card stock, and colored with copic markers (3)
Movie Night and Ticket - cut in white card stock and colored
Popcorn & Cotton Candy(past release)- cut in white and design paper, and airbrushed with the copic airbrushing system
Other supplies:
design paper is Merry & Bright from Pink Paislee, glue, copics to color, airbrushing, stickers, thickers, paint, toilet paper roll, card , glitter
First I flatten my toilet paper roll using the big shots machine, and then cut out the ends using a circle punch. I then painted with black paint, inside and out/set aside to dry. Next I cut my design paper to fit and leave a tad bit of the edges showing black. Then I glued on the paper using a liquid glue. Next is time to decorate(Fun Part), and work on the slider card for the inside. This is where it will say "DATE/TIME/PLACE" :) you can print it out on the computer, or use stickers like I did.
These are super fun and EASY to make!! Hope you enjoyed my post today, and thank you for stopping by!
hugs to all,
Cheryl
Thursday, November 19, 2015
Santa Snowglobe /Very Merry!
Hello everyone, and Happy Thursday to all!
So for Today's card its another one I made for Splitcoaststampers Sketch challenge for this week. I ended up making 2 for this challenge, as this was a super easy sketch to work with.
On my card I used the sweet CottageCutz dies. They are older ones, but super cute.
The CottageCutz Snowglobe was cute using white card stock and then I airbrushed the globe with BG000, next I colored the base with G28, and the other pieces with R59, and bow with R59, and R37. I also added some glitter to it.
For the CottageCutz Snowglobe Accessories I used the Santa and sign pieces, and colored them with copics as well. I used some Flower Soft Polor white on his coat, glove, and hat.
For my Deaign paper I used Pink Paislee's Snow Village stack. And the border is a sticker border is Crate Paper's Sleigh Ride sheet..
Ribbon is from Really Reasonable Ribbon.
Snowflakes are from American Crafts glitter collection.
Dots are from Pebbles and are Candy Dots
Snowflakes are from American Crafts glitter collection.
Dots are from Pebbles and are Candy Dots
Thank you for looking and have a lovely day!
Hugs to all,
Cheryl
Wednesday, October 28, 2015
Winter Wonderland
Hello everyone, and Happy Wednesday to all!Today I have my card for Splitcoaststampers Sketch Challenge to share :) and I absolutely LOVE this weeks sketch.
For my image I used CottageCutz Reindeer & Tree Ornament, which I cut out using white card stock, and then colored using copic markers in G28(for trre), E31,E37,E57(Reindeer), BG000 for the swirls, but then I covered them up using polar white flower soft. LOVE the look of the ornament here.
For the branches I used a punch, and for the circles I used spellbinders. Ribbon is from Really Reasonable Ribbon and is the satin, and velvet. Dp is from American Crafts "Pink Paislee line" SNOW VILLAGE! I have to say I LOVE this Christmas Collection!!! Talk about beautiful design paper, it has so many to choose from, and the deer is one of my favorites :)
Thank you for looking and have a lovely day!
hugs to all,
Cheryl
Thursday, October 15, 2015
Beautiful Poinsettia & Holly/Video Tutorial
Hello everyone,
Just had to do another card for Wednesdays sketch challenge on SCS, and do it without flipping the design...hehehe
Design paper is Snow Village from Pink Paislee. LOVE this collection, its absolutely beautiful!!! Its an older collection from 2013 but still LOVE it!
For my sentiment I stamped it in memento black ink, and then distressed the tag using brushed corduroy and barn door.
Ribbon is from my stash, its GOLD and I hardly ever use it, but when I put it up to this card, I knew it was perfect to complete this one.
Thank you for stopping by, and have a lovely day!
hugs to all,
Cheryl
Just had to do another card for Wednesdays sketch challenge on SCS, and do it without flipping the design...hehehe
For my card I used the Beautiful Poinsettia CottageCutz Christmas die, and colored with copics R37, R39 , E08, YG03 , YG95. I added some gold gala glitz to the center to finish up the poinsettia.
The holly was colored using the YG copics listed above.
For my sentiment I stamped it in memento black ink, and then distressed the tag using brushed corduroy and barn door.
Ribbon is from my stash, its GOLD and I hardly ever use it, but when I put it up to this card, I knew it was perfect to complete this one.
Thank you for stopping by, and have a lovely day!
hugs to all,
Cheryl
Monday, May 18, 2015
Happy Birthday /Alota's Hippie Bugs
Hello everyone, and Happy Monday to all!Today's card was designed for our youngest daughters Birthday. I thought how cute these darling Alota Rubber Stamps "Hippie Bugs" would be for her card.
I just love these darling bugs, and have tons of them, so I thought it would be nice to pull them out and use them. I colored them up with copic markers, and added some stickles to their wings. Love how cute they are!
Alota Rubber Stamps-Hippie Bugs
Copic Markers- Airbrushing was done with B00, Y08,G24,G14,R39
Design Paper- is American Crafts Crate Paper line and is called "Party Day"
Spellbinders- #5 and I got these for dirt cheap at Michaels craft store for 5.00, WOW! Thanks to a really sweet friend of mine, who called me to tell me about it, and pick me up some, then we went shopping the next day at another Michaels and I bought 4 more sets.....wooohoooo
Sentiment- Sweet N Sassy Stamps/Birthday Greetings
Ribbon-Really Reasonable Ribbons diamond satin, and Gingham print.
Sticker Tag(Sentiment stamped on)- Pink Paislee's Sentiment Series
I am super pleased with how this simple card turned out. Hope you enjoyed my post today!
Hugs to all,
Cheryl
Monday, November 24, 2014
CottageCutz Black Friday Preview/Puppy In Bag
Hello everyone and Happy Monday to all!
Today is day 4 of the CottageCutz Black Friday Previews for the CottageCutz "In The Woods" Release.
Today I'm showcasing the Sweet CottageCutz Puppy in Bag Die. He is another super cute die in this darling collection. He is cut out in white card stock, and then colored using the dusting technique. I did dust him using Tim Holtz distressed inks. Next I colored his eyes, nose, and mouth using copics.
card measures 3 1/2"x 3 1/2"
This card was super simple to make, as I cute a 3 1/2" x 7" piece of card stock for the card base, then layered my frame with Pink Paislee design paper Winter Wonderland. I added some Really Reasonable Ribbon in a brown Gingham Print, and a big bow/ with a button. Lastly I added some white dots to the corners, and stamped a StampinUp! sentiment on the bottom.
Thank you for stopping by, and have a lovely day!!!
Please be sure to join us tomorrow on the CottageCutz blog for another preview of the Black Friday "In the Woods" Release!
Hugs to all!
Cheryl
Tuesday, November 11, 2014
CottageCutz Poinsettia & Holly Spray
Hello Friends!!!
I absolutely LOVE this time of year! I love making all the Christmas cards, and fun stuff! And I absolutely LOVE all the NEW Christmas CottageCutz dies! For my card today I used the Beautiful CottageCutz Poinsettia & Holly Spray, along with the CottageCutz Expressions "Noel" for this 3 x 3 Mini Card.
I love when we find easy and fast cards to make. Using the CottageCutz dies makes it super fast and easy, and I LOVE the look of these beauties!!! I'm thinking of making some place setting name tags with these cards and the CottageCutz Petites. I will share what I come up with when finished. :)
The poinsettia spray was colored with copic markers, and then I added some Viva Pearl pen in gold to the center of the poinsettia, and to the branches. The Noel was cut in red card stock. The design paper is a Christmas print from Pink Paislee "Snow Village" I got this pad from American Crafts, and the little card is Bazzils mini 3 x 3, also from American Crafts.
Thank you for looking and have a lovely day!
hugs to all,
Cheryl
Thursday, May 15, 2014
Patriotic and Ribbon Theme Goody Bag
Hello everyone, today I'm sharing a treat bag made for Really Reasonable Ribbon's Patriotic and Ribbon Theme Challenge that started today!
I've wanted to use these super darling treat bags I got from American Crafts, they go with the American Line from Pebbles. I also used the Pen Pal line from from Pink Paislee, love both of these. The Really Reasonable Ribbon works PERFECT with both lines. I LOVE the ribbon for my bow, it reminds me of the american flag, its called "Flag Grosgrain Ribbon", next I used the Mini Pom Poms in blue, and the Lace is Gabrielle off white, and is absolutely beautiful!!
I used the Sweetheart Blossoms from Really Reasonable Ribbon as well, and those can be found here!
The Super Cute Teddy is Mr. Snuggles and is a CottageCutz die and is dusted with distressed ink, and then I added a watermelon sticker to him. He is my favorite teddy!!!
All the stickers are matching to each collection that I listed above. Pen Pal, and Americana, both are paper collections from Pebbles and Pink Paislee.
Thank you for looking and have a super nice day!
Hugs to all,
Cheryl
Tuesday, May 13, 2014
Really Reasonable Ribbon May Hop
Hello everyone and Welcome to
May Hop!
July Desk Calendar(Heidi Swapp)
You should have arrived from Linsey's Blog If not you will want to start out at the Really Reasonable Ribbon Blog so that you wont miss anything.
I hope you have enjoyed our Hop so far today as there is a LOT of inspiration using the Beautiful May Ribbon Kit from Really Reasonable Ribbon. I just LOVE all the ribbons in this months assortment! Of course I LOVE every month as they are all so Beautiful!!! I did use lots of red,blue,and the lace from this months assortment, on my July Desk Calendar for today.
Today's Desk Calendar was designed using the Heidi Swapp desk calendar, and then I covered the chipboard pages(each month) with Design Paper, and then made the second page to hold the actual calendar. On the backside of this cover, is room for a PHOTO. I just haven't placed one in there yet.
I used LOTS of the ribbon from this months assortment. I used the beautiful Red and Blues, and then the red polka dot ribbon. I also used the lace from this months kit as well. The dp is Pen Pal from American Crafts, I believe its the Pink Paislee collection. On the front page I used Buttons, and flowers and those too can be found at Really Reasonable Ribbon.
These are the 2 pages you see when you open July's page. There is room for a photo under that frame. Its part of the Pen Pal collection. For the LOVE button thing, I added some of the lace, and then ribbon behind it, and then hot glued it on. All the sticker chipboard pieces are from this Pen Pal Collection. I ran the lace down both sides under the frame, and then used it across the bottom of the Calendar page. The flowers on these 2 pages are metal and are from American Crafts. These calendar pages are super fun to make, and it looks super cut on my work desk! LOVE IT!!!
Your NEXT stop on the Really Reasonable Ribbon HOP is the Really Reasonable Ribbon Blog Thank you so much for joining us this month, and hop you enjoyed all the inspiration from the DT so far!
Thank you for joining us today, and have a super awesome day!!!
Hugs to all,
Cheryl
Subscribe to:
Posts (Atom)


