Showing posts with label TLC Designs. Show all posts

Sunday, August 13, 2023

Really Reasonable Ribbon August Blog Hop


Welcome to "Really Reasonable Ribbon's  August” Blog Hop if you arrived here from Kathy's Blog you are on the right track. If not , you will want to head back to the Really Reasonable Ribbon Blog that way you don't miss out on any of the FABULOUS Designs from the Design Team today! There is going to be lots of Beautiful projects to see using Fall theme, So each DT member will showcase something using Fall or Fall Colors.

Be sure to comment on the blog hop post on the RRR Blog for a chance to win a $10 gift certificate to Really Reasonable Ribbon  


Ribbons and flowers used:

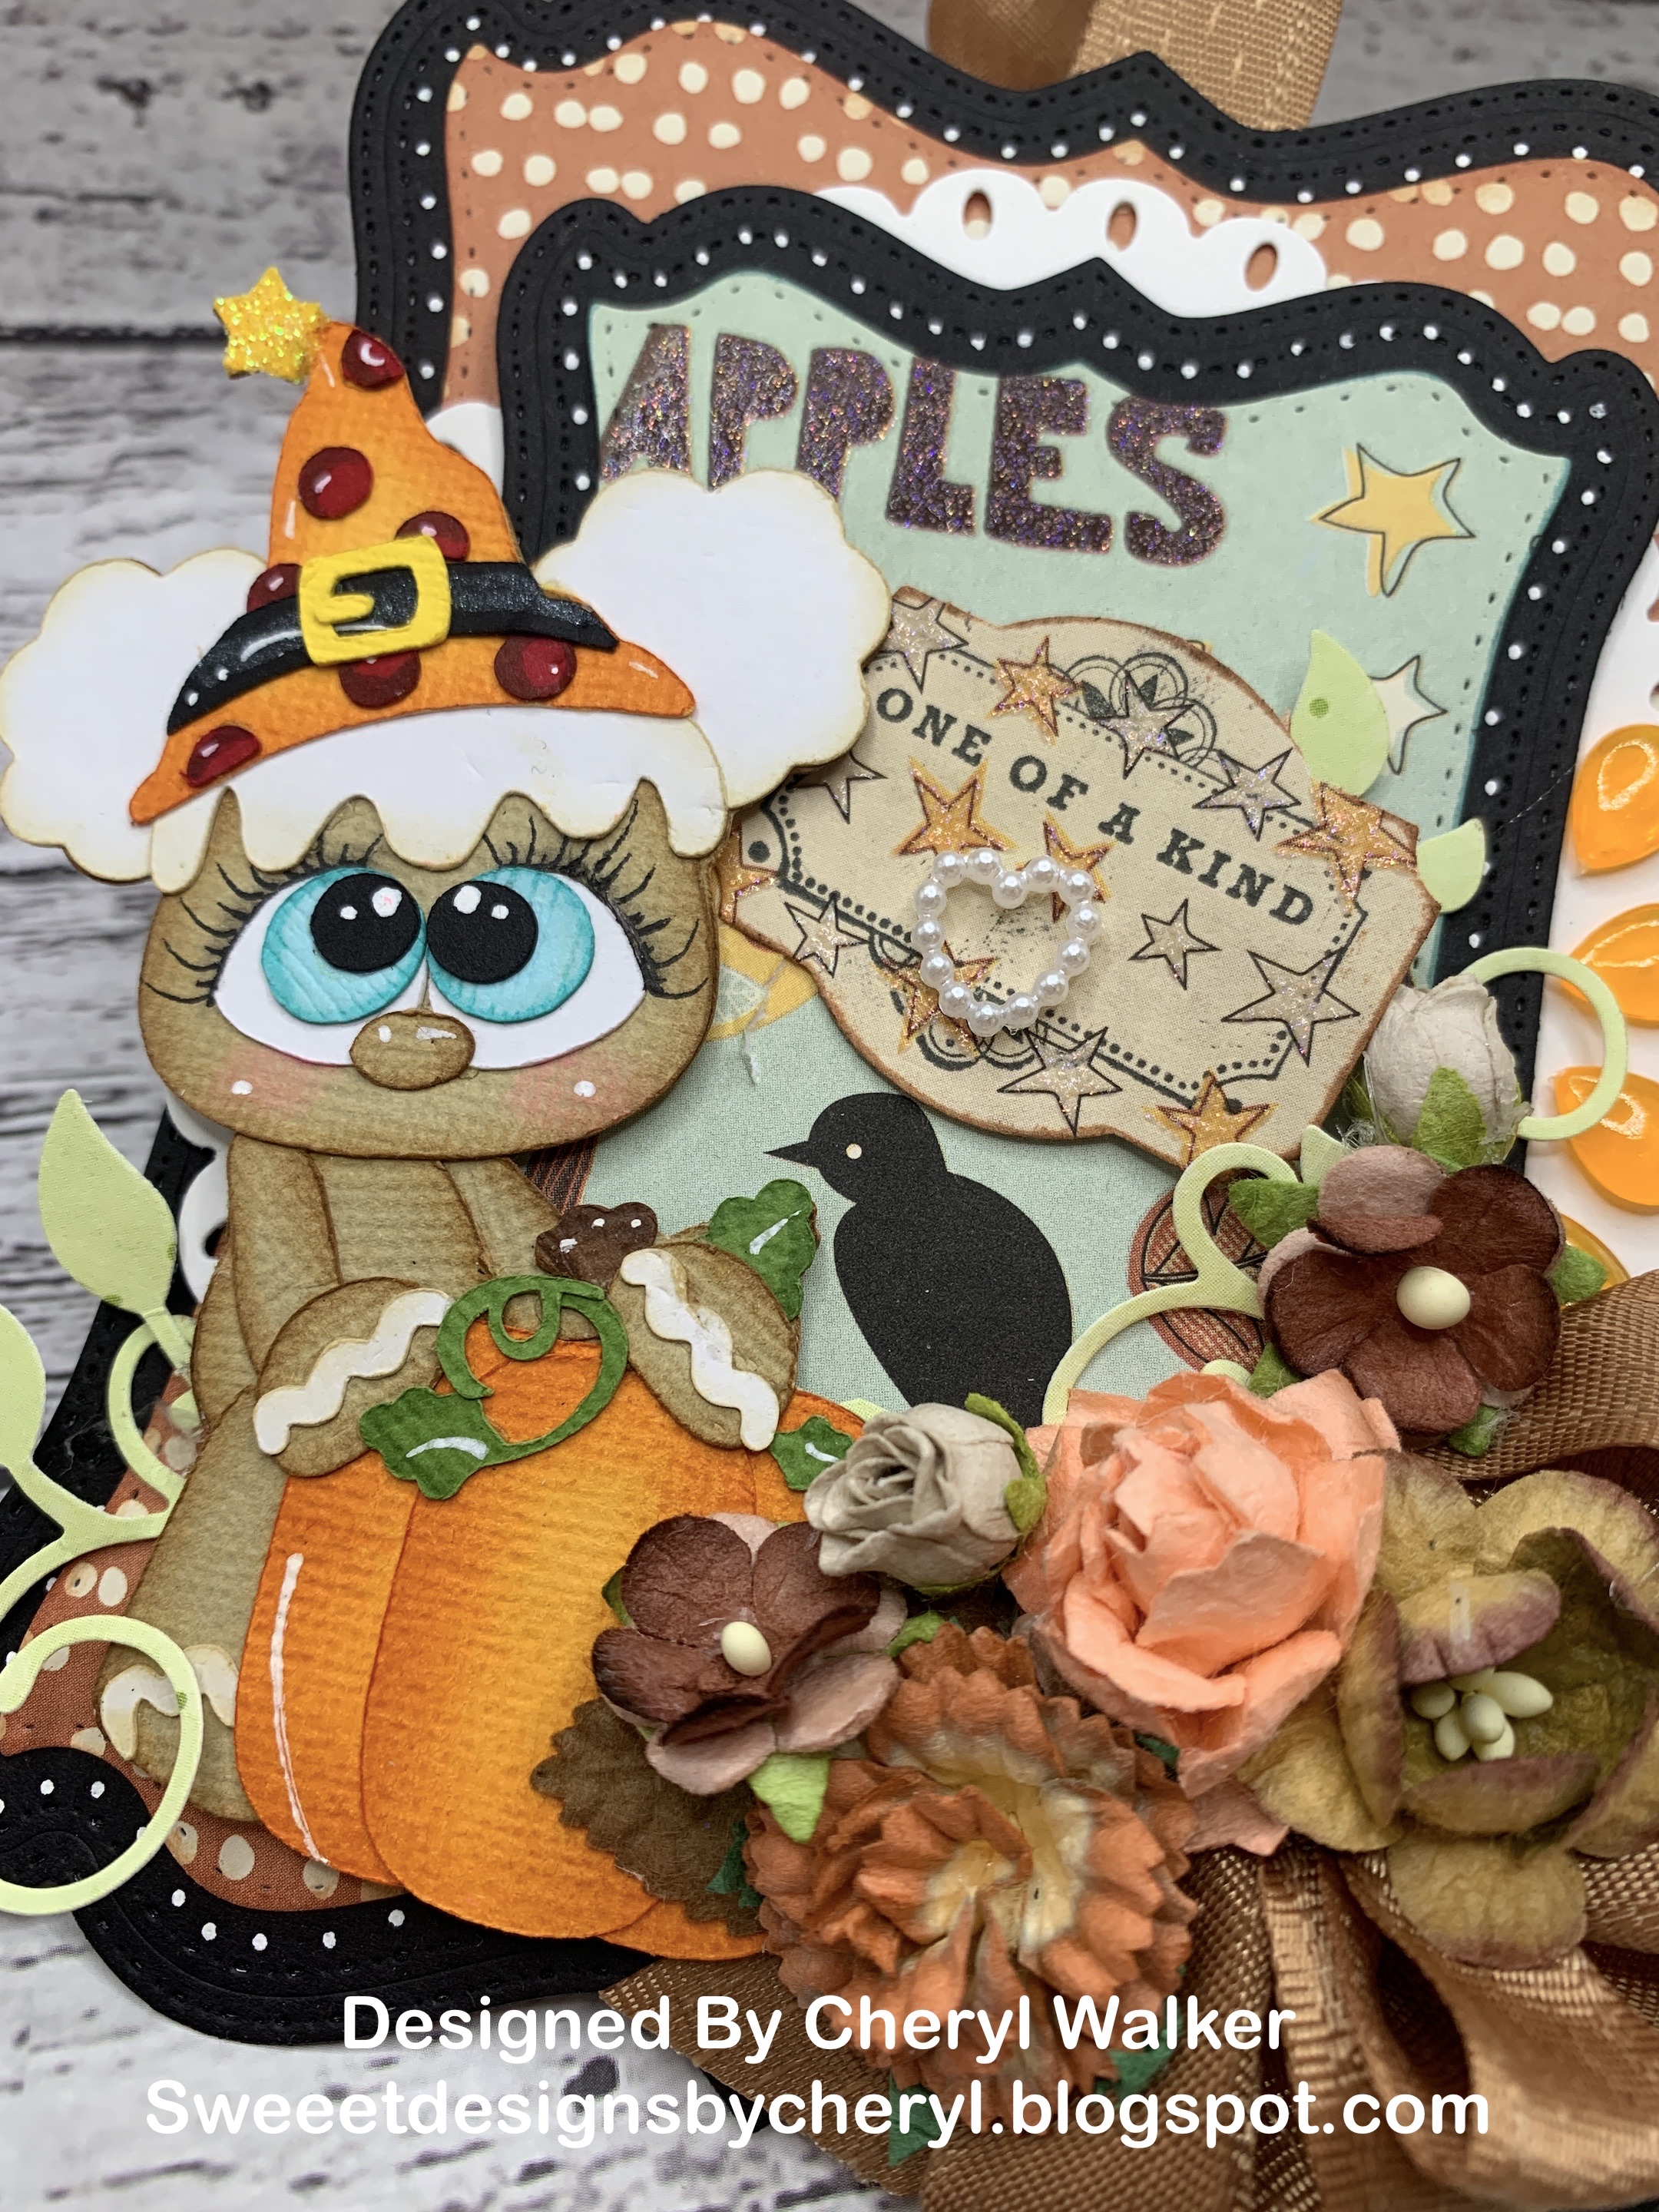
For my Tag today I chose to use the Dies from TLC Designs, and then I picked this darling old design paper called Night and Fall, its from Recollections. Next I picked out my little svg that I had already pieced and ready to go, I was lucky as this one matched my project perfectly and she is absolutely darling! I got all my flowers picked outs nd then my sentiment and punch to use. Its nice when we have some of the greenery extra as I keep it in a pouch with the die so I can grab it.

I did all my layering for the frames first and then picked where I wanted my SVG Ginger to go. Next I placed my greenery and flowers and hot glued them all down over the bow I had made, I did add in a brown leaf that was floating about....heheheheheI also placed some tear drops in orange, as I thought they would look so pretty on my tag. I think fall tags are fun to make and you can always add it to some goodies or what not.

Be sure to comment on the blog hop post on the RRR Blog for a chance to win a $10 gift certificate to Really Reasonable Ribbon


Your NEXT stop for today's hop is Bonnies Wonderful Blog!!!
Hugs to all,

Cheryl

Tuesday, December 27, 2022

TLC You make my heart dance


Hello crafty friends and Happy Tuesday to you all! I do hope you all had a very Merry Christmas! Today's card I'm sharing with you was designed using the darling Tiptoe Fairy Dance Stamp set. Just love this darling set, so many cute images in it. So for todays card I chose to use 2 of them.

To start with I chose the die set called Daisy Frame Die, and cut out all my layers using pink card stock and the beautiful Krafty & Sweet Design paper. Next I stampe my sentiment on the white card stock. My images were stamped and colored using copic markers and then I fussy cut them out to pop them off the front of my card. I wanted a clean and simple card as it always nice to be able to put some together quickly. As after the holidays I'm always pooped , hehehe anyways I did have fun putting this one together and hope you enjoyed my post for today. 


 Thank you so much for stopping by and have a lovely day!

Hugs to all, Cheryl

Tuesday, December 13, 2022

Christmas Poinsettia Treat Holder


 Hello crafty friends and Happy Tuesday to you all! Today I'm sharing this Andes Treat holder I designed using the TLC Butterfly Rectangle Die set, Peppermint Design paper and Delicate Poinsettia Stamp set. 

To start with I took the largest die out of the Butterfly Rectangle Dies and cut it in a green card stock. Next I scored it at 3" and then 3 1/4" press your folds so the small part comes up like in photo above. Next I just used the second largest die and cut a piece or portion of that using the die, so I did not cut out the entire die. I then glued my design paper to the front, easy peasy!  

Next I wanted to cut out the oval from the Loving petals square, this is what helps hold the bottom in place once treats are inside. So I cut out a pink card stock and then used the smaller oval for a white. I stamped my sentiment on the white and then distressed using green ink. I did put these ovals together and then used a punch with 2 holes to tie my ribbon through to hold in place at the top. Now is time to add poinsettia and bow. super fun and easy treat holder for the holidays!

supplies used:


Thank you so much for stopping by and have a lovely day! Hugs to all, Cheryl

Tuesday, December 6, 2022

TLC Delicate Poinsettia Tag

Hello everyone and Happy Tuesday to you all! Today's Delicate Poinsettia tag was designed for TLC Designs using the gorgeous new Delicate Poinsettia stamp set. I just love this set, as its super fun to stamp up the different colors and fussy cut the pieces out. So I do hope you enjoy my post for today!


These tags are super easy to make and take no time at all! Around the holidays I like to make some simple but beautiful gift tags for Christmas, and this one I absolutely love. I used the Delicate Poinsettia Stamp set to stamp up my image, and then fussy cut it out. Next I did another piece and fussy cut it out, this one is on top to give some dimension. I then took a gold metallic pen to do the edges of the flower and the leaves. Love how it turned out. for my design paper I chose the Peppermint Collection from TLC and OMYgosh its Gorgeous design paper! Love this DP! Well I love all of TLC Design paper packs.Lastly I used the tag for my sentiment from the Loving Petals Square die set. I did add some white paint dots using my posca paint pen in white, and then Really Reasonable Ribbon , button, and snowflake embellishment to complete my tag.

Thank you so much for stopping by and have a wonderful day!

Hugs to all, cheryl
 

Thursday, December 1, 2022

A Little Love Pocket tag & Video

Hello crafty friends, today I have a fun little pocket tag & video I did for TLC Designs Instagram Hop, you can find the hop here. I love when you can use dies in different ways, and in my video I will show you how to take one of your large dies or the See you in the Center die and make this tag. super fun and super easy to make!

I did use several dies from TLC Designs, the main one was the See You in the Center Die, then Tiny Vine oval, and the last being Butterfly Rectangle Die Also used their darling design paper from Classic Santa Collection. Stamps used are TLC Designs Warm & Fuzzy Unicorn set. Now the only thing I added after my video was the Ric Rac. I decided once I finished on adding it. You can add any trim or ric rac, or even a border punch. Ribbon is from Really Reasonble Ribbon! Have fun and hope you enjoy! 


Hugs to all,
Cheryl 


Tuesday, November 29, 2022

TLC Designs Unicorn Tag

 
Hello crafty friends and Happy Tuesday to you all! This week I'm sharing more tags, as Ive been busy creating these for Christmas. This one here was designed for TLC Designs using the darling Warm & Fuzzy Unicorn stamp set. Just love this stamp!

For my tag here I chose to use the beautiful Aviary Oval die set for the red tag part. Next I used Tiny Vine Oval die for the Peppermint design paper part. I stamped my sweet unicorn image from the Warm & Fuzzy unicorn stamp set in black memento ink, then colored with copics, and used a shimmer paint on the unicorn body. I then cut it into a square and layered on the same red card stock. My sentiments were stamped also in memento black ink and then cut out. I added some ribbons, brads, and a button to my tag. Love making these as they are super fun and perfect for gifts at Christmas time. 

supplies used:

Warm & Fuzzy Stamp set

Peppermint Slimline Stock Paper pack

Tiny Vine Oval 

Aviary Oval die

Really Reasonable Ribbon

Thank you so much for stopping by and have a lovely day!

Hugs, cheryl

Tuesday, November 22, 2022

TLC Warm & Fuzzy Unicorn tag

Hello crafty friends and Happy Tuesday to you all! Today's tag was designed for TLC Designs using the darling Warm & fuzzy Unicorn Stamp set. Just love this new stamp set, as the darling unicorn is just the cutest.

So for my tag today I used the beautiful Rosie die set to cut out my papers. I used the largest one to cut out my wine colored card stock, then the second largest die to cut out white, and then the square smaller one to cut the design paper. I glued all pieces down and then added some white paint dots. Next I stamped my sweet unicorn image, and colored her up using copic markers. Isn't she the cutest??? I just love her! I also added some stickles to the snow, and falling snow. Next I added some snowflakes from some of my stash shaker pieces. The sentiment was stamped in black in, and I cut it into a tag shape. I distress all edges using pink ink. lastly i added some bows, and then a pearl from the celebrate sprinkls assortment. Super fun tag to make and super easy! I will use this for my granddaughter who loves unicorns.


I hope you enjoyed my post, and thank you for stopping by! Hope you all have a Happy Thanksgiving!

Hugs to all, Cheryl

Tuesday, November 8, 2022

Jingle Time Treats


Hello crafty friends and Happy Tuesday to you all! Today I'm sharing this darling Jingle Time Santa I colored from TLC Designs, isn't he a cutie? 
for my treat holder I chose to use the Digital Stamp file Jingle Time from TLC Designs, I colored the tree and santa in copic markers and then fussy cut them out. I also added some stickles to both of them. Love how they turned out. This is a easy treat holder to make , I ended up using Really Reasonable Ribbon along the bottom part of my treat holder, and also made a bow. I did add a button, and glued on 2 of the pieces from the sprinkles set.


Thank you so much for stopping by and have a lovely day!
Hugs to all,
Cheryl

Tuesday, October 25, 2022

Jingle Time tag

Hello crafty friends and Happy Tuesday to you all! todays tag was designed for TLC Designs Release Hop we are having over on Instagram. I will come back and update to the TLC Instagram later, but here is the link to mine for now. 

My tag-

  • I used to create my tag the TLC Designs See you in the center die. First I picked my card stock and design paper and kinda layered to see how I like. Next I cut the silver withe the largest die, then the pink with the next and then the next die I cut 2 times, once in white and then in the pink design paper that is from the Snow Family Fun Design paper pack.
  • Next I cut out in silver again the sentiment using the oval from the Loving Petals Square Die set.
  • I did distress in pink and added some white dots and some RRR Pearls.

Santa & Tree

  • I printed out my santa, tree, and sentiment from the Jingle Time Digi Stamps, and then colored with copics. I thought how fun it would be to have santa in pink. Love him! I then added some confetti glitter to him, as I thought it would look so cute on him. Love how he turned out.
  • Tree was colored with copic markers and then I added the TLC Designs sprinkles and little gingerbread boys to it. 

decorating tag-

  • I added lots of flowers from Really Reasonable Ribbon and some stamens , dew drops and branches. the tree was decorated using the sprinkles and I did add some gorgeous ribbons and flowers that all came from RRR.


 Thank you so much for stopping by and have a lovely day!

hugs to all,
Cheryl

Tuesday, October 18, 2022

Jack O' Gnome card & treat holder

Hello crafty friends and Happy Tuesday to you all! Today's projects were designed for TLC Designs using the darling jack O' Gnome digi set, and Creeping it Real design papers. 

I decided to do 2 projects, one being a card and the other is a matchbook type treat holder. Its super easy to make and holds 3 candies perfect. I decorated it up using the darling gnome, stickers, ribbons, and a button. he sure is a cutie, and I had a lot of fun working with him.


Next I have the card I made, and this one was pretty simple

  • My card measures 5 3/4" x 5 3/4" the orange base
  • Next I cut my black card stock 5 1/2" x 5 1/2", then the polka dots 5 1/4" x 5 1/4". the next layer was cut at 4 1/2" x 4 3/4" black, then the creeping it real was cut 4 1/4" x 4 1/2", i then added sewing.
  • for the frame I chose the Tiny vine oval frame, and then distressed the white with purple. I did print out my sentiment from the Jack O' Gnome set and distressed it as well. Love this little guy he is absolutely too cute.
  • Jack O' Gnome was colored with copics and then I added some fun glitters to his beard. 
  • Lastly I added some white dots, and double bow.
  • Creeping It Real Digital Design papers 
  • Jack O' Gnome digital stamp set
  • Tiny Vine Oval die set


Thank you so much for stopping by and have a lovely week!
Hugs to all,
Cheryl


Tuesday, October 11, 2022

TLC Designs Jack O' Gnome Treat box


Hello crafty friends and Happy Tuesday to you all! Todays fun Halloween Treat box was designed for TLC Designs using their darling Jack O' Gnome and Creeping It Real design papers. Super fun and easy.

So my box I bought at Hobby Lobby and then just decorated it up using the Creeping It real design papers. I love this darling paper, its super cute, and I had a hard time covering it up, so I tried to show as much as I could. 

  • Jack O' Gnome is a digi and I colored him using copics, and then some purple mix beads for his beard. Love how cute he is. I did fussy cut him out and popped him off the front of the box.
  • the little bat is fussy cut from the design paper Creeping It Real. 
  • Next I added some Really Reasonable Ribbon bows and then some netting to the top.
  • The sentiment tag was printed using the sentiment that came with the gnome digi set and then cut out using the TLC Loving Petals Square Die.
Fast and easy gift or treat box to decorate. Please let me know what you think of my treat box for today.
Thank you so much for stopping by and have a lovely day!

hugs to all, Cheryl

Tuesday, October 4, 2022

Hidden Message card & Video Tutorial


Hello everyone and Happy Tuesday to all! Today's fun fold card with Hidden Message was designed for TLC Designs using their darling stamps, dies, and design papers. Here is a link to my YouTube video I will post all information below.


Inside of my card and hidden message area. Love this as it gives you more room to write or even hide a message from others. You can always add a magnet. Then for the inside I used the stencil Celebrate Sweetly Stencil and I have a Video on this

  • card base measures 6" x 6" , cut a 6" x 12" and scored in half to make 6" x 6"
  • Next for Layer 1 on the front of card Black 5 3/4" x 5 3/4", Tan 5 1/2" x 5 1/2" , black polka dots 5 1/8 x 5 1/8 from Sincerely Yours design paper
  • secret message area- cut tan using largest die(see you in the center) please see video tutorial on this one.
  • cut black in the second largest size die
  • next cut the design paper and white in the smallest die from this set, (please see video)
  • lastly decorate using the darling forest Pals set, some ribbon, flowers, and the tiny vine.

Supplies Used: TLC Designs Forest Pals , Sincerely Yours Design paper , See you in the Center DieTiny Vine Oval DieCelebrate Sweetly Stencil 

Also used Ribbons from Really Reasonable Ribbon and Dew Drops from The Robins Nest Creative 


Thank you so much for stopping by and have a lovely day! Hugs!

Tuesday, September 20, 2022

Turtle-ee Day

 
Hello crafty friends and happy Tuesday to you all! Todays sweet card was designed for TLC Designs using the darling stamp set called Turtle-icous , design papers, stencil, and dies. 

On my card for today I chose to stamp up the sweet turtle, and color her with copics. Next I used the Loving Petal Square die and then distressed the edges and stamped my sentiment. Super easy. On this card I kept the layers to 3 of the design papers, and then the fourth is the die. Lastly I added some RRR flowers. 
TLC Designs supplies used:

Thank you so very much for stopping by and have a lovely day!
Hugs to all, 
Cheryl

Thursday, September 15, 2022

Celebrate Funky Fold card & video


 Hello everyone and happy Thursday to you all! Todays card was designed for TLC Designs Instagram Hop that has started today and will go through the week. Hope you will join us for some fun and inspiration. Link for hop here 

So for todays super fun hop we are using this absolutely darling Celebrate Suite, its the cutest ever, and you will fall in love with everything in this suite! I love the stamps, paper, ephemera pack, stencil, and dies, ooo even the darling sprinkle collection is so super cute. 

So for my card today I re-visted the funky fold cards as it was one of my favorite folds ever. I will show easy ways on how to do inside and decorate this fun card. Video can be found here .

Now on the inside of this one I did do a pocket, I dont show the pocket part but do show how to get the measurements and score and cut the pieces for the inside panel. Its an updated version and different measurements for inside. On this one here I did use the darling border die to create my pocket and layered it 3 times, love the look. I also used the border die to create my cupcakes on the front of my card.


TLC Designs supplies:
Celebrate Ephemera collection
Celebrate sprinkles
Celebrate twine


Thank you so much for stopping by and hope you liked my card for today! Also to view my videos you can see them all here


Tuesday, September 13, 2022

Twinkling Alicorn & Video tutorial

 
Hello everyone and happy Tuesday to you all! Today's interactive card was designed for TLC Designs using the darling Alicorn stamp set, and interactive dies. Love this! Also I will be having 2 post for today, so be sure to check back later for another. Video Tutorial is here

  • First for my card I started with a white card stock 6" x 12" scored in half to make a 6" x 6" card base. 
  • Next design papers I chose are from the Blooming Medley Slimline design papers, and were cut as follows- purple is 2" x 4"(black is 2 1/4" x 4 1/4") floral is 3" x 4 3/4"(black is 3 1/4" x 5") pink is 2 1/4" x 4 1/4"(black is 2 1/2" x 4 1/2") layer using scor tape, or tape runner and then added sewing. I staggered these doing the purple and pink on bottom and then popping up the floral. 
  • Next I cut out my TLC Designs Tiny Vine Oval pieces in white and black, then using the die on the white to give an edge, and then did my stenciling using the TLC Designs Happy Bloom day & Clouds stencil. I did airbrush these clouds using the copic airbrushing system.
  •  Next I used the See You in the Center Interactive die set to create my moving pieces for the Alicorn and clouds. 
  • Now I hot glued my flowers and vines on , and lastly I stamped the Twinkling and the "with Alicorn Specialness using a stamping misti tool.
  •  Inside was airbrushed as well, using the stencil 
TLC Designs supplies used:

Thank you for stopping by and have a lovely day!
hugs,
Cheryl

Tuesday, September 6, 2022

Trolling by to say hi!

Hello crafty friends and happy Tuesday to you all! Today's card was designed for TLC Designs using the darling Troll Cricket Fun stamp set. Love this sweetie.

  • For my card I stamp the sweet Troll in black memento ink and then colored her with copic markers and then fussy cut her out. 
  • Next I cut out my sentiment frames from the Loving petals square die and then airbrushed around the frame using the die. I stamped my sentiment also using the Memento ink, and then layered it on the black frame, and lastly added some white dots.
  • For the large oval I used the Tiny Vine Oval dies to cut those out, I did the same thing using the die as a template to dust around the edges of the white. These were cut to use for my main image and sentiment.
  • I love the Celebrated Times slimline paper collection and chose to use that for one of my layers. I also used a bubblegum pink, and some black cardstock for layering.
  • Inside I chose to stamp up the little sweet mushroom that is also in this stamp collection, isn't it just darling!?


TLC Designs supplies used:

other supplies:
RRR for ribbons, white paint pen for dots, copics for coloring, black ink pen, stickles, card stock.

Thank you so much for stopping by and hope you have a lovely day!
Hugs,
Cheryl