Wednesday, August 31, 2022

Sweet Cupcake Card w/tag and video

Hello crafty friends and happy Wednesday to you all! Today I have another cupcake card using the darling cupcake die from TLC Designs, using Cherry On Top Die. This is a pocket card I created using the cupcake die and also creating a tag out of it as well. I show how to do all this in my Video Tutorial, and you can see it here. I've also put the video below at the bottom to see as well.

  • For the cupcake card you will need card base cut at 4 1/2" x 10" fold in half you will be using the large cupcake die for this part and for a white inside piece for writing. Please see video for instructions on this part.
  • Card layer 1 cut card stock large cupcake, cut wrapper design paper, cute icing design paper, cut card stock using large die for bottom part this will be your pocket.
  • tag- cut cardstock using large cupcake this will be white (video shows how to cut this before adding icing), then cut 2 icings one for front and one for back, cut 2 cherries and 2 stems
  • decorate- I chose to use the darling little flowers and layered them and then added pearls to the centers. I did use stickles for adding accents and also my white paint pen. Lastly I added ribbon, and a little heart button embellishment.

VIDEO on how to make the cupcake card

Thank you so much for stopping by and have a lovely day!
Hugs to all,
Cheryl


Friday, August 26, 2022

Alicorn - You're a rare find!

Hello crafty friends and happy Friday to you all! Today's card was designed for 
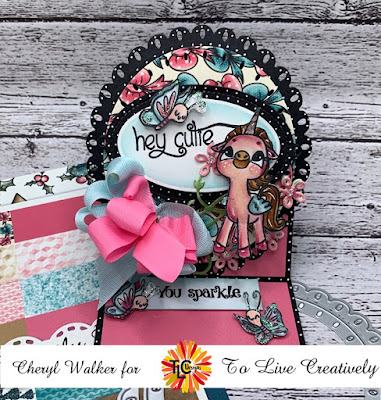
Really Reasonable Ribbon using the gorgeous Delicate Satin ribbon, and beautiful Rainbow flowers, I will list all that I used below. Also I used this sweet Alicorn stamp from TLC Designs, isnt she just darling!? 
You know me, I love doing the insides of my cards, and this one was done using TLC Designs Stencil to create a border on the inside.
For my card I chose to use this darling Rainbow to dreamland Recollections dp pack. I thought it would work perfectly with the alicorn and RRR Rainbow flowers and ribbon.

To start with I picked the papers I wanted, and then cut and layered them all. Next I chose my dies, and stamp. I stamped up Alicorn in black ink, and then colored her using copics. for her body I used Unicorn stickles and that's how she shimmers so pretty. I then fussy cut her out. Next I picked all my flowers, and on this one I chose the Pastel Rainbow Open roses in 20mm, 15mm, and 10mm, now that large flower is Chelsea Rose in rainbow colors. I also used the Mini Sweetheart blossoms in Rainbow for filler flowers, and lastly I used the Rose buds in Pink and blue. I will post links to all below for easy finding. for the sentiment I stamped it on a white card stock and then dusted or distressed in blue , yellow and pink ink to give a little rainbow feel. lastly I added some Daisy pearls to the corners.

Really Reasonable Ribbon supplies used:


I hope you enjoyed my post for today, please let me know what you think as I always love hearing from you. Thank you so much for stopping by and hugs to you all, Cheryl


Wednesday, August 24, 2022

Fall fun Sweet Sunflowers & Video tutorial

 
Hello crafty friends and happy Wednesday to you all! Today's card was designed for The Robins Nest Creative using the beautiful dew drop in my Faux Glass Sunflowers, I do have a video on making these today as well as putting together my card. I do Hope you enjoy! please let me know what you think.

To start with I chose all my papers, and then card stock.
  • first layer- 5 3/4 x 5 3/4 this is the craft one, next is 5 1/2 x 5 1/2 for the wine, gingham blue is  5 1/4 x 5 1/4
  • second layer- 3" x 5" craft, 2 3/4 x 4 3/4" wine , 2 1/2" x 4 1/2" sunflower dp,
  • third layer- 4" x 4 1/4" craft, 3 3/4" x 4" wine, 3 1/2 x 3 3/4" blue design paper
  • 4th layer- 3 3/4" x 3 3/4" craft,  3 1/2" x 3 1/2" wine, 3 1/4" x 3 1/4" sunflower design paper
  • 5 th layer - is oval decorate frame and oval layers with sentiment. choose any for this layer.
  • 6th layer- sunflowers(VIDEO on this) and sweet Ticket to fall fun SVG file all put together
  • lastly I added The Robins Nest dew drops to the 2 corners making flowers.
  • inside was done using TLC stencil
Robins Nest Dew drops can be found here Yellow and brown 

other supplies are as follows- svg is scrapping bug designs, sunflower is cottagecutz, oval frames are old Justrite, tlc designs for stencil on inside. design paper is echo park.


Thank you so much for stopping by and have a lovely day!

Tuesday, August 23, 2022

TLC Turtle-icous Memorydex and video on coloring

Hello everyone and Happy Tuesday to you all! Today's Memorydex card was designed for TLC Designs using the darling Turtle-icous stamp set, along with their gorgeous design paper and a few dies. I also have a fun video on how I colored this sweet turtle up. She is one of my many favorites from TLC Designs.

  • First I started with my memorydex card base in black, then cut the design paper from TLC Designs Something Bloomed Slimline design paper pack. I added my dots.
  • Next I cut out my ovals from the Loving Petals Square set, one in black, and then one in white. I did leave the die on the white one after cutting to use as a template to dust some green, it will leave a white edge when doing this, love that. I lastly stamped my sentiment using one from the stamp set. and then added dots to the black.
  • Now I stamped my turtle , snail and flower using black ink, and then colored them all up using copics. I do have a video on the turtle and coloring her.
  • I now cut out my vine using the Tiny Vine oval die set, this is cut in green. I now placed my fussing cut images where I wanted them and then added my vine and flowers.

TLC Designs Supplies Used:


 Video on coloring turtle


Thank you for stopping by today and have a lovely day!

Hugs to all, Cheryl

Thursday, August 18, 2022

Mini Easel card

Hello crafty friends I have an extra post today to share. Today I'm sharing another Mini Easel card but this one is interactive.  The sweet little butterfly moves up and down, super cute! These darling stamps and dies are all from TLC Designs and are absolutely darling, and also super fun too!


I do have a video on how I made the card, and will have one later on how to do the interactive part. You can see my videos here on youtube 


TLC Designs


Video on Mini Easel card using dies

Thank you so much for stopping by and have a lovely day! 
Hugs to all
Cheryl


Tuesday, August 16, 2022

Sweet Alicorn Easel card & videos

Hello crafty friends and Happy Tuesday to you all! Todays sweet little Easel card was designed for TLC Designs using their darling Alicorn stamp set. Absolutely love this sweet set and cant wait to stamp up more of these. 


For my card I chose to use the Tiny Vines Oval die set from TLC , and the darling Snow Family Fun design paper pack. Love this! I absolutely love all the design papers in this set, as they are all so pretty and can be used for other than the holidays. I wanted to make a small easel card. This one is super small, it measures about 3 1/2" x 4 1/4" 


My sweet Alicorn was colored using copic markers and I do have a video here on it. I absolutely love this little darling she is so sweet. There are 3 different ones in this stamp set to choose from and all sorts of sentiments and little butterflies, stars, bugs and such. So much fun! 

TLC Designs supplies used:


Thank you so much for stopping by and have a lovely day!
Hugs to all,
Cheryl

Monday, August 15, 2022

Chilly Fun /Sweet friends card

Hello everyone and happy Monday to you all! Todays card was designed for TLC Designs Instagram Hop that has started today and will go through the week. Hope you will join us for some fun and inspiration. Link for hop here 

So for our hop today we were to mix and match new sets with older TLC Designs sets. I chose to use the darling Chilly Fun design paper, Chilly fun digital stamp set, Celebrate Sweetly stencil for inside of my card, and Tiny Vine Oval die set. I also used for my sentiment the Turtle-Icious sentiment. Flowers I chose are from RRR. 

I absolutely LOVE this design paper pack and loved layering up all my layers. The little fox was so much fun to color, as I chose to use several copic markers to do that. I did add some white dots too. The sweet little mouse came from Chilly Fun sticker sheet set. My vine for all the flowers is from the Oval die set, love how they add more dies to use for the different shapes. My inside piece was done using one of the edges on the stencil, I ended up dusting it with a moss green ink. Lastly I added some white dots, and sewing to all my layers.

TLC Designs supplies used:


I do hope you enjoyed my card for today, and thank you for stopping by! Hugs to all, Cheryl

Saturday, August 13, 2022

Really Reasonable Ribbon August Hop


Welcome to "Really Reasonable Ribbon's  August” Blog Hop if you arrived here from Kathy's Blog you are on the right track. If not , you will want to head back to the Really Reasonable Ribbon Blog that way you don't miss out on any of the FABULOUS Designs from the Design Team today! There is going to be lots of Beautiful projects to see today using the Autumn Collection Ribbon Assortment, so I hope you Enjoy


For my card today I chose to use the darling Sunflower and pumpkin satin ribbon, and the brown both are in this months ribbon club package. I thought this months ribbon went so perfectly with Carta Bellas fall collection of design paper. I made several layers, and then added my frame that I cut out, next I did add the darling Caramel Apple Goat that is from Kadoodle bug designs. I had distressed and colored all the pieces and glued them together. These I keep ready in a little book so when I want an image I have it. So fun! Next I chose a couple of sunflower dies from my collection, I think one is cottagecutz and the other is cherrylynn designs. Lastly I added sewing, and dots to each layer and then my double bows to both corners. Inside of my card is complete and ready for writing.

Really Reasonable Ribbon:


Thank you so much for stopping by, and hope you enjoyed my fall Caramel Apple Goat card for today.

Your NEXT stop for today's hop is Bonnies Wonderful Blog!!!
Hugs to all,

Cheryl

Friday, August 12, 2022

Floral Delight 3-D sewing machine

Hello everyone and happy Friday to all! Today I'm sharing another one of these darling 3-D sewing machine boxes that I made. I found the tutorial on youtube and you can see it here as well. Her name is Krisiannes crafty adventures, she will show how to construct the box. I added my own touches to it. Hope you enjoy!
I decorated using Really Reasonable Ribbons flowers, and ribbon, half backed pearls, and even the darling daisy flower embellishments. for the handwheel I chose to use a small ribbon spool, and added matching dp to it. I also used spellbinders dies to create that. for the front tension wheel, thread stitch regulator , and thread stitch pattern. Next I also made my needle and faceplate using silver shimmery card stock. for the wheels I chose scrap diva die.


this sewing machine has several places to put things for storage or gift giving. super fun and addicting to make. Ive made 4 so far and will be making more.

Thank you for stopping by and have a lovely day! Hugs to all!
 

Wednesday, August 10, 2022

Sweet Strawberry Post it Notebook & Video Tutorial


Hello everyone and happy Wednesday to you all! Today's Project is a post it notebook that I designed for The Robins Nest Creative. I have been having so much fun creating videos to share with you all, I do hope you enjoy them. Today's video will show how I made the book and decorated it.

Here is the inside of my post it. I made one of these years ago and thought I should do a video on this one. I ended up making 3 and will make more. These make perfect gifts to give to co workers, neighbors, friends and family. I ended up decorating the corners and leaves using the dew drops. So much fun! I also used Really Reasonable Ribbons flowers and ribbon.


Thank you for stopping by! Hugs to all, Cheryl 

Monday, August 8, 2022

3-D Sewing machine with storage

Hello crafty friends and Happy Monday to you all! Today I have this super darling sewing machine storage box that I made for Really Reasonable Ribbon, and to keep on my work area. Love making these and will have many more to share on my blog . Ive used lots of Really Reasonable Ribbon flowers and ribbon on this and will list items below.


In the picture above you see both drawers, there is also a storage box under the spool of thread. And another storage under the base. super fun. I used this darling strawberry design paper and card stock. Then used punches, dies , buttons, and such to decorated. I loved using all the RRR flowers and will list them below for you.

Really Reasonable Ribbon 
Flowers-
Ribbons-
Extras-
White flat backed pearl n a 10mm or 12mm for top of spool
the sewing machine tutorial is on youtube from Kristiannes crafty adventures
Thank yo so much for stopping by and have a lovely day!
Hugs to all,

Tuesday, August 2, 2022

TLC cupcake card w/pocket video

Hello crafty friends and happy Tuesday to you all! Today I have a fun project using the darling cupcake die from TLC Designs, using Cherry On Top Die. This is a pocket card I created using the cupcake die and also creating a tag out of it as well. I show how to do all this in my Video Tutorial, and you can see it here.

  • For the cupcake card you will need card base cut at 4 1/2" x 10" fold in half you will be using the large cupcake die for this part and for a white inside piece for writing. Please see video for instructions on this part.
  • Card layer 1 cut card stock large cupcake, cut wrapper design paper, cute icing design paper, cut card stock using large die for bottom part this will be your pocket.
  • tag- cut cardstock using large cupcake this will be white (video shows how to cut this before adding icing), then cut 2 icings one for front and one for back, cut 2 cherries and 2 stems
  • decorate- I chose to use the darling little flowers and layered them and then added pearls to the centers. I did use stickles for adding accents and also my white paint pen. Lastly I added ribbon, and a little heart button embellishment.


Video tutorial on cupcake card with pocket

Thank you so much for stopping by and have a lovely day!

Hugs to all, Cheryl